Showing posts with label PowerApps. Show all posts

Interactive Experience With Microsoft Search using PowerApps

 Introduction 

 
Let's understand Microsoft Search and how it works:
  • Microsoft Search is a secure way to search both your intranet and web content.
  • Microsoft Search indexes all your Microsoft 365 data to make it searchable for users. When a user executes a search, Microsoft Search pulls results from data sources in Microsoft 365, including SharePoint Online, OneDrive, Teams, Yammer, and organizational and directory service information.
  • Microsoft Search uses insights from the Microsoft Graph to show results that are recent and relevant to each user.


Microsoft Search BookMarks

 
If your organization uses a promoted results set, you can use Bookmarks to do the same. A bookmark can have several keywords and several bookmarks can share the same keyword, but a reserved keyword can't be shared. When a Bookmark is created or modified, the search index is refreshed immediately, and the bookmark is available to users immediately.
 
Microsoft Search Bookmarks integrated with Power Apps makes the search experience much more interactive.
 
Simply put, users search for a topic or keywords that are defined as keywords with the associated app. On the keyword or topic search, the user can launch the app within Microsoft Search. 


Step1 - How to add/edit a bookmark
  1. Go to the Microsoft 365 admin center.
  2. In the navigation pane, go to Settings.
  3. Select > Microsoft Search. 
  4. Select > Answers. 
  5. Select > Bookmarks.
  6. To add a bookmark, select Add new. To edit a bookmark, select the bookmark in the relevant bookmark list.


Step 2 - Create a PowerApps application
 
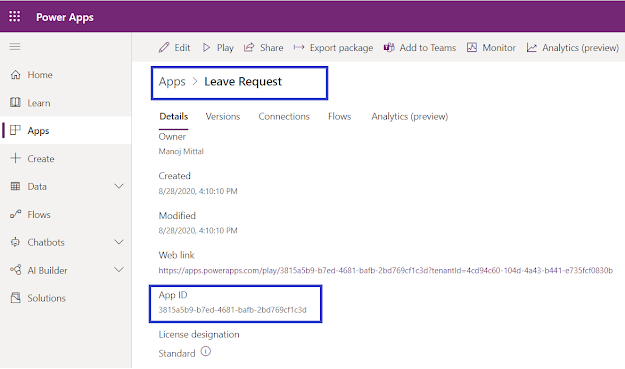
i.e. Leave Request > Save -> Publish. Note down the powerapp ID to configure into Microsoft search.


Note
To get an understanding of Power Apps, visit the previous reference article here.
 
Step 3 - Configure the Bookmarks with Power Apps
  1. Add Title > It will be shown in the bookmark result.
  2. Add Url > It will navigate to a reference document or link.
  3. Bookmark description > Add bookmark description, it will be shown the description of the bookmark.
  4. Keywords > it used to find this page.
  5. Reserved Keywords > It should be unique and the same used to get the result based on unique keywords
  6. Categories > it helps to organize or group the keywords.
  7. Get App ID for the Power App that you want to add from step no.2.
  • Select Power App, and then Add a Power App ID.
  • Height and width are automatically adjusted. Bookmarks can support both portrait and landscape orientations, but currently, the size can't be changed. 
Select Publish or Save to Draft.


Step 4 - Publish the Bookmark
 
Once the bookmark gets published, it will start appearing as below. Bookmark gets indexed quickly and is available for use immediately. Finally, you can define keywords into the search box and a bookmark will appear with an integrated Power App link.


Same Article published here also:- https://www.c-sharpcorner.com/article/interactive-experience-with-microsoft-search/

Summary 

 
I hope you have enjoyed and learned something new in this article. Thanks for reading and stay tuned for the next article.


Join me at Microsoft 365 Virtual Marathon, 36 hour event happening May 27-28 2020

Power Platform Evolution with AI Builder Model

Speedup digital transformation through the Power Platform and AI Builder. AI Builder provides AI templates (Binary Classification, Text Classification, Object Detection, Form Scanning) that you can tailor to easily add intelligence to your apps and processes in Power Apps and/or Microsoft Flow


Join me at Microsoft 365 Virtual Marathon, 36 hour event happening May 27-28 2020 
I will be speaking about Power Platform evolution with AI Builder 
Register here: https://lnkd.in/dA8vQS3 and hope to see you there! 
Virtual event page: https://lnkd.in/dqZ6Ks5 

🗓 Thursday, May, 28th 📺Room Mile 14 ⏱️06:30PM IST / 06:00PM PDT / 03:00 PM CEST

Build Low Code and No-Code solution i.e. Search and Sort by Column Header

Introduction 


PowerApps is an enterprise service that lets you connect, create, and share business apps with your team in minutes, using any device. You can create a PowerApps for an existing list in SharePoint Online.

Let's get started on how we can create a fully functional PowerApps based on a standalone application. I am going the cover all of the steps throughout multiple articles

In this article, I am going to talk about the below points:
  1. Configure Search
  2. Configure Sort to column header
Previous article for reference:- (Build Low Code and No Code Solution)

Build Screen, Navigation and Connector

Build Home, View, Edit Screen with Navigation and Connector

Overview
In this article, I am going to walk through how to build a search and sort order.

Note
I have already explained the Login and Screen creation and navigation in a previous article. Refer to this for more information.
Let's get started with this article.
Step 1 - Login, Add Screen, Data Table and Connection with Datasource
  1. Select New Screen.
  2. A new screen will be added.
  3. Select the data table to display the contents into list view.
  4. Select the added data table and the middle section will appear blank.
  5. Build Connection with SharePoint Online
  6. Select the desired list name, which needs to display at the data source.
  7. Data will start appearing in the selected data table:

Step 2 - Configure Search Box
The search box is not available out of the box, so we need to build it using control and formulas
  1. Select Text Input from Text section
  2. Expand the added text input box as per the desired length.
  3. Select Icon to add search icon
  4. Place the search icon within the text box to create a search box look and feel
  5. Select the data table; i.e. datatable2
  6. Select the Item's property and apply below formula
    1. Search(FlightDetails,TextInput2.Text,"Title"   
  • FlightDetails is datasource name
  • TextInput2.Text is a search box
  • The title is a column name, on which column search is going to apply 

Step 3 - Run and Test Search
Press F5 to run the application and type the appropriate keyword in the search box. Since I have data in the title (flight name) column, and I entered 42, results start appearing.


Step 4 - Add SortIcon
To configure sort, we need to create a local variable; i.e. Column name and default value of sort order.
  1. Select App
  2. Select On Start Property of App
  3. Select local variable; i.e. Title and Sort order toggle value.
    1. Set(_varSortBy, "Title"); Set(SortAscending, true);   
  4. Select Icon and Select icon type Sort
  5. Drag sort icon againt the flight name column 


Step 5 - Configure Sort Icon Property
  1. Select icon8; i.e. filter icon
  2. Set On Select property to update the sort order, switch value against title column
    1. UpdateContext({varSortPriority:"Title",SortDescending:!SortDescending})    


Step 6 - Merger Search and Sort Order
Search work on the item property on the data table, as well as sort work on the item property on the datatable.
  1. Select your database
  2. Set the items property with below formula
    1. SortByColumns(Search(FlightDetails,TextInput2.Text,"Title"),varSortPriority,If(SortDescending,Ascending,Descending))    


Step 7 - Save, Publish and Test
  1. Save the application, click file -> Save.
  2. Click save button to save the application
  3. Click on the publish button to publish the application and make it available to your intended audience.

    Press F5 or click the published version of the app to run.
  • Power Apps home screen will execute like this.
Type the appropriate text into the search box. Since I applied search on the title column, to test search, I wrote the keyword "42" and the result was filtered based on the search keywords.


To apply sort, click on sort icon into the flight name column and the result will toggle into ascending and descending order as per the defined formula.


I hope you have enjoyed and learned something new in this article. Thanks for reading and stay tuned for the next article!


Build Low-Code and No-Code Solutions i.e. Home , View, Edit Screen with Navigation With PowerApps

Introduction 

PowerApps is an enterprise service that lets you connect, create, and share business apps with your team in minutes, using any device. You can create a PowerApps for an existing list in SharePoint Online.
Let's get started on how we can create a fully functional PowerApps based on a standalone application. I am going the cover all of the steps throughout multiple articles.
  1. Design Home Page Screen
  2. Navigation among screen
  3. Item List View Screen
  4. Item Detail View Screen 
  5. Item Detail Edit Screen


Let's get started with next steps,
Step 1 - Add a Display screen with SPO list connection.
  1. Select and click to add a new screen
  2. Rename the screen "Flight Display Screen"
  3. Select and click to add a display form.
  4. FormViewer1 will appear in the tree view and a blank canvas without datasource connection.
  5. Select the form view canvas and click "Connect to Data"
  6. Select the data source from the Form View Property section.

Step 2 - Design Display screen 
  1. Select DataSource as list name i.e. Flight Details.
  2. Set the Column Layout (i.e. 2) and Layout as vertical.
  3. Add a Label for the heading of the screen and change the text to "Flight Detail View Screen".
  4. Add a Home icon from the Icons section to navigate to the home screen.
  5. Add an Edit icon from the Icons section to navigate to the Edit Screen.
  6. Add the Close icon from the Icons section to navigate to the previous screen. 

Step 3 - Add Navigation for Home Icon
Select the Home icon and write a function, i.e:
  1. Navigate(HomeScreen)  
On a click of the home icon, it will navigate to the home screen.  


Step 4 - Add Navigation for Edit Icon

Select the Edit icon and it will write a function, i.e:
  1. Navigate(FlightEditScreen)
On a click of the edit icon, it will navigate to the flight edit screen


Step 5 - Populate View Screen on Item Selection
  1. Select FormView
  2. Set the function for item property i.e. "DataTable1.Selected". This data table exists in the list view form. View get the selected item based on this property.
  3. Once the item property is set, the selected item value appears in the view screen. 
Step 5 - Add and Populate Edit Screen on Item Selection
  1. Select and click to add a new screen
  2. Rename the new screen "Flight Edit Screen"
  3. Add an Edit from the Form Section
  4. Add a data source from Form Property section (i.e. List Name)
  5. Select a Form and set the item property to "DataTable1.Selected.
  6. As the item property is set, select the item value to start appearing in the Edit screen

Step 6 - Add a Save icon functionality on the Edit Screen
Select the save icon and write a function on On Select:
  1. SubmitForm(Form1);Navigate(FlightListView);  
It will save the data to SharePoint Online List and redirect the user to the list view screen. The user will get an updated record on the list view screen.


Step 7 - Define navigation from List View Screen
Select the Flight List View screen, followed by DataTable1
Select the first column (i.e. Flight Name)
On Select property, write the below function to navigate to the Flight Display Screen
  1. Navigate(FlightDisplayScreen)  

Step 8 - Save , Publish and Test
  1. Save the application, click file -> Save.
  2. Click save button to save the application
  3. Click the Publish button to publish the application and make it available to other intended audiences.
Press F5 or click the published version of the app to run.
The power apps home screen will execute like this and select for the click first image.


I hope that you enjoyed and learned something new in this article. Thanks for reading and stay tuned for the next article.

Build Low-Code and No-Code Solutions i.e. Home Screen, List View & Navigation With PowerApps

PowerApps is an enterprise service that lets you connect, create, and share business apps with your team in minutes, using any device. You can create  PowerApps for an existing list in SharePoint Online.
Let's get started creating a fully functional PowerApps based standalone application. 

Overview

In this article, I am going to talk about the first three points:
  1. Design Home Page Screen
  2. Navigation among screen
  3. Item List View Screen

Step1 - Log in to PowerApps Portal
  1. Login to https://web.powerapps.com
  2. Select Apps
  3. Select New app and followed by Canvas 

Step 2 - Design Home Screen
  1. Select New Screen and Click to Add
  2. Rename the newly added screen; i.e. Home Screen
  3. Select Label and Click to Add
  4. Add three more label sections as added text as given in image.
  5. Change the text with "Welcome to Admin Screen", font-weight and background color, as per your desired look and feel.
  6. Select Media and opt for image for option, then click to add (three times)
  7. Select any image icon and select image from right hand side properties. Set size and positioning as per your desired look and feel.


Step 3 - Add New Screen and Data Table
  1. Add a ListView Screen, Selecta  New screen and then click to add.
  2. Rename the screen with Flight List View.
  3. Select the Data table and click to add.
  4. The DataTable will be available under the Flight List View Screen
  5. The DataTable blank section will appear in the middle of the screen. 

Step 4 - Connect to a data source i.e. Site URL
  1. Enter SharePoint Online Site URL
  2. Select Connect to get connect with the SPO site. 


I have created a list in a SharePoint Online site with dummy data. Below is the screenshot for reference:


Step 5 - Connect to a data source i.e. List Name
Select List name and data will start appearing immediately into the selected database. 


Step 6 - Set Navigation from Home to List View Screen
  1. Select home screen and image
  2. Select image into the canvas area
  3. Select the property "On Select " from the dropdown.
  4. Add formula to navigate to different screen

    Navigate(FlightListView)  
     5. Once the user clicks the image, it will navigate the user to the List View Screen


Step 6 - Save, Publish and Test 
  1. Save the application, click file -> Save.
  2. Click save button to save the application 
  3. Click on the publish button to publish the application and make it available to your intended audience.
Press F5 or click the published version of the app to run.


  • Power Apps home screen will execute like this.

I hope you have enjoyed and learned something new in this article. Thanks for reading and stay tuned for the next article!

Leverage Power Apps with SharePoint Framework Extension

PowerApps is an enterprise service that lets you connect, create, and share business apps with your team in minutes and help to build highly tailored application with optimize user experience. You can expedite the business solution with Power Apps as well as SharePoint Online.

Problem Statement

We are creating a solution for audit department. Audit department need to maintain the reports as well as reference document during audit process.

Blueprint approach


Let’s gets start, how we can design and implement such problem statement in optimize way.


Solution Approach

  1. Create Library to store content and List or Library to store all reference documents.
  2. Design SPFx extension solution to deploy at specific library, which will call Modal Dialog with Iframe.
  3. Design Power Apps form calls the same from Modal Dialog with Iframe section.
  4. PowerApps form then saves the data into SharePoint Online List or Library.

Prerequisites


1.      Office 365 subscription

2.      SPFX environment set up
3.     Install visual studio code for code editor - https://code.visualstudio.com/ 
4.     Office 365 Subscription should have access to PowerApps.

Implementation approach

Step1: Create Schema 

  • Login to SharePoint Online Teams or Communication site
  • Create Library with name: Audit Report
  • Create a List with name: Audit Reference
First, Let’s start with power apps form creation

Step 2: Navigate to PowerApps Form

Step 3: Create Canvas App 


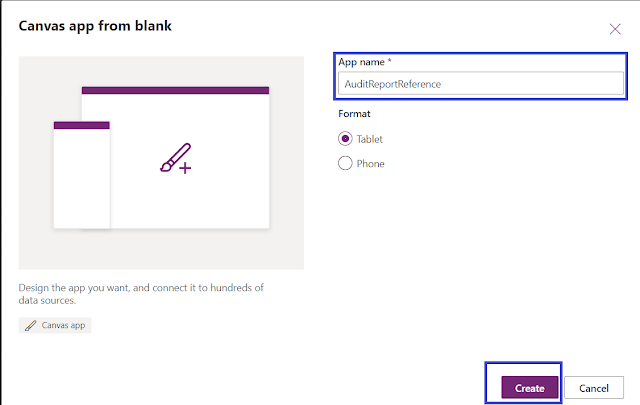
Click on ‘Canvas app from blank’.


Step 4: Power App Name

  • Select app name as ‘Audit Report Reference’, click ‘Create’.

Step 5: Update the app size.

Go to file from menu bar, then select settings -> click on ‘screen size + orientation’ -> select custom give width as 1024 and height as 550.


Click Apply and back button.

Step 6: Rename the Screen

Rename default Screen1 as ‘EditScreen’. Clicking on 3 dots will give option to rename.


Step7 Insert Form and Rename to Edit Form
Click on ‘insert’ from menu bar. Select ‘Edit’ form.

Rename form1 as ‘EditFrom’

Step 8: Connect to SharePoint Online Data source

 Click on ‘connect to data’.


Search for SharePoint in data source options. And select SharePoint.

Type/paste your site URL, and click ‘connect’.

Select the list ‘Audit Reference’. Click ‘Connect’.

Step 9: Change Form DataSource and Form Mode

Select ‘EditForm’, and select data source as ‘Auditreference’ and default mode as ‘New’ from right pane properties.


Step 10: Populate Fields at Form

Edit form populate with fields.
Select datacardvalue of ‘Title’ field.


Step 11: Modify the default formula of Control

Change the default formula as ‘Param("Input")’

Step 12: Add Button Control and Set Navigation

Select ‘EditScreen’. Click on ‘insert ’ on menu bar. Click on button.


Button will get added to screen, rename the button as ‘Save’, in left side tree view.
Place (Drag and drop) the button below the screen,
Select the button and Change the button text as ‘Save’

Step 13: Add new screen for display message

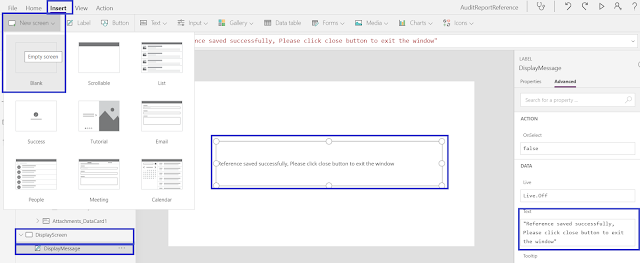
  • Select ‘Insert’ in menu bar. Add new blank screen.
  • Rename that screen as ‘DisplayScreen’ in left side tree view.
  • Select displayScreen and add a label from menu bar insert option.
  • Rename the label as ‘DisplayMessage’.
  • Select label text option and give text as ‘Reference saved successfully, Please click close button to exit the window’
  • Select label. From menu bar select home, change the font size to 24. Alignment as center aligned.
  • Change the text color to blue.
  • Update the label position, size and padding in label properties as shown in below screenshot.

Step 14: Update Navigation

Select EditScreen. Then select ‘Save' button and update ‘OnSelect’ Property to ‘SubmitForm(EditForm);Navigate(DisplayScreen,ScreenTransition.Fade)


Step 15: Save and publish the PowerApps form

Go to ‘File’ from menu bar. Click on Save & Publish

Store the app id , we need to use the same in SPfx Extension.


Let’s Start with SharePoint Extension i.e. List View Command Set

Step 16: Create and SPFX Extention Solution


Navigate to folder structure and type Code  .
Command "yo @microsoft/sharepoint"

Create SPFx Extension Solution with below selected options


Set Command Name and Description

After couple of seconds, you will get below congratulation message. SharePoint Framework extension solution created successfully.

Step 17: Set Extension to specific Library

You can add extension to specific library as per below command  and use RowAccessor to get Row or Item values.


Add Reference “RowAccessor

Step 18: Add Modal Dialog Reference TSX file


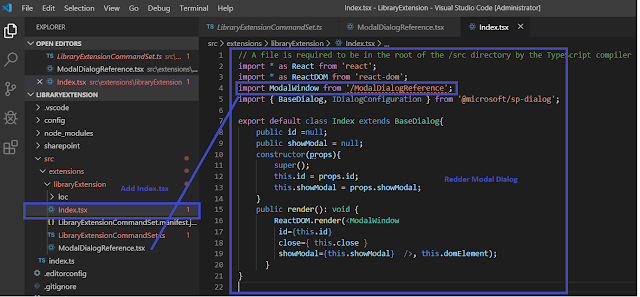
Step 19: Add Index file to call out Modal Dialog Window


Step 20: Remove unused command set


Step 21: Modify the Template and Registration ID to Document Library


Step 22: Build, Bundle and Package the Solution

  • npm install "react-iframe" --save
  • gulp build
  • gulp bundle --ship
  • gulp package-solution –ship


Step 23: Deploy package to app catalog

Login to SharePoint site and redirect to ‘Site Contents’.
Click on ‘Apps for SharePoint’.
Click on ‘Upload’ button


Select .sppkg package from your solution and click on ‘Ok’
Click on ‘Deploy’ in dialog window.
Verify for successful deployment.  Also verify for deployment errors.

Step 25: Add an app to SharePoint site

Redirect to ‘Site Contents’.
Click on ‘New’ then ‘App’.
Add the solution ‘m-365-Bangalore-client-side-solution’.
Verify app is available in SharePoint ‘site contents’


SPFx solution can be dowload from GitHub also  https://github.com/manoj1201/SPFXExtwithPowerapps 

The Output


Finally, How output  look like

1. Select Item at Library and select List View extension


How easy and quick it was to build a custom PowerApps solution with SharePoint Framework Extension.
Hope you have enjoyed and learned something new in this article. Thanks for reading and stay tuned for the next article.