Showing posts with label SPFX. Show all posts

SPFx | Optimize Network call with Image Helper API & Private CDN


Office 365 CDN

Office 365 CDN (content delivery network) played a vital role in reducing the network traffic and fastest rendering of the content. It comprises the Private origins CDN and Public origins CDN.

As images are now automatically managed in a SharePoint Online service-managed Private CDN, the manually configured Private CDN is being deprecated. This means that customers no longer need to configure. Reference article here.

Problem Statement


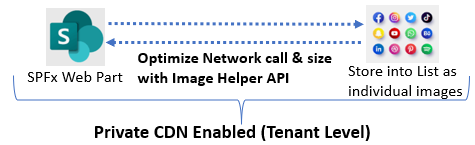
Custom Control (SPFx) renders or displays multiple images which is part of List not part of SPFx solution itself. So content should allow to change later point of time. It cause multiple network call to each render image and lead to performance issues.


Way to achieve the solution

Let's begin to enablement of Private CDN to optimize and reduce the network traffic and configure the codebase accordingly.

Step 1. To validate the Private CDN

  1. Get-SPOTenantCdnEnabled -CdnType Private: return True or False (false means not enabled)
  2. Get-SPOTenantCdnOrigins -CdnType Private: return the path of the origin (blank means not configured and doesn't exist)
  3. Get-SPOTenantCdnPolicies -CdnType Private: return the defined or configured policies.

Step 2. Configure the Private CDN

  1. Set-SPOTenantCdnEnabled -CdnType Private
  2. Press A to confirm the CDN enablement at the Tenant Level
  3. Private CDN-enabled locations start appearing 
  4. Validate Private CDN enablement with Get-SPOTenantCdnEnabled -CdnType Private (True means private CDN enabled)


Step 3. Create a List with an Image DataType

SharePoint Online List structure with the below columns


Step 4. List Image Storage

All List images under the image column get stored in Site Assets automatically. Once you navigate to Site Assets, Sub Folder will get created with the name Lists and a further subfolder with List ID with all images. 

Note. As Private CDN is enabled or enabled automatically, Site Assets origin is set CDN enabled library or folder.


Step 5. Get List Items into the TSX file

Create a state variable type array i.e. footeritems array , and bind the list data within the array using setState.

Step 6. To Convert the source Image Url to CDN, enable the URL using ImageHelper

import { ImageHelper } from "@microsoft/sp-image-helper";

Create a function that takes the source Url and returns the CDN-Enabled Url.

ImageCdnUrl(originalImageUrl : string) { return ImageHelper.convertToImageUrl( { sourceUrl: originalImageUrl, // important width: 80 // up to requirement, size can be set } ); }


Finally, Render Method.

public render(): React.ReactElement<IFooterProps> { return (<> { <section className={`${styles.footer} ${this.props.hasTeamsContext ? styles.teams : ''}`}> <h1 className={`${styles.title}`}>{this.props.description}</h1> <div className={`${styles.socialMediaLinks}`}> {this.state.footerItems.map((fLink, i) => { return ( <> <a target="_blank" href={fLink.FooterUrl?.Url} data-interception="off" rel="noreferrer"> <img alt={fLink["Title"]} src={this.ImageCdnUrl(JSON.parse(fLink.FooterImage)?.serverRelativeUrl)} /> </a> </> ); }) } </div> </section> }</> ); }

 Step 7. Let's build the package, deploy the solution to the app catalog, add a webpart to the page, and validate the Image render path.

I ran the below command to deploy the package.

  1. Gulp Build
  2. Gulp Bundle --ship
  3. Gulp Package-Solution --ship

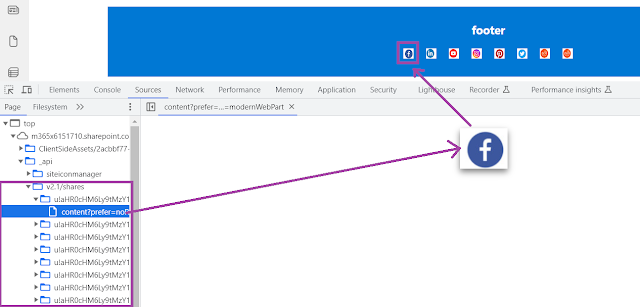
Once the solution is deployed, the web part is added to the page. Inspect the images; we can see all control images redder from Private CDN. It will improve the network traffic with one call instead of multiple.


Hope you have learned something useful here.

Microsoft Team Extendibility | Configure existing SPFx as Teams Tab Component using App Manifest

 Microsoft introduced the possibility to create custom Tab in Microsoft Teams using SharePoint Framework. With the version of SharePoint Framework 1.8, developer can implement Microsoft Teams cusotm Tab using SharePoint Framework.

 
Its significantly simplifies the development and automatically hosted the custom tab within sharepoint without any need of external services. 
 
In this article, I am going to take an already developed web part and see what it takes to get it into Microsoft Teams with upload custom app i.e. SPFx using manifest file. 


Project Setup

 
As mentioned you will need to setup your development environment with at least version of the SharePoint Framework at least 1.8 is required. Setup M365 Tenant Setup SPFx development environment
 

Development Process 

 
Microsoft Teams custom tabs created simply by using the SharePoint Framework 1.8 or later packages.
 
The high-level steps to get started are as follows,
  1. Create a SharePoint Framework solution with a client-side web part
  2. Add "TeamsTab" to the supportedHosts property of the web part manifest to use it as a tab in a channel: "supportedHosts": ["SharePointWebPart", "TeamsTab"]
  3. Add "TeamsPersonalApp" to the SupportedHost property of the web part manifest to use it as a personal app: "supportedHosts": ["SharePointWebPart", "TeamsPersonalApp"]
  4. Deploy the SPFx web part using tenant scoped deployment option to your SharePoint app catalog.
  5. Activate the SPFx solution, which you deployed and Sync to Teams button in the app catalog.
Project Structure look like this ( as i am using SPFx V1.9 for this demo, as it doesn't add manifest file automatically here)


Add Team Tab to Web Part Name manifest.json file

"supportedHosts": ["SharePointWebPart","TeamsTab"
Assumption here, you have finally deployed the SPFx web part and Sync to Team successfully.


Teams Manifest File 

 
This is the place where actual magic happen, The teams manifest file with in the teams package describe how to load the SPFx webpart into teams. 
 
There are five important section, which i need to call out here


The manifest file with 5 important parts,
 
Part 1
 
This section holds the package name and the id of the web part. This id is the same as the id in your web part manifest file. So that’s the connection to the web part to load.
 
Part 2
 
This section holds the name, description and icons as it will appear in Teams. So in order to make your app appear differently in the App catalog, this is the place to edit. The icons match to the icons in your ‘teams’ folder.
 
Part 3
 
This section holds the url to your Site collection connected to your team. Not only the Site collection, but a _layouts page ‘TeamsLogon.aspx’ is called with a ‘dest’ query string parameter holding a _layouts page called ‘teamshostedapp.aspx’. Next to this there are some other parameters. Let’s look into the actual url, 

  1. "configurableTabs": [  
  2.       {  
  3.           "configurationUrl""https://mittal1201.sharepoint.com/sites/Incident/_layouts/15/TeamsLogon.aspx?SPFX=true&dest=https://mittal1201.sharepoint.com/sites/Incident/_layouts/15/teamshostedapp.aspx%3FopenPropertyPane=true%26teams%26componentId=cf3de6a0-3b30-4dfc-a19b-c9f72432239d%26forceLocale=%7Blocale%7D",  
  4.           "canUpdateConfiguration"true,  
  5.           "scopes": [  
  6.               "team"  
  7.           ]  
  8.       }  
  9.   ]


Note
  • mittal1201.sharepoint.com -> team site domian.
  • /sites/incident -> team site path 
  • Encoded character format is very important, it will keep failing, if you missed any like %26 should not be replace with & , %7B should not replace with { , %7D should not replace with } 
The TeamsLogon.aspx is used to authenticate and with the current user to the SharePoint Online site. The TeamshostedApp.aspx page will render the actual web part using the component ID query string parameter, which point to the web part id in the manifest. Further more you can see there is a scopes property, which for now is only available for team
 
Part 4
 
This section hold all valid domain connected to your teams.

  1. "validDomains": [  
  2.         "mittal1201.sharepoint.com"  
  3.     ]

Part 5
 
This section used for SPFx web part SSO integration with Custom Teams Tab. 

  1. "webApplicationInfo": {  
  2.         "id""00000003-0000-0ff1-ce00-000000000000",  
  3.         "resource""https://mittal1201.sharepoint.com"  
  4.     }  


"id": "00000003-0000-0ff1-ce00-000000000000" . This is dummy resource id Or you can create an Azure AD APP within same tenant directory. Use Client ID from there.
 
Now, we are set with final configuraiton i.e.  Manifest and SPfx component . Let's start with Configuration steps 
 
Step 1 - Create Teams and Navigate to Manage Teams Setting
  • Create a new teams example "MSTeams-Tab"  into Microsoft Teams
  • Select "..." and Manage Teams 


Step 2: Navigate to  Selected Teams App Setting
  • Select Apps Tab
  • Right Bottom click to Upload Custom App to upload the manifest file.

Step 3 - Upload Created Manifest Zip File 
  • Create Zip file by selecting all three files i.e. manifest.json, color.png, outline.png
  • Upload via custom app options
  • Click to add button to add into selected Ms Teams 


 At this stage, you have added SPFx control configuration to MS Teams. Now you can add SPFx as a tab.
 
Step 4 - Add and Configure Cusotm Tab
  • Select the MSTeams and Navigate to General Channel or desired Channel within Teams
  • Click to "+" i.e. available next to tab.
  • Search your app name from avaialble created app name 
  • Select the created app name and App addition popup will appear.


Click Save to Continue and your SPFx control will appear as custom Tab i.e. given name "Reporting Management" into manifest file will appear here.
 
As i have already build SPFx control with charting (pre-requisites for this article) , which is configured and appeared now.


 I hope you enjoyed and learned something new in this article.