Showing posts with label SharePoint Online. Show all posts

Execute PnP PowerShell with Azure DevOps Pipeline

Azure DevOps promotes collaboration between development and operation to faster and more reliable software delivery. 

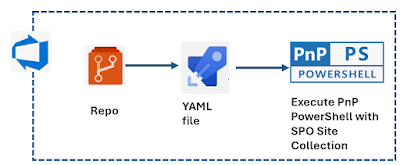
In this article, I am going to demonstrate, How to automate & execute the PnP PowerShell using Azure DevOps Pipeline. Let's get started with the below steps.


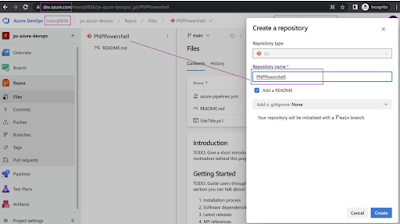
Create Azure DevOps Repository

  • Navigate to https://dev.azure.com and log in with your valid credentials.
  • Select the Organization & Navigate to Repo to create a new repository. (Note, we can use the existing repository also).
  • Create a repository with the name PNP Powershell and click save.
  • Once it's saved, Created Repository and README.md file will appear as per the below screenshots.
Configure the YAML pipeline 
  • Select the Pipeline from the left-hand side and then select the Azure Repos Git i.e. (free private Git Repositories).


  • Select the respective created repository (as we created earlier with the name PNPPowershell). 


  • The YAML file will get generated with the below sample code.

The YAML file will get generated with the below sample code.


Create & Upload the PnP PowerShell

PnP PowerShell Code snippet to display the Site Title & credentials is parameterized. It is always a best practice to store the credentials as managed identity or user library group, which exists under pipeline sections. 

param (

[Parameter()]

[string]$UserName,

[Parameter()]

[SecureString]$Password

)

# Site URL, It can be parametrize also

$SiteURL= "https://mittal1201.sharepoint.com/sites/commsitehub"

#$SecurePassword = ConvertTo-SecureString -String $Password -AsPlainText -Force

$Cred = New-Object -TypeName System.Management.Automation.PSCredential -argumentlist ($UserName, $Password)

#Connect to PnP Online

Connect-PnPOnline -Url $SiteURL -Credential $Cred

#Get the Root Web

$Web = Get-PnPWeb

#Get the Site Title

Write-host -f Green "Site Title " $Web.Title

If you have mapped the repo with a local machine, then desired IDE can be used, such as Visual Code, to do check-in & check-out. As part of this demo, I directly uploaded this file with the below click.

  • Select vertical dots against the Repo name.
  • Browse the ps1 file and click save.
  • SiteTitle.ps1 file start appearing parallel to the .yml file.


Add Credentials to Pipeline

  • Select the Library section under Pipelines & choose variable groups
  • Give the desired name to the variable group, i.e. credentials
  • Add variable as Key-Value pair
    • username: email id
    • password: **** (lock it)


 Add YML file task 

  • The variable used to get detail from Library defined value at run time.
  • The steps consist of two tasks
    • Install PNP Powershell within the current user context.
    • Execute the PnP Powershell with defined credentials into the variable.

# Starter pipeline # Start with a minimal pipeline that you can customize to build and deploy

 # Add steps that build, run tests, deploy, and more:

# https://aka.ms/yaml trigger: - main pool: vmImage: ubuntu-latest variables: - group: Credentials - name: user_name value: $(username) - name: pass_word value: $(password) steps: - task: PowerShell@2 inputs: targetType: 'inline' script: 'Install-Module -Name PnP.PowerShell -Scope CurrentUser -Force' - task: PowerShell@2 displayName: 'PowerShell Script' inputs: targetType: filePath filePath: ./SiteTitle.ps1 arguments: '-username "$(user_name)"  
-password $(ConvertTo-SecureString "$(pass_word)" -AsPlainText -Force)'


Create and Execute Pipeline 

Select Pipeline and click on Run Pipeline.

Under Run pipeline, choose the branch under which yml file exists. 

Click Run to execute.


Output

Once the Pipeline execution is complete and we extend the script section under the job, and we can see Site Title has been printed.


So this is the secure & automated way to execute the PNP PowerShell using Azure DevOps Pipeline. Hope you have learned something new and refreshing in this article.


Handle People Picker Null into SharePoint Online using Power Automate

 Problem Statement

To save people picker value as null or empty is always a tricky situation in SharePoint Online List dynamically. Let's see how it can be achieved when working with Power Automate.

Scenario

Here, we are going to sync the DevOps data i.e. Text, Choice & Identity column, into SharePoint Online List as Text, Choice & People Picker value.

Step 1. Request received when Azure DevOps data saved.

The previous article with the configuration steps of the request received is here.

  1. Request Received
  2. Parse the field into JSON
  3. Initialize the variable as a string
  4. Get User Profile action (Extract email id and pass)


replace(split(body('Parse_JSON')?['Custom.TechnicalInterviewBy'],'<')?[1],'>','')


Step 2. Set variable value as "-1"

If the user email id doesn't exist or came as a null value, Configure Run after "Fail" to set the variable as "-1"  which will be treated as user ID.


Step 3. Check for User Email and Set User ID if it exists

Create Scope and Configure the Run after as "Skipped". It means the user email id exists and gets the user ID of that email address.

The scope has two defined actions.

  • Site Address : https://m365x6151710.sharepoint.com
  • Method        : GET
  • URI                : _api/web/SiteUsers/getByEmail('@{outputs('Get_user_profile_(V2)')?['body/mail']}')

Send an HTTP request to SharePoint to get the user ID.

Set User ID 

@{body('Send_an_HTTP_request_to_SharePoint')?['d']?['id']}


Step 4. Create an Item in SharePoint Online List

Below is the parameter that needs to be configured.

Site Address https://m365x6151710.sharepoint.com

Method    POST

URI           _api/lists/getbytitle('Resource')/items

Header 

{

  "content-type": "application/json;odata=verbose ",

  "Accept": "application/json;odata=verbose"

}

Body

"__metadata": { "type": "SP.Data.ResourceListItem" },

"Title" : "@{body('Parse_JSON')?['System.Title']}",

"TechnicalInterviewById"  :  "@{variables('TechnicalInterviewBy')}",

"AssignmentName" :"@{body('Parse_JSON')?['Custom.AssignmentName']}",

"TechnicalSkill" : "@{body('Parse_JSON')?['Custom.TechnicalSkill']}"

}


Note. variables('TechnicalInterviewBy') always hold "-1" or "Actual user ID". in the case of  "-1", people picker value store as Null else actual user. 


 Let's execute the power automate in both scenarios to get the output.

Output scenario. Azure DevOps Identity column as blank value and sync the same with SPO List People Picker


Output scenario. Azure DevOps Identity column as user value and sync the same with SPO List People Picker


Hope you have learned something useful here

Delegate SharePoint Online CSOM (REST API) With .NET Core 3.1

 Introduction 

 
This article will cover, How to consume Sharepoint online CSOM (REST API) operation using .NET Core 3.1 framework into a console application.


The topic needs to cover here:
  1. Create Azure AD Instance with Delegate Permission.
  2. Create Console Application and Add Microsoft.SharePointOnline.CSOM Nuget Package.
  3. Add Authentication Manager Class to generate the access token.
  4. Get Access Token & access SharePoint Online List data 
Step 1 - Create Azure AD Instance with Delegate Permission
 
Note
Users should have access to Azure Active Directory.
  • Login to https://portal.azure.com
  • Search and Select Azure Active Directory 
Once the user selects Azure AD, the App registration page will appear.
  1. Select App registrations
  2. Select +New registration 


Once the user selects new registration, add below details
  1. Name "spocsom-api", user can add as per project namespace or naming convention guidelines.
  2. Select "Account in this organization (single-tenant)
  3. Click on the Register button 


Grant access to SharePoint Online.
  1. Select API Permission
  2. Click to Add Permission
  3. Search and Add SharePoint from Request API Permission 


Delegate Permission, It required where user application needs to access data as the signed-in user.
  1. Select Add a Permission
  2. Selection Delegate Permission
  3. Search and Select Sites 
  4. Choose "All Site.Read" -> This is not site specific but quite secure , It will just come into use to generate token, not going to grant access to the site to access the content.
  5. Click to "Add Permission" 


Grant Admin Consent
 
Grant permission by admin or user as part of the consent process.
  1. Select "Grant admin consent for default directory and click ok to proceed.
  2. All added api will show granted admin consent on behalf of the user. so it will not prompt for consent. 

Allow Public Client Flows
 
The app is going to collect username and password into plain text, so it should allow to yes.
  1. Select authentication and scroll down till the end
  2. Under advance settings -> select Allow Public client flows -> Select Yes -> Click on Save to Proceed.


Step 2 - Create Console Application and Add Microsoft.SharePointOnline.CSOM Nuget Package
  1. Login to Visual Studio 2019 and Create New Project
  2. Select ConsoleApp (.Net Core) and Ok to proceed.


Install NuGet Package
 
Select solution and right-click on dependencies and NuGet Packages
 
Install the below packages:
  1. Microsoft.SharepointOnline.CSOM 
  2. Newtonsoft.Json
  3. System.IdentityModel.Token.Jwt


Step 3 - Add Authentication Manager Class to generate the access token
 
This class helps us to generate access tokens based on application URI, UserName, Password & Azurre AD App Client ID.
 
Create Auth Manager Class and Copy paste the below codebase:

  1. public class AuthManager : IDisposable  
  2.    {  
  3.        private static readonly HttpClient httpClient = new HttpClient();  
  4.        private const string tokenEndpoint = "https://login.microsoftonline.com/common/oauth2/token";  
  5.        // Replace with Azure AD Client ID  -Generated in above Steps
  6.        private const string defaultAADAppId = "Azure Active Director Client ID";  
  7.   
  8.        // Token cache handling  
  9.        private static readonly SemaphoreSlim semaphoreSlimTokens = new SemaphoreSlim(1);  
  10.        private AutoResetEvent tokenResetEvent = null;  
  11.        private readonly ConcurrentDictionary<string, string> tokenCache = new ConcurrentDictionary<string, string>();  
  12.        private bool disposedValue;  
  13.   
  14.        internal class TokenWaitInfo  
  15.        {  
  16.            public RegisteredWaitHandle Handle = null;  
  17.        }  
  18.   
  19.        public ClientContext GetContext(Uri web, string userPrincipalName, SecureString userPassword)  
  20.        {  
  21.            var context = new ClientContext(web);  
  22.   
  23.            context.ExecutingWebRequest += (sender, e) =>  
  24.            {  
  25.                string accessToken = EnsureAccessTokenAsync(new Uri($"{web.Scheme}://{web.DnsSafeHost}"), userPrincipalName, new System.Net.NetworkCredential(string.Empty, userPassword).Password).GetAwaiter().GetResult();  
  26.                e.WebRequestExecutor.RequestHeaders["Authorization"] = "Bearer " + accessToken;  
  27.            };  
  28.   
  29.            return context;  
  30.        }  
  31.   
  32.   
  33.        public async Task<string> EnsureAccessTokenAsync(Uri resourceUri, string userPrincipalName, string userPassword)  
  34.        {  
  35.            string accessTokenFromCache = TokenFromCache(resourceUri, tokenCache);  
  36.            if (accessTokenFromCache == null)  
  37.            {  
  38.                await semaphoreSlimTokens.WaitAsync().ConfigureAwait(false);  
  39.                try  
  40.                {  
  41.                    // No async methods are allowed in a lock section  
  42.                    string accessToken = await AcquireTokenAsync(resourceUri, userPrincipalName, userPassword).ConfigureAwait(false);  
  43.                    Console.WriteLine($"Successfully requested new access token resource {resourceUri.DnsSafeHost} for user {userPrincipalName}");  
  44.                    AddTokenToCache(resourceUri, tokenCache, accessToken);  
  45.   
  46.                    // Register a thread to invalidate the access token once's it's expired  
  47.                    tokenResetEvent = new AutoResetEvent(false);  
  48.                    TokenWaitInfo wi = new TokenWaitInfo();  
  49.                    wi.Handle = ThreadPool.RegisterWaitForSingleObject(  
  50.                        tokenResetEvent,  
  51.                        async (state, timedOut) =>  
  52.                        {  
  53.                            if (!timedOut)  
  54.                            {  
  55.                                TokenWaitInfo internalWaitToken = (TokenWaitInfo)state;  
  56.                                if (internalWaitToken.Handle != null)  
  57.                                {  
  58.                                    internalWaitToken.Handle.Unregister(null);  
  59.                                }  
  60.                            }  
  61.                            else  
  62.                            {  
  63.                                try  
  64.                                {  
  65.                                    // Take a lock to ensure no other threads are updating the SharePoint Access token at this time  
  66.                                    await semaphoreSlimTokens.WaitAsync().ConfigureAwait(false);  
  67.                                    RemoveTokenFromCache(resourceUri, tokenCache);  
  68.                                    Console.WriteLine($"Cached token for resource {resourceUri.DnsSafeHost} and user {userPrincipalName} expired");  
  69.                                }  
  70.                                catch (Exception ex)  
  71.                                {  
  72.                                    Console.WriteLine($"Something went wrong during cache token invalidation: {ex.Message}");  
  73.                                    RemoveTokenFromCache(resourceUri, tokenCache);  
  74.                                }  
  75.                                finally  
  76.                                {  
  77.                                    semaphoreSlimTokens.Release();  
  78.                                }  
  79.                            }  
  80.                        },  
  81.                        wi,  
  82.                        (uint)CalculateThreadSleep(accessToken).TotalMilliseconds,  
  83.                        true  
  84.                    );  
  85.   
  86.                    return accessToken;  
  87.   
  88.                }  
  89.                finally  
  90.                {  
  91.                    semaphoreSlimTokens.Release();  
  92.                }  
  93.            }  
  94.            else  
  95.            {  
  96.                Console.WriteLine($"Returning token from cache for resource {resourceUri.DnsSafeHost} and user {userPrincipalName}");  
  97.                return accessTokenFromCache;  
  98.            }  
  99.        }  
  100.   
  101.        public async Task<string> AcquireTokenAsync(Uri resourceUri, string username, string password)  
  102.        {  
  103.            string resource = $"{resourceUri.Scheme}://{resourceUri.DnsSafeHost}";  
  104.   
  105.            var clientId = defaultAADAppId;  
  106.            var body = $"resource={resource}&client_id={clientId}&grant_type=password&username={HttpUtility.UrlEncode(username)}&password={HttpUtility.UrlEncode(password)}";  
  107.            using (var stringContent = new StringContent(body, Encoding.UTF8, "application/x-www-form-urlencoded"))  
  108.            {  
  109.   
  110.                var result = await httpClient.PostAsync(tokenEndpoint, stringContent).ContinueWith((response) =>  
  111.                {  
  112.                    return response.Result.Content.ReadAsStringAsync().Result;  
  113.                }).ConfigureAwait(false);  
  114.   
  115.                var tokenResult = JsonSerializer.Deserialize<JsonElement>(result);  
  116.                var token = tokenResult.GetProperty("access_token").GetString();  
  117.                return token;  
  118.            }  
  119.        }  
  120.   
  121.        private static string TokenFromCache(Uri web, ConcurrentDictionary<string, string> tokenCache)  
  122.        {  
  123.            if (tokenCache.TryGetValue(web.DnsSafeHost, out string accessToken))  
  124.            {  
  125.                return accessToken;  
  126.            }  
  127.   
  128.            return null;  
  129.        }  
  130.   
  131.        private static void AddTokenToCache(Uri web, ConcurrentDictionary<string, string> tokenCache, string newAccessToken)  
  132.        {  
  133.            if (tokenCache.TryGetValue(web.DnsSafeHost, out string currentAccessToken))  
  134.            {  
  135.                tokenCache.TryUpdate(web.DnsSafeHost, newAccessToken, currentAccessToken);  
  136.            }  
  137.            else  
  138.            {  
  139.                tokenCache.TryAdd(web.DnsSafeHost, newAccessToken);  
  140.            }  
  141.        }  
  142.   
  143.        private static void RemoveTokenFromCache(Uri web, ConcurrentDictionary<string, string> tokenCache)  
  144.        {  
  145.            tokenCache.TryRemove(web.DnsSafeHost, out string currentAccessToken);  
  146.        }  
  147.   
  148.        private static TimeSpan CalculateThreadSleep(string accessToken)  
  149.        {  
  150.            var token = new System.IdentityModel.Tokens.Jwt.JwtSecurityToken(accessToken);  
  151.            var lease = GetAccessTokenLease(token.ValidTo);  
  152.            lease = TimeSpan.FromSeconds(lease.TotalSeconds - TimeSpan.FromMinutes(5).TotalSeconds > 0 ? lease.TotalSeconds - TimeSpan.FromMinutes(5).TotalSeconds : lease.TotalSeconds);  
  153.            return lease;  
  154.        }  
  155.   
  156.        private static TimeSpan GetAccessTokenLease(DateTime expiresOn)  
  157.        {  
  158.            DateTime now = DateTime.UtcNow;  
  159.            DateTime expires = expiresOn.Kind == DateTimeKind.Utc ? expiresOn : TimeZoneInfo.ConvertTimeToUtc(expiresOn);  
  160.            TimeSpan lease = expires - now;  
  161.            return lease;  
  162.        }  
  163.   
  164.        protected virtual void Dispose(bool disposing)  
  165.        {  
  166.            if (!disposedValue)  
  167.            {  
  168.                if (disposing)  
  169.                {  
  170.                    if (tokenResetEvent != null)  
  171.                    {  
  172.                        tokenResetEvent.Set();  
  173.                        tokenResetEvent.Dispose();  
  174.                    }  
  175.                }  
  176.   
  177.                disposedValue = true;  
  178.            }  
  179.        }  
  180.   
  181.        public void Dispose()  
  182.        {  
  183.            // Do not change this code. Put cleanup code in 'Dispose(bool disposing)' method  
  184.            Dispose(disposing: true);  
  185.            GC.SuppressFinalize(this);  
  186.        }  
  187.   
  188.    }  


Step 4 - Get Access Token & access SharePoint Online List data
 

 Get List Data function get data from SharePoint online List and Print out all result based on return data.

  1. static void Main(string[] args)  
  2.       {  
  3.           List<Data> getdata = GetListData();  
  4.           foreach (Data data in getdata)  
  5.           {  
  6.               Console.WriteLine("Employee Name " + data.Title);  
  7.           }  
  8.           Console.ReadLine();  
  9.       }

The codebase will invoke the SharePoint online api with help of an access token 

  1. public static List<Data> GetListData()  
  2.        {  
  3.            const string DataColumn = "ID,Title";  
  4.            const string DataAPIAllData = "{0}/_api/lists/getbytitle('{1}')/items?$top=10&$select=" + DataColumn + "&$orderby=Modified desc";  
  5.   
  6.            try  
  7.            {  
  8.                var results = new List<Data>();  
  9.   
  10.                string sharepointSiteUrl = Convert.ToString("https://mittal1201.sharepoint.com/sites/CommSiteHub");  
  11.                if (!string.IsNullOrEmpty(sharepointSiteUrl))  
  12.                {  
  13.                    string listname = "Employee";  
  14.                    string api = string.Format(DataAPIAllData, sharepointSiteUrl, listname);  
  15.                    if (!string.IsNullOrEmpty(listname))  
  16.                    {  
  17.                        //Invoke REST Call  
  18.                        string response = TokenHelper.GetAPIResponse(api);  
  19.                        if (!String.IsNullOrEmpty(response))  
  20.                        {  
  21.                            JObject jobj = Utility.Deserialize(response);  
  22.                            JArray jarr = (JArray)jobj["d"]["results"];  
  23.   
  24.                            //Write Response to Output  
  25.                            foreach (JObject j in jarr)  
  26.                            {  
  27.                                Data data = new Data();  
  28.                                data.Title = Convert.ToString(j["Title"]);  
  29.   
  30.                                results.Add(data);  
  31.                            }  
  32.                        }  
  33.                        return results;  
  34.                    }  
  35.                    else  
  36.                    {  
  37.                        throw new Exception("Custom Message");  
  38.                    }  
  39.                }  
  40.                else  
  41.                {  
  42.                    throw new Exception("Custom Message");  
  43.                }  
  44.            }  
  45.            catch (Exception ex)  
  46.            {  
  47.                throw new Exception("Custom Message");  
  48.            }  
  49.        }  
  50.    }  


Created a data class  with filed title here


  1. public class Data  
  2. {  
  3. public string Title { get; set; }  

Create TokenHelper class to get access token based on user credentials and URI. This function helps to get access from AuthManager Class with the provided information.

  1. public static string GetAPIResponse(string url)  
  2.        {  
  3.            string response = String.Empty;  
  4.            try  
  5.            {  
  6.                //Call to get AccessToken  
  7.                string accessToken = GetSharePointAccessToken();  
  8.                //Call to get the REST API response from Sharepoint  
  9.                System.Net.HttpWebRequest endpointRequest = (System.Net.HttpWebRequest)System.Net.HttpWebRequest.Create(url);  
  10.                endpointRequest.Method = "GET";  
  11.                endpointRequest.Accept = "application/json;odata=verbose";  
  12.                endpointRequest.Headers.Add("Authorization""Bearer " + accessToken);  
  13.                System.Net.WebResponse webResponse = endpointRequest.GetResponse();  
  14.                Stream webStream = webResponse.GetResponseStream();  
  15.                StreamReader responseReader = new StreamReader(webStream);  
  16.                response = responseReader.ReadToEnd();  
  17.                return response;  
  18.            }  
  19.            catch (Exception ex)  
  20.            {  
  21.                throw;  
  22.            }  
  23.   
  24.        }  
  25.   
  26.        public static string GetSharePointAccessToken()  
  27.        {  
  28.   
  29.            Uri site = new Uri("https://mittal1201.sharepoint.com/sites/CommSiteHub");  
  30.            string user = "user email address";  
  31.            string pwd = "user password";  
  32.            string result;  
  33.            using (var authenticationManager = new AuthManager())  
  34.            {  
  35.                string accessTokenSP = authenticationManager.AcquireTokenAsync(site, user, pwd).Result;  
  36.                result = accessTokenSP;  
  37.            }  
  38.            return result;  
  39.        }  


Output Window 
 
Execute this solution or press F5.
 
SharePoint List Screen Shot where data is going to read by a console app


Console Output


Finally, we got output using .NetCore 3.1 console app instead of .NetStandard framework. 
 
I hope you enjoyed and learned something new in this article.