Showing posts with label MSFlow. Show all posts

Join me at Microsoft 365 Virtual Marathon, 36 hour event happening May 27-28 2020

Power Platform Evolution with AI Builder Model

Speedup digital transformation through the Power Platform and AI Builder. AI Builder provides AI templates (Binary Classification, Text Classification, Object Detection, Form Scanning) that you can tailor to easily add intelligence to your apps and processes in Power Apps and/or Microsoft Flow


Join me at Microsoft 365 Virtual Marathon, 36 hour event happening May 27-28 2020 
I will be speaking about Power Platform evolution with AI Builder 
Register here: https://lnkd.in/dA8vQS3 and hope to see you there! 
Virtual event page: https://lnkd.in/dqZ6Ks5 

🗓 Thursday, May, 28th 📺Room Mile 14 ⏱️06:30PM IST / 06:00PM PDT / 03:00 PM CEST

SharePoint Online: Approval Request via email comment and update response in List

In this article, we are going to discuss the process of creating an approval workflow. We will work on functionality so that the Approver or Manager can approve and reject the request via email instead to navigate webforms. 
Scenario
  1. Employee raises a leave request.
  2. The request goes to the employee manager or whoever is assigned as AD or synced with the O365 account.
  3. Manager can approve or reject the request with comments via email.
  4. The employee will get notified based on the manager comments. 

Prerequisites
  1. Microsoft Flow.
  2. A SharePoint Online list.
  3. Office 365 Outlook and Office 365 Users account.
Let's get started 
The overall Microsoft Flow structure will look like this.


Step1
To create a leave request, I am using a List at SharePoint Online. Employee submits a request and the associated MS Flow gets triggered on item creation.


Step 2
Create a string variable as a name Manager (This step can be optional too).

Step 3
Get user manager from O365 profile using "created by"; i.e., who has created the request. User Manager should be assigned at O365 User Profile.
Set Manager email id to the created variable to send the request.

Step 4
Add an action “Start and Wait for an approval”.
Select the approval type: Approve/Reject – First to respond and assign the request to Manager with title and details.
The advantage of this action is that the workflow will not proceed until the manager approves or rejects the workflow via email body button.

Step 5
Check for condition and accordingly, update the manager comments provided in an email to SharePoint Online List.

Step5.1
If Request status is approved, then update the action. The "Send email" section will look like this.


Step5.2
If the Request status is rejected, then update the action. The "Send email" section will look like this.

Now, we will talk about the flow process.
The user creates a request via form (Created a list at SharePoint Online with a required column for demo purpose). Here, I have created the first request.


The designated Microsoft Flow gets triggered and waits until the request is not responding.


Switch to "manage email" box and check for email. Manager will get an approval email.


Approval of request assigned manager can act over a request with approving or rejecting a request with comments.


As approver responded to an email with comment and approved status. The Leave request item will get updated with a response,


The employee gets a final notification along with the approve/reject status.


I hope you have learned something new in this article. Stay tuned for related articles to get more insights and learning.

MSFlow | Best Practice | Lookup Threshold Issue

Here, we are going to discuss a very common problem statement faced during the runtime of Microsoft Flow:

The query cannot be completed because the number of lookup columns it contains exceeds the lookup column threshold enforced by the administrator.

This problem statement occurs whenever Microsoft Flow executes over SharePoint Online list or library where the Lookup column exceeds the limit of 12 columns. The administrator cannot change the threshold limit at SharePoint Online, either at the Tenant or Site Collection level.


Why does Microsoft set the magic number 12 as the threshold limit?

Reason
Each lookup column creates a join with other tables. So, Microsoft decided to set the limit at 12 to avoid performance degradation.
Let's get started with detailed resolution.
Custom lookup column can be created using the below types.
  1. Standard Lookup column
  2. People Pickers
  3. Managed Metadata
  4. Workflow
  5. Share With
OOTB Lookup columns
  1. Created by (both for List & Library)
  2. Modified by (both for List & Library)
  3. Name (linked to Document)
  4. Link (Edit to edit item)
  5. Name (linked to Document with edit menu)
  6. Type (icon linked to document)
Lookup column is quite useful but we should be cautious about the threshold limit while designing the schema.
I created a list with 13 lookup columns. See the below list for your reference.

Problem statement with Get Items

When we run flow to get an item from a List or Library having more than 12 lookup columns, it throws the following error.

Resolution with Get Items

Create a list or library view with 12 or fewer than 12 lookup columns and set the view at the Get Items action. During a custom View creation, we can ignore the OOTB column or the ones that are not required for this operation.

After setting the list View with 12 lookup columns, once I execute the flow, it succeeds.


Problem statement with Update Item

A similar issue occurs when we want to update the items using MS Flow.


Resolution with Update Item 

I created a View with 12 lookup columns and set “Limit Column by View” with a newly created View.

Once I executed the flow with the View which is having 12 lookup columns, it succeeded and updated the item.
I hope you have learned something new in this article. Stay tuned for related articles to get more insights and learning.

Synchronize SharePoint Online Security Group Users To Lists Using MS Flow

Microsoft Flow is a SaaS-based platform that allows power users to send an email to a group of users. MS Flow doesn't support sending a direct email to SPO Group. Let's have a look at the scenario and solution to get started.


Scenario
If we need to send an email to SP Groups using MS Flow, it doesn’t support sending emails to SPO Groups. To make it work, a developer needs to store all the users as list items because an SPO List item can be used as “To” to send an email.
Start with the solution
Create a list with key & value pair as string type. Add Key as Group Name and MS Flow will add the users as the values against the defined key.
MS Flow at a glance
MS Flow is a scheduling activity that can be defined periodically as per the requirement, i.e., hourly, daily, weekly, monthly etc.

Let's start step by step.
Step 1
Recurrence is added as a trigger point to this flow. It can be defined as per the requirement and it works like a scheduled job.


Step 2
Initialize a variable, it will be used to store all email addresses with defined delimiter separator.


Variable name SPOGroupMembers of string type.
Step 3
Get Item from the list named GroupUsers. This list has two columns, consisting of a “Single Line Of Text”.


Step 4
Apply for each loop. The list can have multiple keys.
Add an action “Send an HTTP request to SharePoint”. Three properties are important for this action.
  1. Site Address - It should be the URL of the site collection.
  2. Method - Get request.
  3. URL - “_api/Web/SiteGroups/getbyName(“Column Name”)/users?$select=Email

Step 5
Add the action Parse JSON. It expects the payload from the above request. To get the payload or JSON, the response can be obtained from the below article.
Take out the payload from the HTTP request and paste it into the Schema section.

Step 6
Get the result after parsing the JSON. Loop through the result and store it into the above-created variable, i.e., SPOGroupMemebers with “;” as delimiter.


Step 7
Update the SPO List Item with SPOGroupMemebers Variable.


Output
SPO Group has two users -
SPList after running the flow will look like below.
Hope you will like it and Happy Coding.

How To Get Payload Request Data Using Microsoft Flow

To get the payload data from SharePoint Online, a developer needs to use either Postman or Custom Scripts. Usually, it’s a part of the solution or API. However, in some scenarios, developers need to use a payload outside the custom solution. Then, it’s not feasible to write a custom code or use Postman using the Client ID and Client Secret to get the payload or JSON response.
MS Flow is one of the easiest and quickest alternatives to get the JSON response from a SharePoint Online request. JSON response, i.e., the payload, can be used to identify the structure format, which helps to parse the data accordingly.
We can create a 3-step (trigger + action) flow that allows us to send an email quite securely (no need to handle the password separately).

Let’s explore how MS Flow is the quickest and easiest turnaround.
Step 1
Log in here with authorized credentials.
Step 2
Select My Flows -> New -> Create from blank.


Step 3
To start with the flow, we need to set the trigger point. So, I used recurrence as the trigger point to demonstrate.


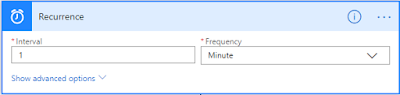
Frequency can be set as per the requirement; I set it to 1 minute for demo purposes.
Step 4
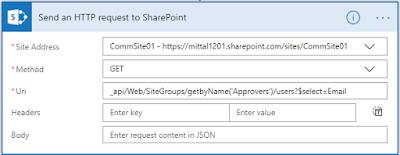
Generate the payload for HTTP Request, i.e., Group Details - Group Name, “Approver” with the email selection.


Step 5
Send an email with the payload body.


Step 6
Save and wait for a minute. Also, you can trigger it manually.
Check your email account. You must have received a JSON payload with the data on the defined email address.

Example
  1. {  
  2.     "d": {  
  3.         "results": [{  
  4.             "__metadata": {  
  5.                 "id""https://mittal1201.sharepoint.com/sites/CommSite01/_api/Web/GetUserById(16)",  
  6.                 "uri""https://mittal1201.sharepoint.com/sites/CommSite01/_api/Web/GetUserById(16)",  
  7.                 "type""SP.User"  
  8.             },  
  9.             "Email""demo@mittal1201.onmicrosoft.com"  
  10.         }, {  
  11.             "__metadata": {  
  12.                 "id""https://mittal1201.sharepoint.com/sites/CommSite01/_api/Web/GetUserById(6)",  
  13.                 "uri""https://mittal1201.sharepoint.com/sites/CommSite01/_api/Web/GetUserById(6)",  
  14.                 "type""SP.User"  
  15.             },  
  16.             "Email""manoj@mittal1201.onmicrosoft.com"  
  17.         }]  
  18.     }  
  19. }  

To verify the result, I have SP Group with two users. I have got the same in the above email.


That's it. I hope this article is helpful to you. Happy Coding!!!

Online Webinar Recording | Automate Business Process using Microsoft Azure Bot, MS Flow,and SharePoint Online

I delivered an online webinar -> Automate Business Process using Microsoft Azure Bot, MS Flow and SharePoint Online.

Business Use Case -> How to automate the internal manual job like send and receive visa file as well as extract the information and consolidate & store in SharePoint Online List.

Talked about couple of component:-
1. Azure Bot Framework -Communication Framwork.
2. LUIS -> to identify the intent.
3. SharePoint Online as data repository
4. MS Flow Premium Connector i.e. DocParser
5. Outlook -> Send and Receive an email.

Online Webinar Recording:-


Demonstrated Solution i.e. Git hub link here

Happy Coding.