Setup Bot Framework Development Environment Using .Net (C#) - Part Two

Part one :- FAQ based Bot Application Using QnA Maker - Part One

I have explained how to build FAQ based bot application using QnA maker for questions and answers. In this article, we will discuss about how setup Bot Framework development environment and we are going to consume QnA maker service.

This article will walk you through “How to Setup a Bot Framework development environment using .Net (C#)” and test the bot application using Bot Framework Emulator.

Prerequisites

Install Visual Studio 2017 for windows
Update all extensions with latest versions
Download Bot Application (.zip) file

Navigate and place the Bot Application.zip template to below path

%USERPROFILE%\Documents\Visual Studio 2017\Templates\ProjectTemplates\Visual C#\

Download Bot Controller (.zip) file and Download Bot Dialog.zip file

Navigate and place the Bot Controller.zip and Bot Dialog.zip template to below path

%USERPROFILE%\Documents\Visual Studio 2017\Templates\ItemTemplates\Visual C#\

Launch the Visual Studio

Once you launch the Visual Studio 2017 and navigate to file -> new project -> You can get Bot Framework Template under Visual C# Template


You can create a bot application using Visual Studio Bot Application template or Download the Bot Application solution created by Azure Portal using Bot Framework SDK. In previous article, I have created the bot application in azure portal. I am going to download and update the solution. 

Step to get the Microsoft Azure Bot Application Solution

1. Login to Azure Portal i.e. https://portal.azure.com and search for created bot name (my bot name is bot2018).

2. Select Web App Bot and you will navigate Web App Bot detail page.


3. Select Build under Bot Management

  • Online Code Editor Option open the codebase into visual studio online.
  • Download the source code using Download Zip file option.

Select second option i.e. Download 


4. Once you download the solution. Unzip the source code. Launch the Visual Studio 2017.

5. File -> Open Project -> Select the solution.

6. Expand the Reference Section -> All DLL or Packages link will be in broken mode and need to update with latest version and packages.


7. Right Click the project and Select Manage NuGet Packages and wait for couple of seconds.

NuGet Package Manager will show the available updates. Select all packages and click Update.

8. Update Microsoft.Net.Compliers V2.6.1 to V1.2.1 

9. Add Key and Value under App Setting in Web.Config file.

AzureWebJobsStorage,  QnASubscriptionKey, QnAKnowledgebaseId. These values can be get from Azure Bot Application App Service Settings. 
  1. <add key="AzureWebJobsStorage" value="DefaultEndpointsProtocol=https;AccountName=bot2018019ada;AccountKey=TPainlj4hGSND3IjYuyP5234m5;"/>  
  2. <add key="QnASubscriptionKey" value="2b523241d6b4a5c105a6e0ad7e"/>  
  3. <add key="QnAKnowledgebaseId" value="453c2a2d-b423-4816-8544-130edf0f593"/>  
2. Navigate to Project -> Dialog folder -> Basic QnADialog.cs file. Replace below section two places using find and replace.

  1. Replace -> Utils.GetAppSetting("QnAKnowledgebaseId") with ConfigurationManager.AppSettings["QnAKnowledgebaseId"];
  2. Replace -> Utils.GetAppSetting("QnASubscriptionKey") with ConfigurationManager.AppSettings["QnASubscriptionKey"]; 

3. Press F5 or Run the solution. VS solution execute in the localhost with port number.


Test your Bot Framework locally

Download Bot Framework Emulator and install the executable.


Open installed Bot Emulator. Select ellipse and click the App Settings


Download ngrok and add the reference to app settings in Bot Framework Emulator and click save.

Response by Emulator 

You can start asking the question as crawled by QnA Maker and you will prompt with response


Publish and test visual studio solution in the azure platform  

1. Navigate to Azure Bot App Services and click Get Publish Profile.


2. Select Visual Studio Project -> Right Click -> Publish option.


3. Select “Create new profile”


4. Select Import file and click publish.


5. Solution success and publish at the Azure Bot website url.

6. Test the bot framework in the azure portal.

Navigate to Azure Web App Bot and Select Test in Web Client under Bot Management section. You can start asking the question as crawled by QnA Maker and you will prompt with response.


Note
I recorded the complete article available at my youtube channel.


FAQ based Bot Application Using QnA Maker - Part One

What is Microsoft Azure Bot Framework?
Microsoft Azure Bot framework enables the organization to build virtual agents known as Bots.
Bots let users interact with intelligent solutions as though they are conversing with another person and assist end users and business users. Bot Connector let you connect your bot seamlessly to social channels such as Twitter, Slack, Facebook and other services. Even connect with web application using Iframe.

What is QnA Maker?
QnAMaker distills information into conversational, easy-to-navigate answers. QnA Maker is based on cognitive service and NLP. QnA Maker is a free, easy-to-use, REST API and web-based service that trains AI to respond to user's questions in a more natural, conversational way.
Question and Answer uses FAQ content in Word, PDF, Excel and Web.


Let us get started with configuration.
1. Login to the QnA Maker Service via https://qnamaker.ai
2. Sign and login with your Microsoft account.
Follow below steps to create QnA Maker Services
1. Click a Create New Service.
2. Give the service name (i.e. FAQKB).
3. Give FAQ site URL or upload the excel, doc or pdf with question and answer .


4. Click on create.

5. It takes a couple of seconds and redirects to a knowledge based page.


6. Click Test to verify the QnA Maker


7. Click Save and retrain -> Publish knowledge base 


8. Click Publish one more time and you will re-direct to Rest End point page. Here you can find two important things,

1. QnAMaker Service ID
2. QnAMaker Service Subscription Key


Integrate the QnAMaker with Bot Application
Navigate to Azure Portal i.e. https://portal.azure.com with your Microsoft Account or Subscription account,
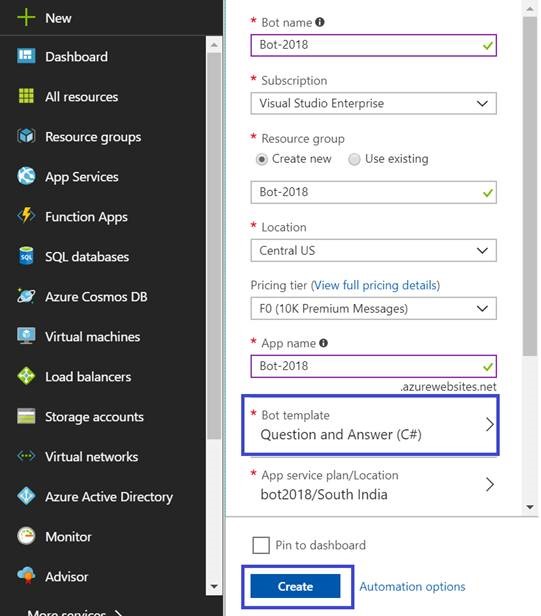
1. Click New -> AI + Cognitive Service -> Web App Bot


2. Set all fields


3. Search your bot with name and click to open. Select Application setting under APP SERVICE SETTING.

4. Provide the QnAMaker Service ID and QnAMaker Service Subscription Key in QnAKnowledgebaseId and QnASubscriptionKey respectively.

  
5. Done with Bot Application. To test -> click Test in Web Chat and start typing the question and get answer as provided by QnAMaker crawler. 


6. Last Section, Integrate bot application with multiple channels or use Iframe in web applications 


7. Click on Edit or Get bot embed codes.

8. Select the embed code (i.e. Iframe and replace your secret keys with Secret Keys) 


Note
I recorded the complete article available at my youtube channel.


Happy Learning !!

Migrate SharePoint on Premises document library’s or list to SharePoint Online using SPO API


SharePoint Point Online migration PowerShell is cmdlets is another ways of content migration without using the tool.
Below is the step by step SharePoint Online PowerShell cmdlets to migrate the content. It requires minimal CSOM (Client object model) call to avoid the threshold. It leverages temporary Azure Blob Storage container to hold the content and Azure Queue, which schedule parallel jobs.

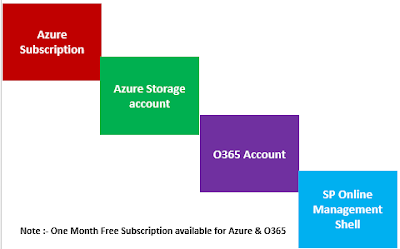
Prerequisites to use the SPO Migration API


Here are the steps for using SPO Migration PowerShell to upload your on-premises data into SharePoint Online

Step1:- Export your document library content
This cmdlets export on-premises content to define folder structure.
Parameter
ItemUrl: - relative path of document library or list (i.e. /sites/teamsite/contentlib )
Path: - folder structure path (C:\MigrationAPI\Contentlib)

Example

Export-SPWeb -Identity "<<SiteUrl>>" -ItemUrl "<<document library relative path>>" -Path "<<physical folder path>>" -NoFileCompression -IncludeVersions All

Step2:- Get your credentials into variables

$username = "manoj@sharepointtimes.onmicrosoft.com"
$cred = Get-Credential $username

Step3:- Set Source Package & File Path
At initial stage source file & package is same as export path of document library

$sourceFiles = "C:\MigrationAPI\Contentlib "
$sourcePackage=" C:\MigrationAPI\Contentlib "

Step4:- Set Output Package Path

$outputPackagePath = "C:\MigrationAPI\outputPackagePath"   

Step5:- Get target web & library

$targetWebUrl = "https://sharepointtimes.sharepoint.com/sites/teamsite"  
$targetLibrary = "contentlib"

Step6:- Convert Package for your target site
This creates a content package from a backup folder, the New-SPOMigrationPackage command reads the list of content targeted by the source path and will generate XML to perform the migration.
The following parameters are required:-
sourceFiles: points to the content you want to migrate
sourcePackage: points to content you want to migrate
targetWebUrl: point to your destination web
targetLibrary: point to the document library inside the web.
OutputPackagePath: points to your Temporary folder
Example:-
This example show how to convert a package to a target one by looking into source

ConvertTo-SPOMigrationTargetedPackage -SourceFilesPath $sourceFiles -SourcePackagePath $sourceFiles -OutputPackagePath $outputPackagePath -TargetWebUrl $targetWebUrl -TargetDocumentLibraryPath $targetLibrary -Credentials $cred


Step7:- Set Azure Storage Path & Variable

$fileContainerName = "onlinefile01”
$packageContainerName ="onlinepackage01"
$azureAccountName = "onlineazurestorage"
$azureAccountKey = “TQDKxHnHUDCG7uCjlfk646fzH5BV+mjjrocA9p6P0ENCJ2aHoY4+F6xOfdhnUslQ=="
$azureAzureQueueName = "migrationqueue01"

Step8:- Set SharePoint Online Migration Package source
This cmdlet help to create a defined file & package container into Azure blob storage as well as move the content from source file & output package path
The following parameters are required & optional:-
source files: points to the content you want to migrate
source package: points to your Temporary folder
FileContainerName:- temporary file container to hold the content (optional)
PackageContainerName:- temporary package container to hold the package (optional)
AccountName:- Azure blob storage account name
AccountKey:- Azure blob storage account access key
AzureQueueName:- Azure storage queue name (optional)

Example

$azurelocations=Set-SPOMigrationPackageAzureSource -SourceFilesPath $sourceFiles -SourcePackagePath $outputPackagePath -FileContainerName $fileContainerName -PackageContainerName $packageContainerName -AccountName $azureAccountName -AccountKey $azureAccountKey –Overwrite  -AzureQueueName $azureAzureQueueName


Step9:- List down the Azure Storage File container, Package Container & Queue URI

$azurelocations|fl


Step10:- Submit the Migration Job
This cmdlets help to generate the parallel queue to migrate the content from temporary storage to target web
There are three required parameter
TargetWebUrl:- target weburl where content need to migrate
MigrationPackageAzureLocations:- above set variable

Example

Submit-SPOMigrationJob -TargetWebUrl $targetWebUrl -MigrationPackageAzureLocations $azurelocations -Credentials $cred

Step11:- Monitoring the job status (Optional)

After the job is submitted, Only Azure Migration Queue interact to fetch and migrate the content to target SharePoint Online Site. This process is timer-job based.

Example

This cmdlet gives the running job status, If it doesn’t return any value – it means processing has been completed else it shows In Processing.

Get-SPOMigrationJobStatus -TargetWebUrl $targetWebUrl -Credentials $cred


Microsoft Flow Save update from Facebook to SharePoint List Part4

In this article, you will learn how to save update from Facebook a SharePoint List.


Step1:-
Navigate to Flow Page i.e. https://flow.microsoft.com/ and click My Flows and Create from template


Step2:-
Select Social Media from showing drop down & select the template named “Save update from Facebook to a SharePoint List”


Step3:-
Validate the account or use switch account if required and click continue.


Step4:- Fill template values
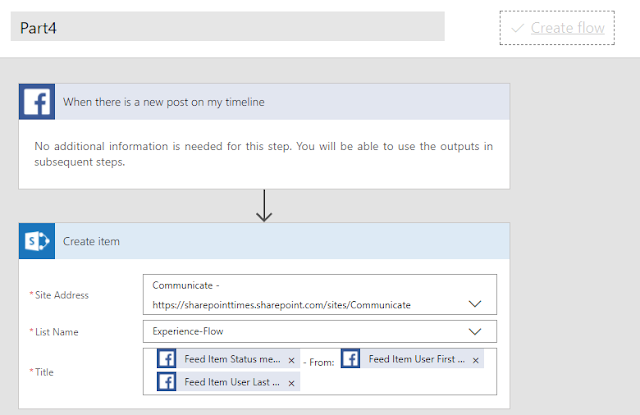
Select SharePoint Site and List name, where the post is going to store.


Give the name of flow (i.e. Part4)  and save it or create flow.

Step 5:- Login to Facebook account and post something on timeline


Step 6: Check the flow status, it shows succeed means it has completed successfully.


Step 7:- Navigate to SharePoint Site and List to check the tweet detail saved in a list or not.


Facebook post saved successfully in SharePoint List.


Microsoft Flow Save Tweet that include a special hashtag to SharePoint List Part3

In this article, you will learn how to save tweet that includes a  special hashtag to a SharePoint List.


Step1:-
Navigate to Flow Page i.e. https://flow.microsoft.com/ and click My Flows and Create from template


Step2:-
Select Social Media from showing drop down & select the template named “Save tweet that includes a special hashtag to a SharePoint List”


Step3:-
Validate the account or use switch account if required and click continue.


Step4:- Fill template values
  1. Give the hashtag name i.e. (#DemoMicrosoftFlow)
  2. Select SharePoint Site and List name, where tweet is going to store.
  3. Select tweet and name which need to store in the title column.


Give the name of flow and save it or create flow.
Step 5:- Login  to twitter account and tweet using hashtag


Step 6: Check the flow status, it shows succeed means it has completed successfully.


Step 7:- Navigate to SharePoint Site and List to check the tweet detail saved in a list or not.


Twitter tweet saved successfully in SharePoint List.


Microsoft Flow Save my email attached to a SharePoint Document Library -Part2

In this article, you will learn how to save my email attached to a SharePoint Document Library.


Step1:-
Navigate to Flow Page i.e. https://flow.microsoft.com/ and click My Flows and Click Create from template


Step2:-
Select Email from showing drop down & select the template named “Save my email attachment to a SharePoint document library”


Step3:- Validate the account or use switch account if required and click continue.


Step4:- Fill template values
  1. Select the Outlook folder i.e. Inbox, Archive, Sent, Junk, Delete etc. to retrieve the attachments.
  2. Select output from above step
  3. Select the path of SharePoint Document Library to save the attachment.


Step 5:- Send an email with attachment to above-configured account. Login to O365 account email and check inbox email.


Step 6: Check the flow status, it shows succeed means it has completed successfully.


Step 7:- Navigate to SharePoint Site and Shared Document Library.


Email attachment saved in shared document library automatically.

Microsoft Flow: Send customized email when new item added to SharePoint list - Part1


In this article, you will learn how to send customized email, when new item added to SharePoint list.

Step1:- Navigate to O365 SharePoint Site e.g.


Step2:- Navigate to Site Content and create a custom list named “Experience-Flow”.

By default, New Experience is enabled and Flow is enabled for Modern List. If new experience enables, you can switch the using this article:-


Modern List with Flow & Power App Options:-


Step3:- Click a create flow as highlighted above

Right-hand side option will appear. Select and click “Send a customized email when a new 
SharePoint list item added”.


Step 4:- You will be redirected to template page, where you can send the customized email to O365 account.


Step 5:- Verify the O365 account or you can switch to other accounts also and click continue.


Step6:- This template has pre-defined three section
  1. Select the Site & List and associate the flow.
  2. Select the user profile.
  3. Select the email template using pre-defined fields


Step7:- Click edit and select the SharePoint site and list name.


Step8:- Click edit a send an email and modify the template as per requirement.


Email Template can be customized using advanced option:-


Step9:- Give the name and create flow


Step 10:- Create Item in the SharePoint List


Step 11:- Navigate to see your flow


Step 12:- Navigate to Outlook and you will get a mail on new item creation.