Showing posts with label Microsoft Flow. Show all posts

Microsoft Flow Save update from Facebook to SharePoint List Part4

In this article, you will learn how to save update from Facebook a SharePoint List.


Step1:-
Navigate to Flow Page i.e. https://flow.microsoft.com/ and click My Flows and Create from template


Step2:-
Select Social Media from showing drop down & select the template named “Save update from Facebook to a SharePoint List”


Step3:-
Validate the account or use switch account if required and click continue.


Step4:- Fill template values
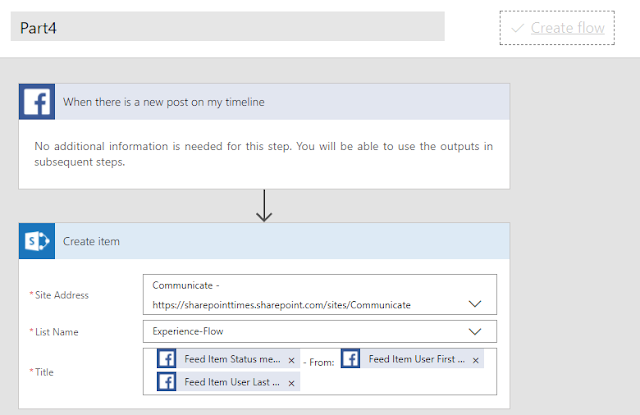
Select SharePoint Site and List name, where the post is going to store.


Give the name of flow (i.e. Part4)  and save it or create flow.

Step 5:- Login to Facebook account and post something on timeline


Step 6: Check the flow status, it shows succeed means it has completed successfully.


Step 7:- Navigate to SharePoint Site and List to check the tweet detail saved in a list or not.


Facebook post saved successfully in SharePoint List.


Microsoft Flow Save Tweet that include a special hashtag to SharePoint List Part3

In this article, you will learn how to save tweet that includes a  special hashtag to a SharePoint List.


Step1:-
Navigate to Flow Page i.e. https://flow.microsoft.com/ and click My Flows and Create from template


Step2:-
Select Social Media from showing drop down & select the template named “Save tweet that includes a special hashtag to a SharePoint List”


Step3:-
Validate the account or use switch account if required and click continue.


Step4:- Fill template values
  1. Give the hashtag name i.e. (#DemoMicrosoftFlow)
  2. Select SharePoint Site and List name, where tweet is going to store.
  3. Select tweet and name which need to store in the title column.


Give the name of flow and save it or create flow.
Step 5:- Login  to twitter account and tweet using hashtag


Step 6: Check the flow status, it shows succeed means it has completed successfully.


Step 7:- Navigate to SharePoint Site and List to check the tweet detail saved in a list or not.


Twitter tweet saved successfully in SharePoint List.


Microsoft Flow Save my email attached to a SharePoint Document Library -Part2

In this article, you will learn how to save my email attached to a SharePoint Document Library.


Step1:-
Navigate to Flow Page i.e. https://flow.microsoft.com/ and click My Flows and Click Create from template


Step2:-
Select Email from showing drop down & select the template named “Save my email attachment to a SharePoint document library”


Step3:- Validate the account or use switch account if required and click continue.


Step4:- Fill template values
  1. Select the Outlook folder i.e. Inbox, Archive, Sent, Junk, Delete etc. to retrieve the attachments.
  2. Select output from above step
  3. Select the path of SharePoint Document Library to save the attachment.


Step 5:- Send an email with attachment to above-configured account. Login to O365 account email and check inbox email.


Step 6: Check the flow status, it shows succeed means it has completed successfully.


Step 7:- Navigate to SharePoint Site and Shared Document Library.


Email attachment saved in shared document library automatically.

Microsoft Flow: Send customized email when new item added to SharePoint list - Part1


In this article, you will learn how to send customized email, when new item added to SharePoint list.

Step1:- Navigate to O365 SharePoint Site e.g.


Step2:- Navigate to Site Content and create a custom list named “Experience-Flow”.

By default, New Experience is enabled and Flow is enabled for Modern List. If new experience enables, you can switch the using this article:-


Modern List with Flow & Power App Options:-


Step3:- Click a create flow as highlighted above

Right-hand side option will appear. Select and click “Send a customized email when a new 
SharePoint list item added”.


Step 4:- You will be redirected to template page, where you can send the customized email to O365 account.


Step 5:- Verify the O365 account or you can switch to other accounts also and click continue.


Step6:- This template has pre-defined three section
  1. Select the Site & List and associate the flow.
  2. Select the user profile.
  3. Select the email template using pre-defined fields


Step7:- Click edit and select the SharePoint site and list name.


Step8:- Click edit a send an email and modify the template as per requirement.


Email Template can be customized using advanced option:-


Step9:- Give the name and create flow


Step 10:- Create Item in the SharePoint List


Step 11:- Navigate to see your flow


Step 12:- Navigate to Outlook and you will get a mail on new item creation.