PowerApps is an enterprise service that lets you connect, create, and share business apps with your team in minutes, using any device. You can create a PowerApps for an existing list in SharePoint Online.
Let’s get started on how we can integrate PowerApps form with SPFx and leverage the PowerApps out of the box capability.

Overview
The SPFx solution calls the PowerApps form using Modal Dialog with IFrame. PowerApps form then saves the data into SharePoint Online List.
- SPFx (SharePoint Framework) control is designed to render the web part at SharePoint Online Modern Framework Page.
- PowerApps is designed to add data into SharePoint Online List without REST API call.
- SharePoint Online List is created to store the data.
PowerApps Form Creation
Step 1 - Navigate to the PowerApps application here.
Log in with your O365 credentials, provided your credentials have been assigned the PowerApps license.
Due to network traffic, sometimes the request navigates to here. In the end, it also provides the same interface and functionality.
Step 2 - Create a Canvas App
There are two types of Apps, i.e., Canvas App or Model Apps. In a nutshell, both seem similar, but they have a very basic difference,
- Canvas AppIt's used to create a simple visual design without complicated coding or programming tools.
- Model AppIt's used to design complex business logic with the ability to generate data model.
Select “+Create” >> Canvas app from blank.

Step 3 - Canvas App Name
Provide the App name and select the format as Tablet. Click "Create" to proceed.

Step 4 - Add Data Source
Once a blank app is created, select View -> Data Source. Type SharePoint to select the connection.
Create an OOTB generic SharePoint List name "Leave Request" with below schema.
S.NO
|
Column Name
|
Data Type
|
1
|
Leave Comment
|
Single Line of Text
|
2
|
StartDate
|
Date
|
3
|
EndDate
|
Date
|

Step 5 - Connect to SharePoint Online Site Collection
Select the desired site collection from the availble list.

Step 6 - Select the List Name

Step 7 - Add Form to Screen
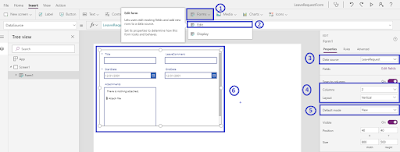


- Select Forms
- Edit Form
- Select the Data Source from the left-hand side; i.e., List Name
- Edit Form will appear on the screen with a 3-column layout with all fields in the default views. Change the column and layout with 2 and vertical respectively.
- Select Mode to New.
- All controls appear on the form with a 2-column layout.
This form is going to create a new request.

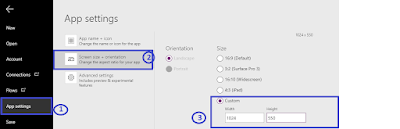
Step 8 - Change the form setting
Click the File menu.
- Select App Settings >> Screen Size and Orientation >>Choose custom width and height.
Click "Apply" to save the changes.

Step 9 - Resize the Form and Control
Increase the width and height of the form.
- Select Title Data card >> set the width in the property as 1024.
- Select Data Card Value >> set the width of the text box in the property as 1000.
Follow the same steps for "Leave comments". Select an attachment and remove it.

Step 10 - Add Form Submit Button
- Add button to form and rename the text “Submit” and select the form
- Choose the form “On Select” from the dropdown
- Change the value to “SubmitForm(Form1)
Once the "Submit" button is clicked, it will save the created form.

Step 11 - Add new screen
Select Home -> New Screen -> Blank. It will add a new blank screen into an app.
New screen used for navigation after successful submission of the form.

Step 12 - Add Success message to screen
- Select newly added screen2 -> Select insert ribbon -> Select Text
- Click HTML Text control.
- Select HTML Text control
- Add HTML Text to control like “Request Submitted successfully”

Step 13 - Navigate form on Success
Once the form gets submitted, it will navigate the form to screen 2 and show the success message.
- Select screen1 Form
- Select On Success from dropdown
- set value “Navigate (Screen2)

Step 14 - Execute the Form
Press F5 to run the form and set all the details and click submit.
SPFX Webpart integerate with Powerapps Form
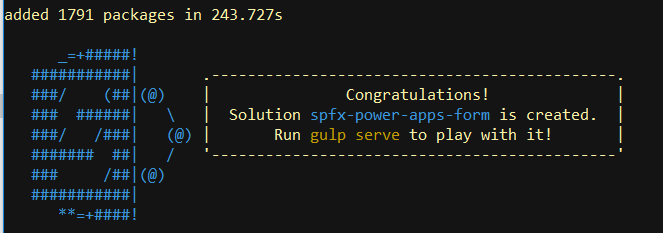
Step 15 - Create and Navigate to SPFx Folder
- yo @microsoft/sharepoint

Step 16 - Describe SPFx solution artifacts
- Provide Solution Name: SPFX_PowerAppsForm
- Provide the Target Solution: SharePoint Online
- Provide Web Parts Name: SPFX_PowerAppsForm
- Provide WebParts Description: SPFX_PowerAppsForm
- Select Framework: React

After a few minutes, the "Congratulations!" screen will appear to notify the successful generation of the package.
Step 17 - Import and Add References
Browse the solution and navigate to filename SpfxpowerappsForm.tsx.
- import { Modal } from 'office-ui-fabric-react/lib/Modal';
- import Iframe from 'react-iframe';
- import { Icon } from 'office-ui-fabric-react/lib/Icon';
- import { css, classNamesFunction, DefaultButton, IButtonProps, IStyle, Label, PrimaryButton } from 'office-ui-fabric-react';
Install "react-iframe" package using the following command.
- npm install --save react-iframe

Step 18 - Add State and Initialize the Contractor
Add State with ShowModalNew variable.
- export interface ISpfxPowerAppsFormState {
- showModalNew: boolean;
- }
- const CloseModal = () => (
- <Icon iconName="ChromeClose" className="ms-IconExample" style={{fontWeight : "bold"}} />
- );
- constructor(props: any) {
- super(props);
- this.state = {
- showModalNew: false,
- };
- }

Step 19 - Add Button to invoke Model Dialog
Add Office-UIiFabric default button and Modal Dailog.
Initilize the Iframe tag inside the Modal Dialog to call the power apps form,
- public render(): React.ReactElement<ISpfxPowerAppsFormProps> {
- return (
- <div>
- <DefaultButton id="requestButton" onClick={this._showModalNew} text="Raise Leave Request"></DefaultButton>
- <Modal
- titleAriaId="titleId"
- subtitleAriaId="subtitleId"
- isOpen={this.state.showModalNew}
- onDismiss={this._closeModalNew}
- isBlocking={false}
- containerClassName="ms-modalExample-container">
- <div >
- <span ><b>Leave Request Form </b> </span>
- <DefaultButton onClick={this._closeModalNew} className={styles.CloseButton} ><CloseModal/></DefaultButton>
- </div>
- <div id="subtitleId" className="ms-modal-body">
- <Iframe url={"https://web.powerapps.com/webplayer/iframeapp?source=iframe&screenColor=rgba(104,101,171,1)&appId=/providers/Microsoft.PowerApps/apps/f33f9511-5001-467f-8238-fddc36665299"}
- width="1024px" height="550px"
- position="relative"
- allowFullScreen>
- </Iframe>
- </div>
- </Modal>
- </div>
- );
- }
To hide the Powerapps ribbon into modal dialog, we need to use below define format in the Iframe URL.
https://web.powerapps.com/webplayer/iframeapp?source=iframe&screenColor=rgba(104,101,171,1)&appId=/providers/Microsoft.PowerApps/apps/<PowerAppsFormID>
Navigate to https://web.powerapps.com
Navigate to designed apps and click the "Detail" section.

Step 20 - Add CSS class to float cross icon to right.
Add CSS to SpfxPowerAppsForm.module.scss at the end.
- .CloseButton
- {
- float: right;
- background-color: #3860b2;
- height: 40px;
- color: antiquewhite;
- &:hover{
- background-color: #3860b2;
- }
- }
Step 21 - Test Solution locally
Navigate to View -> Integrated Terminal
- type gulp serve

Step 22 - Browse the Workbench
Browse the workbench with <<SitecollectionUrl>>/_layouts/15/workbench.aspx
Click the + Icon and add the Web Part since the web part has the only button with Modal Popup.

Step 23 - Raise a leave request
The button will invoke the PowerApps form

Fill the details and click the submit. On click of Submit, it will navigate to a different screen with a success message and add an item to SharePoint Online List.

Finally, the record gets added to the SharePoint List.

How easy and quick it was to build a custom PowerApps form solution, without a single line of code.
Hope you have enjoyed and learned something new in this article. Thanks for reading and stay tuned for the next article.
