Build Low-Code and No-Code Solutions i.e. Home Screen, List View & Navigation With PowerApps

PowerApps is an enterprise service that lets you connect, create, and share business apps with your team in minutes, using any device. You can create  PowerApps for an existing list in SharePoint Online.
Let's get started creating a fully functional PowerApps based standalone application. 

Overview

In this article, I am going to talk about the first three points:
  1. Design Home Page Screen
  2. Navigation among screen
  3. Item List View Screen

Step1 - Log in to PowerApps Portal
  1. Login to https://web.powerapps.com
  2. Select Apps
  3. Select New app and followed by Canvas 

Step 2 - Design Home Screen
  1. Select New Screen and Click to Add
  2. Rename the newly added screen; i.e. Home Screen
  3. Select Label and Click to Add
  4. Add three more label sections as added text as given in image.
  5. Change the text with "Welcome to Admin Screen", font-weight and background color, as per your desired look and feel.
  6. Select Media and opt for image for option, then click to add (three times)
  7. Select any image icon and select image from right hand side properties. Set size and positioning as per your desired look and feel.


Step 3 - Add New Screen and Data Table
  1. Add a ListView Screen, Selecta  New screen and then click to add.
  2. Rename the screen with Flight List View.
  3. Select the Data table and click to add.
  4. The DataTable will be available under the Flight List View Screen
  5. The DataTable blank section will appear in the middle of the screen. 

Step 4 - Connect to a data source i.e. Site URL
  1. Enter SharePoint Online Site URL
  2. Select Connect to get connect with the SPO site. 


I have created a list in a SharePoint Online site with dummy data. Below is the screenshot for reference:


Step 5 - Connect to a data source i.e. List Name
Select List name and data will start appearing immediately into the selected database. 


Step 6 - Set Navigation from Home to List View Screen
  1. Select home screen and image
  2. Select image into the canvas area
  3. Select the property "On Select " from the dropdown.
  4. Add formula to navigate to different screen

    Navigate(FlightListView)  
     5. Once the user clicks the image, it will navigate the user to the List View Screen


Step 6 - Save, Publish and Test 
  1. Save the application, click file -> Save.
  2. Click save button to save the application 
  3. Click on the publish button to publish the application and make it available to your intended audience.
Press F5 or click the published version of the app to run.


  • Power Apps home screen will execute like this.

I hope you have enjoyed and learned something new in this article. Thanks for reading and stay tuned for the next article!

Online webinar recording | Simplify user application authentication using Microsoft Identity Platform


Microsoft identity platform is an evolution of the Azure Active Directory developer platform. It allows developers to build applications that sign in all Microsoft identities. It support to below kind of activity:

Work and school accounts
Personal accounts (such as Outlook.com or Hotmail.com)
Social identity (such as LinkedIn, Facebook, Google) via MSAL and Azure AD B2C

Azure AD v1.0 platform used to authenticate work and school accounts by requesting tokens from the Azure AD v1.0 endpoint.

Microsoft identity platform (v2.0) authenticate any Microsoft identity into your application. It is fully supported open-source Microsoft Authentication Library (MSAL) is recommended for use against the identity platform endpoints. MSAL support single sign-on (SSO) experiences for your users.

Let's explore the difference between Microsoft Authentication Library (v2.0) and Azure Active Directory Authentication Library (V1.0).


S.NO MSAL JS or MSAL .NET ADAL JS or ADAL .NET
1 Known as Microsoft Authentication Library using endpoint V2.0 Known as Azure AD Authentication Library using endpoint V1.0
2 MSAL used to authenticate a broader set of Microsoft Identities
Azure AD identities
Microsoft account, social and local account through Azure B2C)
Azure AD V1.0 used  to authenticate
Azure identities (work and school)
3 Method to renew tokens silently without prompting users is named acquireTokenSilent (more descriptive) Method to renew tokens silently without prompting users is named acquireToken
4 MSAL.js API is designed around user agent client application such as Web Browser ADAL.js uses AuthenticationContext as the representation of an instance of your application's connection 
5 Method to acquire token requests can take different authority values than what is set in the UserAgentApplication  Methods to acquire tokens are associated with a single authority set in the AuthenticationContext
6 Authority Value: V2.0 use https://login.microsoftonline.com/common authority, will allow users to sign in with any Azure AD organization account or a Microsoft personal account (MSA).
To restrict the sign in to only Azure AD accounts use https://login.microsoftonline.com/organizations
Authority Value :  v1.0, use https://login.microsoftonline.com/common authority will allow users to sign in with any Azure AD account (for any organization)


Speaking at SharePoint Saturday at Bangalore

Super Excited, I am going to speak in SharePoint Saturday at Bangalore


Join and Learn SharePoint Framework Updates with Cool Demo of SPFX 1.8.1 & 1.9.1 & V-Next.


Join and Learn from community leader and influence people .

Agenda of the session:-


Block your Date and visit us in Blue/Orange/Green/Yellow colored dress as a dress code ;)

Venue Details:-

Microsoft Office, Bangalore
Microsoft - Prestige Ferns Galaxy, 6/18, Bellandur Gate Road, Bellandur, Bengaluru, KA 560103

Please visit for more details http://www.spsevents.org/city/Bangalore/Bangalore2019

Speaking at Global Microsoft 365 Developer BootCamp at Bangalore

Glad to announce, I am going to speak in Global Microsoft 365 Developer BootCamp at Bangalore

Session:- "Hands On Lab " Building business solutions using SPFx and PowerApps


Join and Learn How to leverage powerapps solution with shar point framework extension.

Session:-  Simplify user authentication using Microsoft Identity Platform


Join and Learn How to build an application using  Microsoft identity with one sign in experience.


Event Agenda:-
https://www.eventbrite.com/e/global-microsoft-365-developer-bootcamp-2019-tickets-65257785794

Leverage Power Apps with SharePoint Framework Extension

PowerApps is an enterprise service that lets you connect, create, and share business apps with your team in minutes and help to build highly tailored application with optimize user experience. You can expedite the business solution with Power Apps as well as SharePoint Online.

Problem Statement

We are creating a solution for audit department. Audit department need to maintain the reports as well as reference document during audit process.

Blueprint approach


Let’s gets start, how we can design and implement such problem statement in optimize way.


Solution Approach

  1. Create Library to store content and List or Library to store all reference documents.
  2. Design SPFx extension solution to deploy at specific library, which will call Modal Dialog with Iframe.
  3. Design Power Apps form calls the same from Modal Dialog with Iframe section.
  4. PowerApps form then saves the data into SharePoint Online List or Library.

Prerequisites


1.      Office 365 subscription

2.      SPFX environment set up
3.     Install visual studio code for code editor - https://code.visualstudio.com/ 
4.     Office 365 Subscription should have access to PowerApps.

Implementation approach

Step1: Create Schema 

  • Login to SharePoint Online Teams or Communication site
  • Create Library with name: Audit Report
  • Create a List with name: Audit Reference
First, Let’s start with power apps form creation

Step 2: Navigate to PowerApps Form

Step 3: Create Canvas App 


Click on ‘Canvas app from blank’.


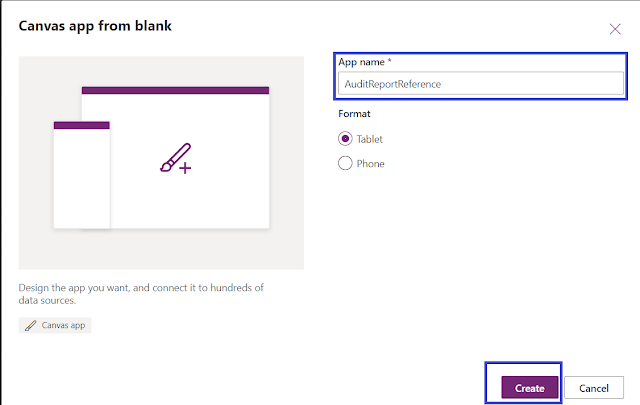
Step 4: Power App Name

  • Select app name as ‘Audit Report Reference’, click ‘Create’.

Step 5: Update the app size.

Go to file from menu bar, then select settings -> click on ‘screen size + orientation’ -> select custom give width as 1024 and height as 550.


Click Apply and back button.

Step 6: Rename the Screen

Rename default Screen1 as ‘EditScreen’. Clicking on 3 dots will give option to rename.


Step7 Insert Form and Rename to Edit Form
Click on ‘insert’ from menu bar. Select ‘Edit’ form.

Rename form1 as ‘EditFrom’

Step 8: Connect to SharePoint Online Data source

 Click on ‘connect to data’.


Search for SharePoint in data source options. And select SharePoint.

Type/paste your site URL, and click ‘connect’.

Select the list ‘Audit Reference’. Click ‘Connect’.

Step 9: Change Form DataSource and Form Mode

Select ‘EditForm’, and select data source as ‘Auditreference’ and default mode as ‘New’ from right pane properties.


Step 10: Populate Fields at Form

Edit form populate with fields.
Select datacardvalue of ‘Title’ field.


Step 11: Modify the default formula of Control

Change the default formula as ‘Param("Input")’

Step 12: Add Button Control and Set Navigation

Select ‘EditScreen’. Click on ‘insert ’ on menu bar. Click on button.


Button will get added to screen, rename the button as ‘Save’, in left side tree view.
Place (Drag and drop) the button below the screen,
Select the button and Change the button text as ‘Save’

Step 13: Add new screen for display message

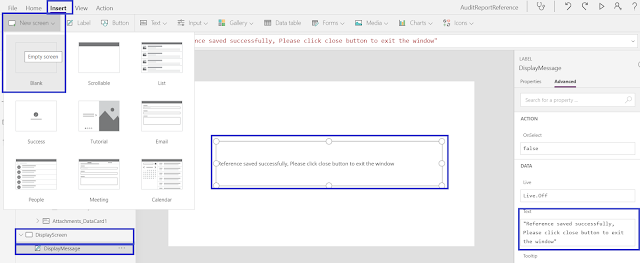
  • Select ‘Insert’ in menu bar. Add new blank screen.
  • Rename that screen as ‘DisplayScreen’ in left side tree view.
  • Select displayScreen and add a label from menu bar insert option.
  • Rename the label as ‘DisplayMessage’.
  • Select label text option and give text as ‘Reference saved successfully, Please click close button to exit the window’
  • Select label. From menu bar select home, change the font size to 24. Alignment as center aligned.
  • Change the text color to blue.
  • Update the label position, size and padding in label properties as shown in below screenshot.

Step 14: Update Navigation

Select EditScreen. Then select ‘Save' button and update ‘OnSelect’ Property to ‘SubmitForm(EditForm);Navigate(DisplayScreen,ScreenTransition.Fade)


Step 15: Save and publish the PowerApps form

Go to ‘File’ from menu bar. Click on Save & Publish

Store the app id , we need to use the same in SPfx Extension.


Let’s Start with SharePoint Extension i.e. List View Command Set

Step 16: Create and SPFX Extention Solution


Navigate to folder structure and type Code  .
Command "yo @microsoft/sharepoint"

Create SPFx Extension Solution with below selected options


Set Command Name and Description

After couple of seconds, you will get below congratulation message. SharePoint Framework extension solution created successfully.

Step 17: Set Extension to specific Library

You can add extension to specific library as per below command  and use RowAccessor to get Row or Item values.


Add Reference “RowAccessor

Step 18: Add Modal Dialog Reference TSX file


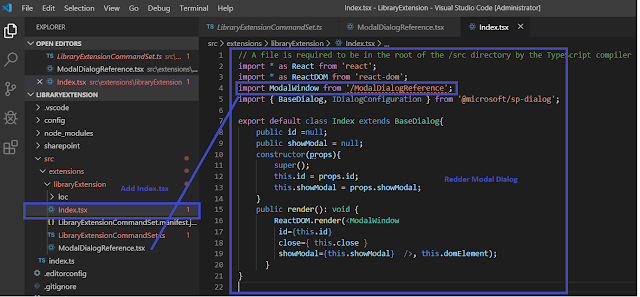
Step 19: Add Index file to call out Modal Dialog Window


Step 20: Remove unused command set


Step 21: Modify the Template and Registration ID to Document Library


Step 22: Build, Bundle and Package the Solution

  • npm install "react-iframe" --save
  • gulp build
  • gulp bundle --ship
  • gulp package-solution –ship


Step 23: Deploy package to app catalog

Login to SharePoint site and redirect to ‘Site Contents’.
Click on ‘Apps for SharePoint’.
Click on ‘Upload’ button


Select .sppkg package from your solution and click on ‘Ok’
Click on ‘Deploy’ in dialog window.
Verify for successful deployment.  Also verify for deployment errors.

Step 25: Add an app to SharePoint site

Redirect to ‘Site Contents’.
Click on ‘New’ then ‘App’.
Add the solution ‘m-365-Bangalore-client-side-solution’.
Verify app is available in SharePoint ‘site contents’


SPFx solution can be dowload from GitHub also  https://github.com/manoj1201/SPFXExtwithPowerapps 

The Output


Finally, How output  look like

1. Select Item at Library and select List View extension


How easy and quick it was to build a custom PowerApps solution with SharePoint Framework Extension.
Hope you have enjoyed and learned something new in this article. Thanks for reading and stay tuned for the next article.

Free Online Event | Simply user application authentication using Microsoft Identity

Microsoft identity platform is an evolution of the Azure Active Directory (Azure AD) developer platform. It allows developers to build applications that sign in all Microsoft identities and get tokens to call Microsoft APIs such as Microsoft Graph or APIs that developers have built


Register and Join  How to build an application using  Microsoft identity with one sign in experience.

https://www.c-sharpcorner.com/events/simply-user-application-authentication-using-microsoft-identity


Agenda:
  • What is Microsoft Identity Platform
  • Build an application using Microsoft Identity and How Simple it is.
  • How Microsoft Identity Works
  • Advance Scenarios i.e. Permission and Consent

Block your Date and Time & Donn't miss to join.


Venue: Free Online Event


Date & Time: 9th November , 6-7 PM.


Speaking at Global Microsoft 365 Developer BootCamp at Mumbai

Glad to announce, I am going to speak in Global Microsoft 365 Developer BootCamp at Mumbai


Join and Learn How to build an application using  Microsoft identity with one sign in experience.


Join and Learn from community leader and influence people .
Agenda of the session:-


Block your Date and Time & Donn't miss to join.