Showing posts with label Search. Show all posts

Interactive Experience With Microsoft Search using PowerApps

 Introduction 

 
Let's understand Microsoft Search and how it works:
  • Microsoft Search is a secure way to search both your intranet and web content.
  • Microsoft Search indexes all your Microsoft 365 data to make it searchable for users. When a user executes a search, Microsoft Search pulls results from data sources in Microsoft 365, including SharePoint Online, OneDrive, Teams, Yammer, and organizational and directory service information.
  • Microsoft Search uses insights from the Microsoft Graph to show results that are recent and relevant to each user.


Microsoft Search BookMarks

 
If your organization uses a promoted results set, you can use Bookmarks to do the same. A bookmark can have several keywords and several bookmarks can share the same keyword, but a reserved keyword can't be shared. When a Bookmark is created or modified, the search index is refreshed immediately, and the bookmark is available to users immediately.
 
Microsoft Search Bookmarks integrated with Power Apps makes the search experience much more interactive.
 
Simply put, users search for a topic or keywords that are defined as keywords with the associated app. On the keyword or topic search, the user can launch the app within Microsoft Search. 


Step1 - How to add/edit a bookmark
  1. Go to the Microsoft 365 admin center.
  2. In the navigation pane, go to Settings.
  3. Select > Microsoft Search. 
  4. Select > Answers. 
  5. Select > Bookmarks.
  6. To add a bookmark, select Add new. To edit a bookmark, select the bookmark in the relevant bookmark list.


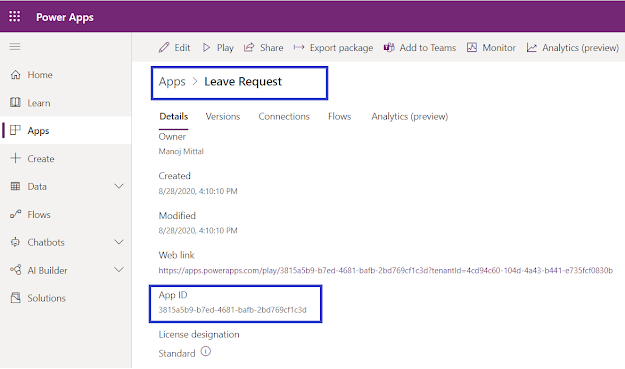
Step 2 - Create a PowerApps application
 
i.e. Leave Request > Save -> Publish. Note down the powerapp ID to configure into Microsoft search.


Note
To get an understanding of Power Apps, visit the previous reference article here.
 
Step 3 - Configure the Bookmarks with Power Apps
  1. Add Title > It will be shown in the bookmark result.
  2. Add Url > It will navigate to a reference document or link.
  3. Bookmark description > Add bookmark description, it will be shown the description of the bookmark.
  4. Keywords > it used to find this page.
  5. Reserved Keywords > It should be unique and the same used to get the result based on unique keywords
  6. Categories > it helps to organize or group the keywords.
  7. Get App ID for the Power App that you want to add from step no.2.
  • Select Power App, and then Add a Power App ID.
  • Height and width are automatically adjusted. Bookmarks can support both portrait and landscape orientations, but currently, the size can't be changed. 
Select Publish or Save to Draft.


Step 4 - Publish the Bookmark
 
Once the bookmark gets published, it will start appearing as below. Bookmark gets indexed quickly and is available for use immediately. Finally, you can define keywords into the search box and a bookmark will appear with an integrated Power App link.


Same Article published here also:- https://www.c-sharpcorner.com/article/interactive-experience-with-microsoft-search/

Summary 

 
I hope you have enjoyed and learned something new in this article. Thanks for reading and stay tuned for the next article.


Next Generation | Document Search Bot using Bot Framework SDK V4

Azure Bot Service provides an integrated environment that is purpose-built for bot development, enabling you to build, connect, test, deploy, and manage intelligent bots.

Overview 

In this article, I am going to discuss how to leverage document search using Azure bot framework SDK V4.
SharePoint Online search engine is quite robust at the enterprise level and allows the developer to define custom managed properties and leverage that into search.
Here I am going to leverage SharePoint online search api to find the document based on keywords.


  1. Azure Bot Framework used to build chatbot interface.
  2. Luis cognitive services used to defined the intent and it will help to define the score and identified keywords.
  3. QnAMaker cognitive service used to define the FAQ based questions and answers
  4. Azure App API used to build search api and return data based on defined keywords.
  5. SharePoint Online is used as content repositorty.
  6. Adaptive Card used to design the card based on api results.  

Let's get started with implementation
Step 1
Lanuch VS2019 and create echo bot project.

Bot Project Structure look like this,
Step 2
Login to Luis.ai and create an app with intent, entity and utterances.
Luis is known as language understanding and used to defined intent; i.e. intention around the phrases, and Entity is used to define multple phrases with custom and build in entities.
In short, Luis has inbuilt machine learning capability and help to understand the intention around phases as well as defined keywords which will help to search documents.
Select and define intent name: "DocumentSearch" 


Select Entities and add some phrase 


Once you finish with Intent and Entities, train and publish the app.


Luis Key and End Point


Step 3
Browse the appsetting.json file in the solution and add Luis and QnA Maker keys and endpoint url:-
  1. {  
  2.   "MicrosoftAppId""",  
  3.   "MicrosoftAppPassword""",  
  4.   "ScmType""",  
  5.   
  6.   "LuisAppId""XXXXXXXX-3b11-4ae7-89fb-9c169d78e0ff",  
  7.   "LuisAPIKey""XXXXXX63f5ed4881a152c055309ac809",  
  8.   "LuisAPIHostName""westus.api.cognitive.microsoft.com/",  
  9.   
  10.   "QnAKnowledgebaseId""XXXXXX7b-e0d4-4b32-b9c3-27634d078778",  
  11.   "QnAAuthKey""XXXXXXX-17a9-4772-aaed-fb2ba3f8775e",  
  12.   "QnAEndpointHostName""https://docsearchqna.azurewebsites.net/qnamaker"  
  13. }  
Step 4
Add Luis recognizer class; i.e. create a connection with Luis based on defined Luis ID, Luis Key and Luis end point.
Create a folder name; i.e. Cognitive Services.
Add new file; i.e. SearchLuisRecognizer.cs and add the below code as-is. 
  1. public class SearchLuisRecognizer : IRecognizer  
  2.    {  
  3.        private readonly LuisRecognizer _recognizer;  
  4.        public SearchLuisRecognizer(IConfiguration configuration)  
  5.        {  
  6.            var luisIsConfigured = !string.IsNullOrEmpty(configuration["LuisAppId"]) && !string.IsNullOrEmpty(configuration["LuisAPIKey"]) && !string.IsNullOrEmpty(configuration["LuisAPIHostName"]);  
  7.            if (luisIsConfigured)  
  8.            {  
  9.                var luisApplication = new LuisApplication(  
  10.                    configuration["LuisAppId"],  
  11.                    configuration["LuisAPIKey"],  
  12.                    "https://" + configuration["LuisAPIHostName"]);  
  13.   
  14.                var recognizerOptions = new LuisRecognizerOptionsV3(luisApplication)  
  15.                {  
  16.                    PredictionOptions = new Microsoft.Bot.Builder.AI.LuisV3.LuisPredictionOptions  
  17.                    {  
  18.                        IncludeInstanceData = true,  
  19.                    }  
  20.                };  
  21.   
  22.                _recognizer = new LuisRecognizer(recognizerOptions);  
  23.            }  
  24.        }  
  25.   
  26.        public virtual bool IsConfigured => _recognizer != null;  
  27.   
  28.        public virtual async Task<RecognizerResult> RecognizeAsync(ITurnContext turnContext, CancellationToken cancellationToken)  
  29.            => await _recognizer.RecognizeAsync(turnContext, cancellationToken);  
  30.   
  31.        public virtual async Task<T> RecognizeAsync<T>(ITurnContext turnContext, CancellationToken cancellationToken)  
  32.            where T : IRecognizerConvert, new()  
  33.            => await _recognizer.RecognizeAsync<T>(turnContext, cancellationToken);  
  34.    }  
Step 5
Add Main Dialog and define water fall model to call Luis and QnA Maker.
MainDialog will recognize the intention in the phrases.
  1. Create folder name i.e. Dialogs
  2. Add new file i.e. MainDialogs.cs  
  1. private readonly SearchLuisRecognizer _luisRecognizer;  
  2.        public QnAMaker SearchBotQnA { get; private set; }  
  3.   
  4.        //string messageText = "What can I help you with today?";  
  5.        // Dependency injection uses this constructor to instantiate MainDialog  
  6.        public MainDialogs(SearchLuisRecognizer luisRecognizer, QnAMakerEndpoint endpoint)  
  7.            : base(nameof(MainDialogs))  
  8.        {  
  9.            _luisRecognizer = luisRecognizer;  
  10.            SearchBotQnA = new QnAMaker(endpoint);  
  11.   
  12.            AddDialog(new TextPrompt(nameof(TextPrompt)));  
  13.            AddDialog(new WaterfallDialog(nameof(WaterfallDialog), new WaterfallStep[]  
  14.            {  
  15.                IntroStepAsync,  
  16.                ActStepAsync,  
  17.                FinalStepAsync,  
  18.            }));  
  19.   
  20.            // The initial child Dialog to run.  
  21.            InitialDialogId = nameof(WaterfallDialog);  
  22.        }  
Main Dialog is used to define the Luis Connection, QnAMaker Connection and Waterfall Dialog Model used for implementing sequencial conversation flow.


1. IntroStepAsync ->  It's used to check Luis connection and move forward. 
  1. private async Task<DialogTurnResult> IntroStepAsync(WaterfallStepContext stepContext, CancellationToken cancellationToken)  
  2.        {  
  3.            if (!_luisRecognizer.IsConfigured)  
  4.            {  
  5.                return await stepContext.NextAsync(null, cancellationToken);  
  6.            }  
  7.   
  8.            return await stepContext.PromptAsync(nameof(TextPrompt), new PromptOptions { }, cancellationToken);  
  9.        }   
2. ActStepAsync -> Used to define the intent against phrase. Based on intention, calls respective method to execute.
  1. private async Task<DialogTurnResult> ActStepAsync(WaterfallStepContext stepContext, CancellationToken cancellationToken)    
  2.         {    
  3.     
  4.             var luisResult = await _luisRecognizer.RecognizeAsync<ContentSearchLuisRecognizer>(stepContext.Context, cancellationToken);    
  5.             APICaller aPICaller = new APICaller();    
  6.             switch (luisResult.TopIntent().intent)    
  7.             {    
  8.                    
  9.     
  10.                 case ContentSearchLuisRecognizer.Intent.DocumentSearch:    
  11.                     string documentName = luisResult.DocumentNameEntities != null ? luisResult.DocumentNameEntities : "";    
  12.                     string documents = aPICaller.GetDocument(documentName);    
  13.                     var docAttachments = DocumentCard.GetDocumentCard(documents);    
  14.                     await stepContext.Context.SendActivityAsync(MessageFactory.Carousel(docAttachments), cancellationToken);    
  15.                     break;    
  16.     
  17.                 default:    
  18.     
  19.                     var results = await SearchBotQnA.GetAnswersAsync(stepContext.Context);    
  20.                     if (results.Length > 0)    
  21.                     {    
  22.                         var answer = results.First().Answer;    
  23.                         await stepContext.Context.SendActivityAsync(MessageFactory.Text(answer), cancellationToken);    
  24.                     }    
  25.                     else    
  26.                     {    
  27.                         string documentNames = aPICaller.GetDocument(stepContext.Context.Activity.Text);    
  28.                         if (!String.IsNullOrEmpty(documentNames) && documentNames != "[]")    
  29.                         {    
  30.                             var documentAttachments = DocumentCard.GetDocumentCard(documentNames);    
  31.                             await stepContext.Context.SendActivityAsync(MessageFactory.Carousel(documentAttachments), cancellationToken);    
  32.                         }    
  33.                         else    
  34.                         {    
  35.                             Activity reply = ((Activity)stepContext.Context.Activity).CreateReply();    
  36.                             reply.Text = $"😢 **Sorry!!! I found nothing** \n\n Please try to rephrase your query.";    
  37.                             await stepContext.Context.SendActivityAsync(reply);    
  38.                         }    
  39.                     }    
  40.                     break;    
  41.             }    
  42.     
  43.             return await stepContext.NextAsync(null, cancellationToken);    
  44.         }   
3. FinalStepAsync ->  Used to initiate the conversation flow again.
  1. private async Task<DialogTurnResult> FinalStepAsync(WaterfallStepContext stepContext, CancellationToken cancellationToken)  
  2. {  
  3.   
  4. return await stepContext.ReplaceDialogAsync(InitialDialogId, null, cancellationToken);  
  5. }  
Step 6 - Call Custom API 
API will return data from SharePoint Online into Json Format. As of now I used anonymous api so it didn't generate access token. It's always a best practice to use user token and access token to make api and connection secure.
  • Create a folder name Services
  • Create a file "APICaller.cs"
  1. public string GetDocument(string qry)  
  2.        {  
  3.            HttpClient httpClient = new HttpClient();  
  4.            var baseUrl = "http://botapi.azurewebsites.net/";  
  5.            var route = "api/document?query=" + qry;  
  6.            httpClient.BaseAddress = new Uri(baseUrl);  
  7.            httpClient.DefaultRequestHeaders.Accept.Clear();  
  8.            httpClient.DefaultRequestHeaders.Accept.Add(  
  9.            new MediaTypeWithQualityHeaderValue("application/json"));  
  10.   
  11.            string responseString = string.Empty;  
  12.            var response = httpClient.GetAsync(route).Result;  
  13.            if (response.IsSuccessStatusCode)  
  14.            {  
  15.                responseString = response.Content.ReadAsStringAsync().Result;  
  16.            }  
  17.            return responseString;  
  18.        }  
Step 7
Define Adaptive; i.e. Document Card, based on api response.
Adaptive; i.e. Document card, will be designed to return api response into card format and the same is going to attach to carousel.
Create Folder Name: Cards

Create file name : DocumentCards.cs 
  1. public static List<Attachment> GetDocumentCard(string dataSet)  
  2.         {  
  3.             var attachments = new List<Attachment>();  
  4.             List<DocumentDto> documentDtos = JsonConvert.DeserializeObject<List<DocumentDto>>(dataSet);  
  5.             foreach (DocumentDto info in documentDtos)  
  6.             {  
  7.                 string summary = HtmlToPlainText(info.Summary);  
  8.                 string documentIcon = GetFileIcon(info.DocumentPath);  
  9.                 //Icon fileIcon=Icon.ExtractAssociatedIcon("<fullPath>");  
  10.   
  11.                 var card = new AdaptiveCard("1.2");  
  12.                 List<AdaptiveElement> AdaptiveElements = new List<AdaptiveElement>  
  13.                 {  
  14.                      new AdaptiveColumnSet()  
  15.                      {  
  16.                         Columns =new List<AdaptiveColumn>()  
  17.                         {  
  18.                             new AdaptiveColumn()  
  19.                                 {  
  20.                                     Width="100px",  
  21.                                     Items = new List<AdaptiveElement>()  
  22.                                     {  
  23.                                           
  24.                                         new AdaptiveImage(documentIcon)  
  25.                                         {  
  26.                                            Id="documentIcon",  
  27.                                            Size = AdaptiveImageSize.Medium,  
  28.                                            Style = AdaptiveImageStyle.Default,  
  29.                                         },  
  30.                                     }  
  31.                                 },  
  32.                             new AdaptiveColumn()  
  33.                             {  
  34.                                     Width=AdaptiveColumnWidth.Stretch,  
  35.                                     Items = new List<AdaptiveElement>()  
  36.                                     {  
  37.                                          new AdaptiveTextBlock()  
  38.                                          {  
  39.                                             Id="title",  
  40.                                             Text = info.Title,  
  41.                                             Size = AdaptiveTextSize.Medium,  
  42.                                             Weight = AdaptiveTextWeight.Bolder,  
  43.                                             HorizontalAlignment =AdaptiveHorizontalAlignment.Left,  
  44.                                          },  
  45.                                          new AdaptiveTextBlock()  
  46.                                          {  
  47.                                            Id="author",  
  48.                                            Text ="✍ " +info.Author,  
  49.                                            Weight = AdaptiveTextWeight.Lighter,  
  50.                                            Size=AdaptiveTextSize.Small,  
  51.                                            Color=AdaptiveTextColor.Dark,  
  52.                                            Wrap=true,  
  53.                                          },  
  54.                                          new AdaptiveTextBlock()  
  55.                                          {  
  56.                                            Id="date",  
  57.                                            Text = "🗓 "+info.CreatedDateTime,  
  58.                                            Weight = AdaptiveTextWeight.Lighter,  
  59.                                            Color=AdaptiveTextColor.Dark,  
  60.                                            Size=AdaptiveTextSize.Small,  
  61.                                            Wrap=true,  
  62.                                          },  
  63.                                     }  
  64.                             }  
  65.                         }  
  66.                      },  
  67.                      new AdaptiveColumnSet()  
  68.                      {  
  69.                             Columns =new List<AdaptiveColumn>()  
  70.                             {  
  71.                                 new AdaptiveColumn()  
  72.                                 {  
  73.                                      
  74.                                     Items = new List<AdaptiveElement>()  
  75.                                     {  
  76.                                         new AdaptiveTextBlock()  
  77.                                         {  
  78.                                            Id="summary",  
  79.                                            Text = summary,  
  80.                                            Weight = AdaptiveTextWeight.Default,  
  81.                                            Size=AdaptiveTextSize.Small,  
  82.                                            Color=AdaptiveTextColor.Dark,  
  83.                                            Wrap=true,  
  84.                                         },  
  85.   
  86.                                     }  
  87.   
  88.                                 }  
  89.                             }  
  90.                      },  
  91.                      new AdaptiveActionSet()  
  92.                      {  
  93.                         Actions = new List<AdaptiveAction>(){  
  94.                            new AdaptiveOpenUrlAction()  
  95.                            {  
  96.                               Id="open_url_action",  
  97.                               Title = "View",  
  98.                               UrlString = info.DocumentPath  
  99.                            }  
  100.                         }  
  101.                      }  
  102.                 };  
  103.                   
  104.                 card.Body = AdaptiveElements;  
  105.                 Attachment attachment = new Attachment()  
  106.                 {  
  107.                     ContentType = AdaptiveCard.ContentType,  
  108.                     Content = card  
  109.                 };  
  110.                 attachments.Add(attachment);  
  111.   
  112.             }  
  113.             return attachments;  
  114.         }  
Step 8
Create search bot file and call MainDialog file
Add new file searchbot.cs into bot folder. It has two main functions.
OnMemberAddedAsync
  1. protected override async Task OnMembersAddedAsync(IList<ChannelAccount> membersAdded, ITurnContext<IConversationUpdateActivity> turnContext, CancellationToken cancellationToken)  
  2.        {  
  3.            foreach (var member in membersAdded ?? Array.Empty<ChannelAccount>())  
  4.            {  
  5.                if (member.Id != turnContext.Activity.Recipient.Id)  
  6.                {  
  7.                    //if (turnContext.Activity.MembersAdded[0].Name == "USER_NAME")  
  8.                    //{  
  9.                    Activity reply = ((Activity)turnContext.Activity).CreateReply();  
  10.                    reply.Text = $" ðŸ˜€ **Hi, I am Virtual Assistant!!** \n\n I am here to assist you.";  
  11.                    await turnContext.SendActivityAsync(reply, cancellationToken);  
  12.                    //}  
  13.                }  
  14.            }  
  15.            await Dialog.RunAsync(turnContext, ConversationState.CreateProperty<DialogState>(nameof(DialogState)), cancellationToken);  
  16.        }  
 OnTeamMemberAddedAsync
  1. protected override async Task OnTeamsMembersAddedAsync(IList<TeamsChannelAccount> membersAdded, TeamInfo teamInfo, ITurnContext<IConversationUpdateActivity> turnContext, CancellationToken cancellationToken)  
  2.        {  
  3.            foreach (var teamMember in membersAdded)  
  4.            {  
  5.                Activity reply = ((Activity)turnContext.Activity).CreateReply();  
  6.                reply.Text = $" ðŸ˜€ **Hi, I am Virtual Assistant!!** \n\n I am here to assist you.";  
  7.                await turnContext.SendActivityAsync(reply, cancellationToken);  
  8.            }  
  9.        }  
Step 9
Call Search Bot.cs file into startup.cs file,
  1. public void ConfigureServices(IServiceCollection services)  
  2.        {  
  3.            services.AddMvc().SetCompatibilityVersion(CompatibilityVersion.Version_2_1);  
  4.   
  5.            // Create the Bot Framework Adapter with error handling enabled.  
  6.            services.AddSingleton<IBotFrameworkHttpAdapter, AdapterWithErrorHandler>();  
  7.   
  8.            // Create the storage we'll be using for User and Conversation state. (Memory is great for testing purposes.)  
  9.            services.AddSingleton<IStorage, MemoryStorage>();  
  10.   
  11.            // Create the User state. (Used in this bot's Dialog implementation.)  
  12.            services.AddSingleton<UserState>();  
  13.   
  14.            // Create the Conversation state. (Used by the Dialog system itself.)  
  15.            services.AddSingleton<ConversationState>();  
  16.   
  17.            services.AddSingleton<SearchLuisRecognizer>();  
  18.   
  19.   
  20.            // the dialog that will be run by the bot.  
  21.            services.AddSingleton<MainDialogs>();  
  22.   
  23.            services.AddSingleton(new QnAMakerEndpoint  
  24.            {  
  25.                KnowledgeBaseId = Configuration.GetValue<string>($"QnAKnowledgebaseId"),  
  26.                EndpointKey = Configuration.GetValue<string>($"QnAAuthKey"),  
  27.                Host = Configuration.GetValue<string>($"QnAEndpointHostName")  
  28.            });  
  29.   
  30.            // Create the bot as a transient. In this case the ASP Controller is expecting an IBot.  
  31.            services.AddTransient<IBot, SearchBot>();  
  32.        }  
Step 10
Test, Build and Run the solution to test into bot emulator
Press F5 to test locally; i.e. using Bot Emulator,


I hope you have enjoyed and learned something new in this article. Thanks for reading and stay tuned for the next article.