Showing posts with label AzureDevOps. Show all posts

Execute PnP PowerShell with Azure DevOps Pipeline

Azure DevOps promotes collaboration between development and operation to faster and more reliable software delivery. 

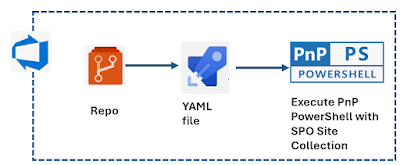
In this article, I am going to demonstrate, How to automate & execute the PnP PowerShell using Azure DevOps Pipeline. Let's get started with the below steps.


Create Azure DevOps Repository

  • Navigate to https://dev.azure.com and log in with your valid credentials.
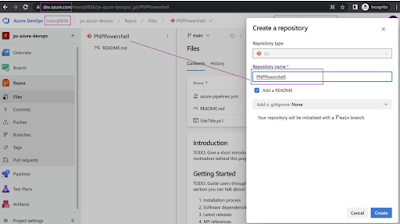
  • Select the Organization & Navigate to Repo to create a new repository. (Note, we can use the existing repository also).
  • Create a repository with the name PNP Powershell and click save.
  • Once it's saved, Created Repository and README.md file will appear as per the below screenshots.
Configure the YAML pipeline 
  • Select the Pipeline from the left-hand side and then select the Azure Repos Git i.e. (free private Git Repositories).


  • Select the respective created repository (as we created earlier with the name PNPPowershell). 


  • The YAML file will get generated with the below sample code.

The YAML file will get generated with the below sample code.


Create & Upload the PnP PowerShell

PnP PowerShell Code snippet to display the Site Title & credentials is parameterized. It is always a best practice to store the credentials as managed identity or user library group, which exists under pipeline sections. 

param (

[Parameter()]

[string]$UserName,

[Parameter()]

[SecureString]$Password

)

# Site URL, It can be parametrize also

$SiteURL= "https://mittal1201.sharepoint.com/sites/commsitehub"

#$SecurePassword = ConvertTo-SecureString -String $Password -AsPlainText -Force

$Cred = New-Object -TypeName System.Management.Automation.PSCredential -argumentlist ($UserName, $Password)

#Connect to PnP Online

Connect-PnPOnline -Url $SiteURL -Credential $Cred

#Get the Root Web

$Web = Get-PnPWeb

#Get the Site Title

Write-host -f Green "Site Title " $Web.Title

If you have mapped the repo with a local machine, then desired IDE can be used, such as Visual Code, to do check-in & check-out. As part of this demo, I directly uploaded this file with the below click.

  • Select vertical dots against the Repo name.
  • Browse the ps1 file and click save.
  • SiteTitle.ps1 file start appearing parallel to the .yml file.


Add Credentials to Pipeline

  • Select the Library section under Pipelines & choose variable groups
  • Give the desired name to the variable group, i.e. credentials
  • Add variable as Key-Value pair
    • username: email id
    • password: **** (lock it)


 Add YML file task 

  • The variable used to get detail from Library defined value at run time.
  • The steps consist of two tasks
    • Install PNP Powershell within the current user context.
    • Execute the PnP Powershell with defined credentials into the variable.

# Starter pipeline # Start with a minimal pipeline that you can customize to build and deploy

 # Add steps that build, run tests, deploy, and more:

# https://aka.ms/yaml trigger: - main pool: vmImage: ubuntu-latest variables: - group: Credentials - name: user_name value: $(username) - name: pass_word value: $(password) steps: - task: PowerShell@2 inputs: targetType: 'inline' script: 'Install-Module -Name PnP.PowerShell -Scope CurrentUser -Force' - task: PowerShell@2 displayName: 'PowerShell Script' inputs: targetType: filePath filePath: ./SiteTitle.ps1 arguments: '-username "$(user_name)"  
-password $(ConvertTo-SecureString "$(pass_word)" -AsPlainText -Force)'


Create and Execute Pipeline 

Select Pipeline and click on Run Pipeline.

Under Run pipeline, choose the branch under which yml file exists. 

Click Run to execute.


Output

Once the Pipeline execution is complete and we extend the script section under the job, and we can see Site Title has been printed.


So this is the secure & automated way to execute the PNP PowerShell using Azure DevOps Pipeline. Hope you have learned something new and refreshing in this article.
 

Handle People Picker Null into SharePoint Online using Power Automate

 Problem Statement

To save people picker value as null or empty is always a tricky situation in SharePoint Online List dynamically. Let's see how it can be achieved when working with Power Automate.

Scenario

Here, we are going to sync the DevOps data i.e. Text, Choice & Identity column, into SharePoint Online List as Text, Choice & People Picker value.

Step 1. Request received when Azure DevOps data saved.

The previous article with the configuration steps of the request received is here.

  1. Request Received
  2. Parse the field into JSON
  3. Initialize the variable as a string
  4. Get User Profile action (Extract email id and pass)


replace(split(body('Parse_JSON')?['Custom.TechnicalInterviewBy'],'<')?[1],'>','')


Step 2. Set variable value as "-1"

If the user email id doesn't exist or came as a null value, Configure Run after "Fail" to set the variable as "-1"  which will be treated as user ID.


Step 3. Check for User Email and Set User ID if it exists

Create Scope and Configure the Run after as "Skipped". It means the user email id exists and gets the user ID of that email address.

The scope has two defined actions.

  • Site Address : https://m365x6151710.sharepoint.com
  • Method        : GET
  • URI                : _api/web/SiteUsers/getByEmail('@{outputs('Get_user_profile_(V2)')?['body/mail']}')

Send an HTTP request to SharePoint to get the user ID.

Set User ID 

@{body('Send_an_HTTP_request_to_SharePoint')?['d']?['id']}


Step 4. Create an Item in SharePoint Online List

Below is the parameter that needs to be configured.

Site Address https://m365x6151710.sharepoint.com

Method    POST

URI           _api/lists/getbytitle('Resource')/items

Header 

{

  "content-type": "application/json;odata=verbose ",

  "Accept": "application/json;odata=verbose"

}

Body

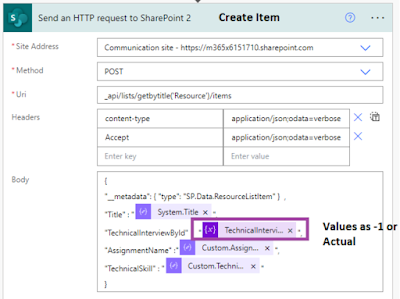
"__metadata": { "type": "SP.Data.ResourceListItem" },

"Title" : "@{body('Parse_JSON')?['System.Title']}",

"TechnicalInterviewById"  :  "@{variables('TechnicalInterviewBy')}",

"AssignmentName" :"@{body('Parse_JSON')?['Custom.AssignmentName']}",

"TechnicalSkill" : "@{body('Parse_JSON')?['Custom.TechnicalSkill']}"

}


Note. variables('TechnicalInterviewBy') always hold "-1" or "Actual user ID". in the case of  "-1", people picker value store as Null else actual user. 


 Let's execute the power automate in both scenarios to get the output.

Output scenario. Azure DevOps Identity column as blank value and sync the same with SPO List People Picker


Output scenario. Azure DevOps Identity column as user value and sync the same with SPO List People Picker


Hope you have learned something useful here

Extract & Sync Work Item Drop Down values with SPO List Choice column

 Azure DevOps board is used to create a task or work item with a pre-defined or custom work item template. It can consist of multiple different types of fields like Text, Multi Text, Drop Down, Identity (People Picker), and Date Time. 

If, as a developer, I need to extract all schema-defined drop-down values and need to sync with another system like the SharePoint Online List choice column.


Let's begin here with the creation of a work item and extraction using power automate.

  • Resource Work Item type has the below layout, and the User can submit the detail as provided.
  • Technical Skill i.e. drop-down field, has multiple values which need to extract.


Power Auotmate Steps

  • Create a Recurrence flow,
  • Add Azure DevOps action i.e. "Send an HTTP request to Azure DevOps".
  • Relative URI: https://dev.azure.com/m365x6151710/Resource/_apis/wit/
    workitemtypes/Resource/fields?$expand=allowedValues&api-version=5.1

    1.           Organization Name m365x6151710
    2.           Project Name Resource
    3.           Work Item Template Name Resource 


  • Add Variable of type Array and name as Technical Skill
  • Add action "Apply to each" with an output of "Send an HTTP request to Azure DevOps" This will return all Azure DevOps work item fields 
  • Add a Condition to restrict the specific column i.e. "Custom.TechnicalSKill". (All Custom created columns should be treated as prefixes with Custom.)
  • Once the Condition is satisfied, select the allowed values and set it back to the variable.

Let's execute the power automate to get the output.


Once the value gets into the defined array variable, set the array variable to the SPO choice field.
Add SharePoint action "Send an HTTP request to SharePoint"


  • Site Address https://m365x6151710.sharepoint.com/
  • Method POST URI
    _api/web/lists/GetByTitle('Resource')/Fields/GetByID('69ca0e44-d80d-4e5b-9038-33fdc2e87c9d')
  • Header

{

  "accept": "application/json;odata=verbose",

  "Content-Type": "application/json;odata=verbose",

  "X-HTTP-Method": "PATCH",

  "IF-MATCH": "*"

}

  • Body
{
    "__metadata": {
        "type": "SP.FieldChoice"
    },
    "Choices": {
        "__metadata": {
            "type": "Collection(Edm.String)"
        },
        "results": @{variables('TechnicalSkill')}
    }


Note:- To get the field ID into the above URI, use this REST api in the browser where "m365x6151710.sharepoint.com" is SharePoint Online Site where the list and column exist.

https://m365x6151710.sharepoint.com/_api/web/lists/getbytitle('Resource')?$select=schemaXml


Let's execute the power automate to get the output


SharePoint Online List Choice fields.


Now, these extracted values are synced with another system like SharePoint Online List, so both systems i.e. Azure DevOps and SharePoint Online List choice values, are in sync without manually updating.

Hope you have learned something useful here.

Trigger PowerAutomate on the Change of Specific Field/Column Value of Azure DevOps

 Azure DevOps also have a premium connector with power automate. It consists of triggers and multiple actions on item add, updates, delete, etc. On update of any item, we usually use the Item update action to capture the details. But the downside of this approach, Power Automate will invoke every time whenever changes happen to a DevOps work item, whether it's required to capture or not. 

It's unnecessary to increase the number of counts, which is limited per user account, and increase the flow history.

Solution Approach

Let's invoke Power Automate to change the "Sync To SharePoint Online" Toggle button only.


This sequence of steps helps to execute the power automate on change of a specific column instead of item work item,

Step 1. Select the Project Setting of the Project.

  1. Select the Service hooks from the Left-hand side pane.
  2. Select "+ Create Subscription," and Pop Up will appear with Title "New Service Hooks Subscription".
  3. Select the WebHooks
  4. Click Next to Proceed

Step 2. Update the Trigger action, Project Name, and Column Name 

  1. Select the Work Item Updated under Trigger on this type of event dropdown.
  2. Select Project Name under Filter sub-section area path.
  3. Select Resource as Work item Type (It can be different as per the defined template name).
  4. Select the field or column name responsible for triggering the Power Automate based on trigger defined action.


Step 3. The next Wizard option ends with the Power Automate Invoke trigger action url.

  1. Navigate to Power Automate and create new top new trigger action as "When an HTTP request is received" and add parse json as a response action next to that.
  2. Take the HTTP POST URL from the Power Automation trigger action and Paste it into the URL under Settings.
  3. Click Finish to proceed and close the wizard.

Once the wizard is added, You can see the WebHook is created under the service hook and ready to execute item updates on specific column values. 


Execution Steps

Let's Change the value into Azure DevOps Work Item and validate the scenario.


Output 

Execution Happened only once, which saved the number of runs & consumption. 


Item also created into SharePoint Online List.


This is the best practice to follow defined standards and effectively utilize product-related services. Hope you have learned something useful here.


SPFX with DevOps using SharePoint ALM & Blob Storage

Implement SPFx (SharePoint Framework) deployment with DevOps using SharePoint ALM Commands & Blob Storage

Azure DevOps (Visual Studio Team Services / Team Foundation Server) consists of a set of tools and services that help developers implement DevOps, Continuous Integration, and Continuous Deployment processes for their development projects.

This article explains the steps involved in setting up your Azure DevOps environment with Continuous Integration and Continuous Deployment to automate your SharePoint Framework builds, unit tests, and deployment.

SharePoint ALM (Application Life Cycle Management) APIs provide simple APIs to manage deployment of your SharePoint Framework solutions and add-ins across your tenant or Site Collection level.

ALM APIs can be used to perform exactly the same operations that are available from a UI perspective

Continuous Integration

Continuous Integration (CI) helps developers integrate code into a shared repository by automatically build  and packaging the solution each time new code changes are submitted.

Setting up Azure DevOps for Continuous Integration with a SharePoint Framework solution requires the following steps:

Office Azure & SharePoint ALM - Build Pipeline

  • Node 10.x
  • Gulp Clean
  • Gulp Build
  • Gulp Bundle --ship
  • Gulp Package-Solution --ship
  • Publish Build Artifacts  (Task Version 1)
    • "Display Name" -> Publish Artifact: CDN
    • "Path to Publish" -> temp/deploy
    • "Artifact Name" -> CDN
    • "Artifact Publish Location" -> Azure Pipeline
  • Publish Build  Artifact
    • "Display Name" -> Publish Artifact: App
    • "Path to Publish" -> sharepoint/solution
    • "Artifact Name" -> App
    • "Artifact Publish Location" -> Azure Pipeline


Continuous Deployment

Continuous Deployment (CD) takes validated code packages from build process and deploys them into a staging or production environment. Developers can track which deployments were successful or not and narrow down issues to specific package versions.

Setting up Azure DevOps for Continuous Deployments with a SharePoint Framework solution requires the following steps:

  • Office Azure & SharePoint ALM - Build Pipeline
  • Azure file copy (Task Version 2)
    • "Display name"-> AzureBlobFileCopy
    • "Source"->  $(System.DefaultWorkingDirectory)/_AzureDevOpsCI/CDN
    • "AzureConnectionType"-> Azure Resource Manager
    • "Azure Subscription"
    • "Destination Type"-> Azure Blob
    • "RM Storage Account"- > 
    • "Container Name"->
  • SharePoint ALM: Catalog Scoped Actions
    • "Display name"->SharePoint ALM: Add Solution Package
    • "Connection to SharePoint" -> commsite01
    • "Action"-> Add Solution  Package
    • "Path to SharePoint Solution Package"-> $(System.DefaultWorkingDirectory)/_AzureDevOpsCI/App/devops-01.sppkg
    • "
    • "PackageId output variable"-> AppPackageId
  • SharePoint ALM: Catalog Scoped Actions
    • "Display name"->SharePoint ALM: Deploy Solution Package
    • "Connection to SharePoint" -> commsite01
    • "Action"-> Deploy Solution Package
    • "Id of the package in the SharePoint App Catalog"  -> $(AppPackageId)


End to End implementation SPFx deployment using Azure DevOps with SharePoint (Application Life Cycle Management) & Blob Storage for Static files.