Showing posts with label PnP. Show all posts

Execute PnP PowerShell with Azure DevOps Pipeline

Azure DevOps promotes collaboration between development and operation to faster and more reliable software delivery. 

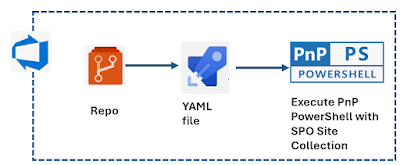
In this article, I am going to demonstrate, How to automate & execute the PnP PowerShell using Azure DevOps Pipeline. Let's get started with the below steps.


Create Azure DevOps Repository

  • Navigate to https://dev.azure.com and log in with your valid credentials.
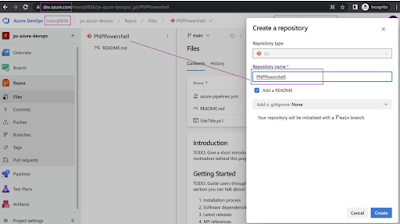
  • Select the Organization & Navigate to Repo to create a new repository. (Note, we can use the existing repository also).
  • Create a repository with the name PNP Powershell and click save.
  • Once it's saved, Created Repository and README.md file will appear as per the below screenshots.
Configure the YAML pipeline 
  • Select the Pipeline from the left-hand side and then select the Azure Repos Git i.e. (free private Git Repositories).


  • Select the respective created repository (as we created earlier with the name PNPPowershell). 


  • The YAML file will get generated with the below sample code.

The YAML file will get generated with the below sample code.


Create & Upload the PnP PowerShell

PnP PowerShell Code snippet to display the Site Title & credentials is parameterized. It is always a best practice to store the credentials as managed identity or user library group, which exists under pipeline sections. 

param (

[Parameter()]

[string]$UserName,

[Parameter()]

[SecureString]$Password

)

# Site URL, It can be parametrize also

$SiteURL= "https://mittal1201.sharepoint.com/sites/commsitehub"

#$SecurePassword = ConvertTo-SecureString -String $Password -AsPlainText -Force

$Cred = New-Object -TypeName System.Management.Automation.PSCredential -argumentlist ($UserName, $Password)

#Connect to PnP Online

Connect-PnPOnline -Url $SiteURL -Credential $Cred

#Get the Root Web

$Web = Get-PnPWeb

#Get the Site Title

Write-host -f Green "Site Title " $Web.Title

If you have mapped the repo with a local machine, then desired IDE can be used, such as Visual Code, to do check-in & check-out. As part of this demo, I directly uploaded this file with the below click.

  • Select vertical dots against the Repo name.
  • Browse the ps1 file and click save.
  • SiteTitle.ps1 file start appearing parallel to the .yml file.


Add Credentials to Pipeline

  • Select the Library section under Pipelines & choose variable groups
  • Give the desired name to the variable group, i.e. credentials
  • Add variable as Key-Value pair
    • username: email id
    • password: **** (lock it)


 Add YML file task 

  • The variable used to get detail from Library defined value at run time.
  • The steps consist of two tasks
    • Install PNP Powershell within the current user context.
    • Execute the PnP Powershell with defined credentials into the variable.

# Starter pipeline # Start with a minimal pipeline that you can customize to build and deploy

 # Add steps that build, run tests, deploy, and more:

# https://aka.ms/yaml trigger: - main pool: vmImage: ubuntu-latest variables: - group: Credentials - name: user_name value: $(username) - name: pass_word value: $(password) steps: - task: PowerShell@2 inputs: targetType: 'inline' script: 'Install-Module -Name PnP.PowerShell -Scope CurrentUser -Force' - task: PowerShell@2 displayName: 'PowerShell Script' inputs: targetType: filePath filePath: ./SiteTitle.ps1 arguments: '-username "$(user_name)"  
-password $(ConvertTo-SecureString "$(pass_word)" -AsPlainText -Force)'


Create and Execute Pipeline 

Select Pipeline and click on Run Pipeline.

Under Run pipeline, choose the branch under which yml file exists. 

Click Run to execute.


Output

Once the Pipeline execution is complete and we extend the script section under the job, and we can see Site Title has been printed.


So this is the secure & automated way to execute the PNP PowerShell using Azure DevOps Pipeline. Hope you have learned something new and refreshing in this article.
 

Publish Duplicate Client Side Page Changes To Original Page Within Same SPO Site Pages Library


Problem Statement

 
This article is a continuation of my previous article, Duplicate the Client Side Pages into same Modern SharePoint Online Library Folder where I explained how to duplicate the client side page with all existing controls.
 
In this article, I would like to explain this: If the user makes any changes to duplicate page, how to publish the duplicate client side pages to the original page into same site pages library within the same site collection.
 
As a developer, we have a couple of options to duplicate the page into another modern site collection library or different folder structure, but there is no way to copy the pages within the same modern site collection sites library within the same folder structure.
 
Prerequisite Steps
 
Let's create a page and add existing below control, or user can add any other available controls. This is just for demo purposes.
  • SharePoint Online PnP PowerShell Overview here
  • Browse the existing pages
Home Page looks like this,


Duplicate Page looks like this with changes,
  • Add new control
  • Modify the pages control layout


Approach Overview

 
Key steps to publish duplicate client side page with changes to original Modern Site Collection Site Pages into Same Library Folder.
  1. Use PnP Online to connect to SharePoint Online Modern Site
  2. Export PnP Client Side Pages Command export pages with PnP Provisioning Template
  3. Store it locally.
  4. Apply PnP Provisioning Template store it with different name. 
  1. try   
  2.    {  
  3.   
  4.          $srcUrl = "https://mittal1201.sharepoint.com/sites/commsitehub"   
  5.          Connect-PnPOnline -Url $srcUrl  
  6.   
  7.          $SourcePageName = "home_duplicate"  
  8.          $TargetPageName = "home"  
  9.       
  10.          $tempFile = 'C:\CsharpCorner\'+ $SourcePageName +'.xml'  
  11.          Export-PnPClientSidePage -Force -Identity $SourcePageName -Out $tempFile  
  12.   
  13.          $con = Get-Content $tempFile  
  14.          $sourcepage=$SourcePageName +".aspx"  
  15.          $targetpage=$TargetPageName +".aspx"  
  16.        
  17.          $con | % { $_.Replace($sourcepage,$targetpage) } | Set-Content $tempFile  
  18.          Apply-PnPProvisioningTemplate -Path  $tempFile  
  19.          write-host -ForegroundColor Magenta "Page reverted with name of  " $targetpage      
  20.        
  21.      
  22. }   
  23. catch {  
  24.     Write-Host - ForegroundColor Red 'Error '':'  
  25.     $Error[0].ToString();  
  26.      
  27. }  


Save and run this script.
 

OutPut Steps

 
Applying template to client side pages
 

Export-PnPClientSidePage Cmdlets applying the PnP Provisioning template and export ".xml" file into shared locaiton. Cmdlets referece can be find here 


Creation of client side pages
 
Apply-PnPProvisioningTemplate cmdlets will create a new page within the same library from download or exported ".xml" file with provided name i.e. pagename _ duplicate
Cmdlets referece can be find here


Final Duplicate Page Outcome
 
Browse the url; i.e., original page. New Client Side Page will be available with all configuration and controls.


I hope you have enjoyed and learned something new in this article. Thanks for reading and stay tuned for the next article.


Duplicate Client Side Pages Into Same Modern SharePoint Online SitePages Lib


Problem Statement 

 
In this article, I would like to explain how to duplicate client side pages which have OOTB webparts and custom SPFx webparts into the same site pages library within the same site collection.
 
As a developer, we have a couple of options to duplicate the page into another modern site collection library or different folder structure, but  there is no way to copy the pages within the same modern site collection site library within the same folder structure.


Prerequisites Steps  
 
Let's create a page and add the exisitng below controls,  or the user can add any other available controls. This is just for demo purposes. 
  • SharePoint Online PnP PowerShell Overview here
  • Add and Configure  Custom SPFx Control
  • Add and Configure  Image Control
  • Add and Configure  News Control


Approach Overview

 
We need to follow the below key steps to perform duplication of Modern Site Collection Site Pages into the Same Library Folder. 
  1. Use PnP Online to connect to SharePoint Online Modern Site
  2. Export PnP Client Side Pages Command  export pages with PnP Provisioning Template
  3. Store it locally.
  4. Apply PnP Provisioning Template store it with different name. 
SharePoint Online PnP PowerShell Script

  1. try   
  2.    {  
  3.       
  4.         $srcUrl = "https://mittal1201.sharepoint.com/sites/commsitehub"   
  5.         Connect-PnPOnline -Url $srcUrl  
  6.         $pageName  = [System.Web.HttpUtility]::UrlDecode("Home")  
  7.         write-host $pageName  
  8.         $tempFile = 'C:\CsharpCorner\'+ $pageName +'.xml'  
  9.         Export-PnPClientSidePage -Force -Identity $pageName -Out $tempFile  
  10.   
  11.         $con = Get-Content $tempFile  
  12.         $sourcepage=$pageName +".aspx"  
  13.         $targetpage=$pageName +"_Duplicate.aspx"  
  14.        
  15.         $con | % { $_.Replace($sourcepage, $targetpage) } | Set-Content $tempFile  
  16.         Apply-PnPProvisioningTemplate -Path  $tempFile  
  17.         write-host -ForegroundColor Magenta "Page Created with name of  " $targetpage    
  18.      
  19. }   
  20. catch {  
  21.     Write-Host - ForegroundColor Red 'Error '':'  
  22.     $Error[0].ToString(); 


Save and run this script.

OutPut Steps 

 
Applying template to client side pages
 
Export-PnPClientSidePage Cmdlets applying the PnP Provisioning template and export ".xml" file into shared locaiton. Cmdlets referece can be found here 


Creation of client side pages 
 
Apply-PnPProvisioningTemplate cmdlets will create a new page within same library from download or exported ".xml" file with provided name i.e. pagename _ duplicate
Cmdlets referece can be found here


 Final Duplicate Page outcome

 
Browse the url with suffix as _duplicate in the url. New Client Side Page will be available with all configuration and controls.


I hope you have enjoyed and learned something new in this article. Thanks for reading and stay tuned for the next article.


Course: Learn PnP Powershell Cmdlets with SharePoint Online

Welcome to PnP Powerhsell Cmdlets series with SharePoint Online using Modular Structure


Introduction


SharePoint Patterns and Practice (PnP) contains a library of PowerShell Cmdlets which allowed to perform operation towards SharePoint. These Cmdlets use CSOM and works for both SharePoint Online and On Premises.


#1. Get Started with PnP Cmdlets with SharePoint Online


#2. Create or Delete Subsite using PnP Cmdlets with SharePoint Online


#3. Create or Delete Site Column using PnP Cmdlets with SharePoint Online


#4. Create or Delete Content Type using PnP Cmdlets with SharePoint Online


#5. Associate Site Column with Content Type using PnP Cmdlets with SharePoint Online

#6. Create or Delete a List using PnP Cmdlets with SharePoint Online


#7. Add Content  Type to List using PnP Cmdlets with SharePoint Online


#8. Add View to List using PnP Cmdlets with SharePoint Online

Github Link for all sample code here:- https://github.com/manoj1201/PnPUsingSPO

Happy Coding.

#8. PnP Powershell cmdlets with SharePoint Online

Introduction


In this article you will learn via demo application, 

1. Get List using PnP Powershell Modular approach.
2. Get Content Type using PnP Powershell Modular approach.
3. Get Fields using PnP Powershell Modular approach.
4. Get List Views using PnP Powershell Modular approach.
5. Create and Use a Bat and CSV file as input.

GitHub Link - https://github.com/manoj1201/PnPUsingSPO/tree/master/AddViewToList/AddFieldsToView


SharePoint Patterns and Practice (PnP) contains a library of PowerShell Cmdlets which allowed to perform operation towards SharePoint. These Cmdlets use CSOM and works for both SharePoint Online and On Premises.


#7. PnP Powershell cmdlets with SharePoint Online

Introduction


In this article you will learn via demo application, 

1. Get List using PnP Powershell Modular approach.
2. Get Content Type using PnP Powershell Modular approach.
3. Associate Content Type with List using PnP Powershell Modular approach.
4. Remove Content Type from List using PnP Powershell Modular apporach5. Create and Use a Bat and CSV file as input.

GitHub Link :- https://github.com/manoj1201/PnPUsingSPO/tree/master/ContentTypeToList

SharePoint Patterns and Practice (PnP) contains a library of PowerShell Cmdlets which allowed to perform operation towards SharePoint. These Cmdlets use CSOM and works for both SharePoint Online and On Premises.