Strategy Design Pattern Using .Net (C#)

In this article, we will understand what Strategy Pattern is and when we actually need to use it, along with a practical example and real-life use case.

This pattern falls under the category of behavioral pattern and as the name suggests, it allows clients to choose an algorithm from a set of algorithms at run time.
Strategy pattern defines a family of algorithms, encapsulates each one of them and makes them interchangeable at run time within that family.
Now let's understand what each one of them actually means.


Family of Algorithms
This means this pattern provides a set of algorithms using one of which at run time you can achieve the desired output.

Encapsulate each one of the
This pattern allows you to place your algorithms in different classes (encapsulate them).

Makes the algorithm interchangeable
The beauty with strategy pattern is that we can select at run time which algorithm we want to apply to our object and can also replace them with one another.

These are the three main points of Strategy pattern. I hope we are clear with the above- discussed points. So, let's understand one real -world scenario where it can be really helpful to use.

Example

Suppose you want to order food online and apply one of the available coup. In this case you can implement the Strategy Pattern.

As per our example, IApplyCoupon is the interface which looks something like,​

  • 1.  public interface IApplyCoupon    
  • 2.     {    
  • 3.         string applycoupon(string couponType);    
  • 4.     }   


We have 2 Concrete coupon classes which implement IApplyCoupon interface and these classes can have their own logic to calculate the time.
  1. 1.  public class FamilyHours :IApplyCoupon    
  2. 2.     {    
  3. 3.         public string applycoupon(string couponType)    
  4. 4.         {    
  5. 5.             return "You applied family hours coupon";    
  6. 6.         }    
  7. 7.     }    


  1. 1.  public class FestivalOffer :IApplyCoupon    
  2. 2.   {    
  3. 3.       public string applycoupon(string couponType)    
  4. 4.       {    
  5. 5.           return "You applied festival offer coupon";    
  6. 6.       }    
  7. 7.   }   


Lastly, we have one Context class called TravelStrategy using which a client can select any strategy at run-time.

  1. 1.  public class Coupon    
  2. 2.     {    
  3. 3.             private IApplyCoupon _applycoupon;    
  4. 4.             public Coupon(IApplyCoupon applycoupon)    
  5. 5.             {    
  6. 6.                 _applycoupon = applycoupon;    
  7. 7.             }    
  8. 8.             public void applycoupon(string couponType)    
  9. 9.             {    
  10. 10.                var result = _applycoupon.applycoupon(couponType);    
  11. 11.                Console.WriteLine(result);    
  12. 12.            }    
  13. 13.            
  14. 14.    }    

Our main program looks like:

  1. 1.  class Program    
  2. 2.     {    
  3. 3.         static void Main(string[] args)    
  4. 4.         {    
  5. 5.             Console.WriteLine("Hello!, Please select the coupon for Dinining \n1.FamilyHours \n2.FestivalHours");    
  6. 6.             var userStrategy = Console.ReadLine().ToLower();    
  7. 7.             Console.WriteLine("\nUser has selected " + userStrategy + " as dining coupon\n");    
  8. 8.             switch (userStrategy)    
  9. 9.             {    
  10. 10.                case "FamilyHours":    
  11. 11.                    new Coupon(new FamilyHours()).applycoupon("FamilyHours");    
  12. 12.                    break;    
  13. 13.                case "FestivalHours":    
  14. 14.                    new Coupon(new FestivalOffer()).applycoupon("FestivalHours");    
  15. 15.                    break;    
  16. 16.                default:    
  17. 17.                    Console.WriteLine("You didn't select any coupon");    
  18. 18.                    break;    
  19. 19.            }    
  20. 20.            Console.ReadLine();    
  21. 21.        }    
  22. 22.    }    

OUTPUT

When user selects family hours as the preferred dining coupon


Answer


 2. When user selects festival hours as the preferred dining coupon


Output


Hope you have learned something new in this article, Stay tune for next one.

How to Add List View command Set To both List And Document Library using SPFX Extension

SharePoint Framework extensions extend the user experience toward the SharePoint Online Modern Framework List and Library to render custom components.
There are three types of SharePoint framework extensions:
  1. Application level customizer – basically used to render custom component to defined placeholder example Top Navigation, Footer, etc.
  2. Fields level customizer – basically used to render the field level modification within views.
  3. List View Command Set – basically used to render a new action at the list view level. 
In this article, we are going to discuss how to enable List view command set to Generic List and Document library level.
Let’s get started.
Step 1 - Generate SharePoint Framework Extension
Open the command prompt and create a blank folder


  1. md Extension  
Step 2

Navigate to the created directory.


Step 3
Run the  yeoman command,
  1. yo@microsoft/sharepoint   


  • Enter the name of Solution: Metadata
  • Select “SharePoint Online” baseline package you want to target for your component(s).
  • Select “Use the current folder” place the files.
  • Select “Extensions” to the type of client-side component.
  • Select “ListView Command Set” as a type of client-side extension
  • Enter command Set name: Metadata

Yeomen will take a couple of minutes to install required dependencies and scaffolding the SPFX project. Finally, you will get the below “congratulations “ message.


Step 4
Navigate to Visual Studio Code to open the solution.
  1. Type Code .  
It will open the project into an open source IDE, i.e., Visual Studio Code (condition - Visual Studio Code needs to be installed). Navigate to SharePoint Folder Structure -> assets -> element.xml.
Custom Action tag has Registration Id of 100 which means it's associated with Generic List. We need to change the Registration Id from 100 to 101 which means it will associate the SPFX extension component to Generic Library.


NoteIf you want to use the same custom SPFX extension to both list and library, copy and paste the same custom action and section one RegistrationId assign to 101. 


Step 5
Open Integrated Terminal to build sppkg package using gulp command,


Step 6 - Run Gulp Build

It will build a solution and create two new folders - Lib and Temp


Step 7 - Run Gulp Bundle –ship

It will bundle all JS and CSS files and make it ready to bundle files in CDN. It creates a dist folder.


Step 8 Package Deployment at Site Collection Level
The package can be deployed at Tenant Level App Catalog or Site collection level App Catalog. It really depends on the project scenario and governance policies to the usage of the designed app which is the preferred option. Let's proceed with site collection level app catalog.
Navigate to Modern site collection.
Go to Site Content -> App for SharePoint -> Upload the .SPPKG file.


Click to deploy the solution.

Step 9 

Navigate to Site Content.
Click New -> Add APP.

Step 10
Add Apps to Site Collection Level.


NoteWait for a couple of seconds to activate the solution.
Step 11
Browse any generic template created  list and select item, you will find Command One and Command Two at the top of list view. Click on the command One text, it will prompt a custom message given in SPFX Extension solution.

Step 12
Browse any generic template created Library and select item, you will find Command One and Command Two at the top of list view. Click on the command One text, it will prompt a custom message given in SPFX Extension solution.


Hope you have learned something new in this article. Stay tuned for more related articles to get more insights and learning.

How To Enable Digital Signature In Digital Signed PDF Using Column Formatting

This article will walk you through one of the problems faced during the creation of a PDF and will provide a workaround solution.
 

Problem Statement

 
A business user uses a digital signature over a PDF file and stores into a SharePoint Online document library to maintain the document repository. When the user clicks the name of the document within the document library, it shows the signature space as empty.


Approach

 
When the user downloads the file locally from the document library and opens in the browser, it shows a digital signature.


To make it work the same in a document library, we need to follow the below steps to apply column formatting.
  1. Browse the document library.
  2. Select the name column.
  3. Select "Column Settings".
  4. Select "Format this column".
NoteA user needs a minimum to contribute access to do this operation. 
 
Column formatting needs to be applied with the column "name".

  1. {  
  2.    "$schema""https://developer.microsoft.com/json-schemas/sp/column-formatting.schema.json",  
  3.    "elmType""a",  
  4.    "txtContent""@currentField",  
  5.   
  6.    "attributes": {  
  7.       "target""_blank",  
  8.       "href""='https://mittal1201.sharepoint.com/sites/CommSite01/DigitalSignedPDF/' + [$FileLeafRef]+'?web=1'"  
  9.    }  


After applying and refreshing the browser, again, click on the name of the digitally signed PDF. The browser shows a digital signature.


Hope you learned something new in this article.

Synchronize SharePoint Online Security Group Users To Lists Using MS Flow

Microsoft Flow is a SaaS-based platform that allows power users to send an email to a group of users. MS Flow doesn't support sending a direct email to SPO Group. Let's have a look at the scenario and solution to get started.


Scenario
If we need to send an email to SP Groups using MS Flow, it doesn’t support sending emails to SPO Groups. To make it work, a developer needs to store all the users as list items because an SPO List item can be used as “To” to send an email.
Start with the solution
Create a list with key & value pair as string type. Add Key as Group Name and MS Flow will add the users as the values against the defined key.
MS Flow at a glance
MS Flow is a scheduling activity that can be defined periodically as per the requirement, i.e., hourly, daily, weekly, monthly etc.

Let's start step by step.
Step 1
Recurrence is added as a trigger point to this flow. It can be defined as per the requirement and it works like a scheduled job.


Step 2
Initialize a variable, it will be used to store all email addresses with defined delimiter separator.


Variable name SPOGroupMembers of string type.
Step 3
Get Item from the list named GroupUsers. This list has two columns, consisting of a “Single Line Of Text”.


Step 4
Apply for each loop. The list can have multiple keys.
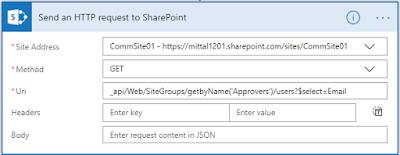
Add an action “Send an HTTP request to SharePoint”. Three properties are important for this action.
  1. Site Address - It should be the URL of the site collection.
  2. Method - Get request.
  3. URL - “_api/Web/SiteGroups/getbyName(“Column Name”)/users?$select=Email

Step 5
Add the action Parse JSON. It expects the payload from the above request. To get the payload or JSON, the response can be obtained from the below article.
Take out the payload from the HTTP request and paste it into the Schema section.

Step 6
Get the result after parsing the JSON. Loop through the result and store it into the above-created variable, i.e., SPOGroupMemebers with “;” as delimiter.


Step 7
Update the SPO List Item with SPOGroupMemebers Variable.


Output
SPO Group has two users -
SPList after running the flow will look like below.
Hope you will like it and Happy Coding.

How To Get Payload Request Data Using Microsoft Flow

To get the payload data from SharePoint Online, a developer needs to use either Postman or Custom Scripts. Usually, it’s a part of the solution or API. However, in some scenarios, developers need to use a payload outside the custom solution. Then, it’s not feasible to write a custom code or use Postman using the Client ID and Client Secret to get the payload or JSON response.
MS Flow is one of the easiest and quickest alternatives to get the JSON response from a SharePoint Online request. JSON response, i.e., the payload, can be used to identify the structure format, which helps to parse the data accordingly.
We can create a 3-step (trigger + action) flow that allows us to send an email quite securely (no need to handle the password separately).

Let’s explore how MS Flow is the quickest and easiest turnaround.
Step 1
Log in here with authorized credentials.
Step 2
Select My Flows -> New -> Create from blank.


Step 3
To start with the flow, we need to set the trigger point. So, I used recurrence as the trigger point to demonstrate.


Frequency can be set as per the requirement; I set it to 1 minute for demo purposes.
Step 4
Generate the payload for HTTP Request, i.e., Group Details - Group Name, “Approver” with the email selection.


Step 5
Send an email with the payload body.


Step 6
Save and wait for a minute. Also, you can trigger it manually.
Check your email account. You must have received a JSON payload with the data on the defined email address.

Example
  1. {  
  2.     "d": {  
  3.         "results": [{  
  4.             "__metadata": {  
  5.                 "id""https://mittal1201.sharepoint.com/sites/CommSite01/_api/Web/GetUserById(16)",  
  6.                 "uri""https://mittal1201.sharepoint.com/sites/CommSite01/_api/Web/GetUserById(16)",  
  7.                 "type""SP.User"  
  8.             },  
  9.             "Email""demo@mittal1201.onmicrosoft.com"  
  10.         }, {  
  11.             "__metadata": {  
  12.                 "id""https://mittal1201.sharepoint.com/sites/CommSite01/_api/Web/GetUserById(6)",  
  13.                 "uri""https://mittal1201.sharepoint.com/sites/CommSite01/_api/Web/GetUserById(6)",  
  14.                 "type""SP.User"  
  15.             },  
  16.             "Email""manoj@mittal1201.onmicrosoft.com"  
  17.         }]  
  18.     }  
  19. }  

To verify the result, I have SP Group with two users. I have got the same in the above email.


That's it. I hope this article is helpful to you. Happy Coding!!!

Online Free Webinar | How to use Elevation with SharePoint Framework using Custom Web API

Speaking | How to use Elevation with SharePoint Framework using Custom Web API

Online Free Webinar: How to use Elevation with SharePoint Framework using Custom Web API