Handle People Picker Null into SharePoint Online using Power Automate

 Problem Statement

To save people picker value as null or empty is always a tricky situation in SharePoint Online List dynamically. Let's see how it can be achieved when working with Power Automate.

Scenario

Here, we are going to sync the DevOps data i.e. Text, Choice & Identity column, into SharePoint Online List as Text, Choice & People Picker value.

Step 1. Request received when Azure DevOps data saved.

The previous article with the configuration steps of the request received is here.

  1. Request Received
  2. Parse the field into JSON
  3. Initialize the variable as a string
  4. Get User Profile action (Extract email id and pass)


replace(split(body('Parse_JSON')?['Custom.TechnicalInterviewBy'],'<')?[1],'>','')


Step 2. Set variable value as "-1"

If the user email id doesn't exist or came as a null value, Configure Run after "Fail" to set the variable as "-1"  which will be treated as user ID.


Step 3. Check for User Email and Set User ID if it exists

Create Scope and Configure the Run after as "Skipped". It means the user email id exists and gets the user ID of that email address.

The scope has two defined actions.

  • Site Address : https://m365x6151710.sharepoint.com
  • Method        : GET
  • URI                : _api/web/SiteUsers/getByEmail('@{outputs('Get_user_profile_(V2)')?['body/mail']}')

Send an HTTP request to SharePoint to get the user ID.

Set User ID 

@{body('Send_an_HTTP_request_to_SharePoint')?['d']?['id']}


Step 4. Create an Item in SharePoint Online List

Below is the parameter that needs to be configured.

Site Address https://m365x6151710.sharepoint.com

Method    POST

URI           _api/lists/getbytitle('Resource')/items

Header 

{

  "content-type": "application/json;odata=verbose ",

  "Accept": "application/json;odata=verbose"

}

Body

"__metadata": { "type": "SP.Data.ResourceListItem" },

"Title" : "@{body('Parse_JSON')?['System.Title']}",

"TechnicalInterviewById"  :  "@{variables('TechnicalInterviewBy')}",

"AssignmentName" :"@{body('Parse_JSON')?['Custom.AssignmentName']}",

"TechnicalSkill" : "@{body('Parse_JSON')?['Custom.TechnicalSkill']}"

}


Note. variables('TechnicalInterviewBy') always hold "-1" or "Actual user ID". in the case of  "-1", people picker value store as Null else actual user. 


 Let's execute the power automate in both scenarios to get the output.

Output scenario. Azure DevOps Identity column as blank value and sync the same with SPO List People Picker


Output scenario. Azure DevOps Identity column as user value and sync the same with SPO List People Picker


Hope you have learned something useful here

Extract & Sync Work Item Drop Down values with SPO List Choice column

 Azure DevOps board is used to create a task or work item with a pre-defined or custom work item template. It can consist of multiple different types of fields like Text, Multi Text, Drop Down, Identity (People Picker), and Date Time. 

If, as a developer, I need to extract all schema-defined drop-down values and need to sync with another system like the SharePoint Online List choice column.


Let's begin here with the creation of a work item and extraction using power automate.

  • Resource Work Item type has the below layout, and the User can submit the detail as provided.
  • Technical Skill i.e. drop-down field, has multiple values which need to extract.


Power Auotmate Steps

  • Create a Recurrence flow,
  • Add Azure DevOps action i.e. "Send an HTTP request to Azure DevOps".
  • Relative URI: https://dev.azure.com/m365x6151710/Resource/_apis/wit/
    workitemtypes/Resource/fields?$expand=allowedValues&api-version=5.1

    1.           Organization Name m365x6151710
    2.           Project Name Resource
    3.           Work Item Template Name Resource 


  • Add Variable of type Array and name as Technical Skill
  • Add action "Apply to each" with an output of "Send an HTTP request to Azure DevOps" This will return all Azure DevOps work item fields 
  • Add a Condition to restrict the specific column i.e. "Custom.TechnicalSKill". (All Custom created columns should be treated as prefixes with Custom.)
  • Once the Condition is satisfied, select the allowed values and set it back to the variable.

Let's execute the power automate to get the output.


Once the value gets into the defined array variable, set the array variable to the SPO choice field.
Add SharePoint action "Send an HTTP request to SharePoint"


  • Site Address https://m365x6151710.sharepoint.com/
  • Method POST URI
    _api/web/lists/GetByTitle('Resource')/Fields/GetByID('69ca0e44-d80d-4e5b-9038-33fdc2e87c9d')
  • Header

{

  "accept": "application/json;odata=verbose",

  "Content-Type": "application/json;odata=verbose",

  "X-HTTP-Method": "PATCH",

  "IF-MATCH": "*"

}

  • Body
{
    "__metadata": {
        "type": "SP.FieldChoice"
    },
    "Choices": {
        "__metadata": {
            "type": "Collection(Edm.String)"
        },
        "results": @{variables('TechnicalSkill')}
    }


Note:- To get the field ID into the above URI, use this REST api in the browser where "m365x6151710.sharepoint.com" is SharePoint Online Site where the list and column exist.

https://m365x6151710.sharepoint.com/_api/web/lists/getbytitle('Resource')?$select=schemaXml


Let's execute the power automate to get the output


SharePoint Online List Choice fields.


Now, these extracted values are synced with another system like SharePoint Online List, so both systems i.e. Azure DevOps and SharePoint Online List choice values, are in sync without manually updating.

Hope you have learned something useful here.

Trigger PowerAutomate on the Change of Specific Field/Column Value of Azure DevOps

 Azure DevOps also have a premium connector with power automate. It consists of triggers and multiple actions on item add, updates, delete, etc. On update of any item, we usually use the Item update action to capture the details. But the downside of this approach, Power Automate will invoke every time whenever changes happen to a DevOps work item, whether it's required to capture or not. 

It's unnecessary to increase the number of counts, which is limited per user account, and increase the flow history.

Solution Approach

Let's invoke Power Automate to change the "Sync To SharePoint Online" Toggle button only.


This sequence of steps helps to execute the power automate on change of a specific column instead of item work item,

Step 1. Select the Project Setting of the Project.

  1. Select the Service hooks from the Left-hand side pane.
  2. Select "+ Create Subscription," and Pop Up will appear with Title "New Service Hooks Subscription".
  3. Select the WebHooks
  4. Click Next to Proceed

Step 2. Update the Trigger action, Project Name, and Column Name 

  1. Select the Work Item Updated under Trigger on this type of event dropdown.
  2. Select Project Name under Filter sub-section area path.
  3. Select Resource as Work item Type (It can be different as per the defined template name).
  4. Select the field or column name responsible for triggering the Power Automate based on trigger defined action.


Step 3. The next Wizard option ends with the Power Automate Invoke trigger action url.

  1. Navigate to Power Automate and create new top new trigger action as "When an HTTP request is received" and add parse json as a response action next to that.
  2. Take the HTTP POST URL from the Power Automation trigger action and Paste it into the URL under Settings.
  3. Click Finish to proceed and close the wizard.

Once the wizard is added, You can see the WebHook is created under the service hook and ready to execute item updates on specific column values. 


Execution Steps

Let's Change the value into Azure DevOps Work Item and validate the scenario.


Output 

Execution Happened only once, which saved the number of runs & consumption. 


Item also created into SharePoint Online List.


This is the best practice to follow defined standards and effectively utilize product-related services. Hope you have learned something useful here.


Customize SharePoint Online Site Template

 SharePoint Online Site Design (renamed as Site Template) and site scripts used to automate modern SharePoint sites provisioning with your own custom or pre-defined set of actions and configurations.


Site Template can be applied (Navigate to Site Collection -> Settings -> Apply a Site Template),


Once the user clicks to "Apply a Site Template", select a template that shows two options,

1. From Microsoft -> It shows the template from the lookbook (https://lookbook.microsoft.com/). Site Template appears differently as per Communication Site or Modern Teams Site Collection.

2. From your organization -> It shows all custom-designed Site Template.


Let's get started with customize Site Template,

Scenario

In an organization, when people want to apply department or business unit specific defined "Site Template" to newly created or existing Modern Site Collection, it assists to maintain the consistency across the site collection with respect to theme, schema, master data, association with hub sites as well as security. It's quite useful, you need to push the Site Collection level changes as Site Template to existing Site Collection with never version of Site Scripts & Site Template (which consists of a pre-defined set of activities and configurations).

For example, IT Department people create a new Site Collection for each and every project, Once it is created with OOTB templates like Communication or Teams Site Template, Customize designed Site Template can be applied to maintain consistency with the look and feel, schema, permission, etc. In the future, if you want to release new changes to the Site Template, the user can release a new version of the Site Template associated with scripts and make it available. It can be easily available to the site owners to apply or update the existing sites.


SharePoint online site Template is used to apply configurations or actions to existing modern sites, like,

  • Create additional list
  • Apply a theme
  • Join a hub site etc.

There are almost 300 actions or 100,000 characters that can be bumped into site scripts. A site design can be associate with one or more associated site scripts. Site Scripts are JSON files that contain the ordered list of actions that will apply the custom configurations (ex. creating a list, joining a hub site, etc.) onto the new or existing created site.

Generate Site Scripts

Site Scripts is a collection of actions and sub-actions such as creating a list, site column, content type, theme. Each action is specified as "Verb". Verb actions run in the order they specified or appear in JSON script. Check out the JSON Schema for all actions available.

Site Script sample can be downloaded from Github to re-use into your own scripts.

Below scripts have reference to create Site Column, Site Content-Type, SP List, Data Column Formation, and add navigation.

{
    "$schema": "https://developer.microsoft.com/json-schemas/sp/site-design-script-actions.schema.json",
    "actions": [

{
    "verb": "createSiteColumnXml",
    "schemaXml": "<Field Type=\"Choice\" DisplayName=\"Project Status\" Required=\"FALSE\" Format=\"Dropdown\" StaticName=\"ProjectStatus\" Name=\"ProjectStatus\"><Default>In Progress</Default><CHOICES><CHOICE>In Progress</CHOICE><CHOICE>In Review</CHOICE><CHOICE>Done</CHOICE><CHOICE>Has Issues</CHOICE></CHOICES></Field>"
},
{
    "verb": "createSiteColumnXml",
    "schemaXml": "<Field Type=\"Choice\" DisplayName=\"Project Category\" Required=\"FALSE\" Format=\"Dropdown\" StaticName=\"ProjectCategory\" Name=\"ProjectCategory\"><Default>Operations</Default><CHOICES><CHOICE>Operations</CHOICE><CHOICE>IT</CHOICE><CHOICE>Legal</CHOICE><CHOICE>Engineering</CHOICE><CHOICE>HR</CHOICE><CHOICE>Services</CHOICE><CHOICE>Consulting</CHOICE></CHOICES></Field>"
},
{
  "verb": "createContentType",
  "name": "ContosoProjects",
  "id": "0x0100B609FEFDEFAA484299C6DE254182E666",
  "description": "custom list content type",
  "parentId": "0x01",
  "hidden": false,
  "subactions": [
    {
      "verb": "addSiteColumn",
      "internalName": "ProjectStatus"
    },
    {
      "verb": "addSiteColumn",
      "internalName": "ProjectCategory"
    }
  ]
},
{
  "verb": "createSPList",
  "listName": "Project Tracker",
  "templateType": 100,
  "subactions": [
    {
      "verb": "addContentType",
      "name": "ContosoProjects"
    },
    {
      "verb": "addSPFieldXml",
      "schemaXml": "<Field DisplayName=\"Project Progress\" Percentage=\"FALSE\" Title=\"Project Progress\" Type=\"Number\" ID=\"{1a2f5cd6-3734-4afa-927d-bd11d38e78a4}\" StaticName=\"ProjectProgress\" Name=\"ProjectProgress\" />"
    },
    {
        "verb": "setSPFieldCustomFormatter",
        "fieldDisplayName": "Project Status",
        "formatterJSON": {
            "$schema": "http://columnformatting.sharepointpnp.com/columnFormattingSchema.json",
            "elmType": "div",
            "attributes": {
                "class": {
                "operator": "?",
                "operands": [
                    {
                    "operator": "==",
                    "operands": [
                        "@currentField",
                        "Done"
                    ]
                    },
                    "sp-field-severity--good",
                    {
                    "operator": "?",
                    "operands": [
                        {
                        "operator": "==",
                        "operands": [
                            "@currentField",
                            "In progress"
                        ]
                        },
                        "sp-field-severity--low",
                        {
                        "operator": "?",
                        "operands": [
                            {
                            "operator": "==",
                            "operands": [
                                "@currentField",
                                "In review"
                            ]
                            },
                            "sp-field-severity--warning",
                            {
                            "operator": "?",
                            "operands": [
                                {
                                "operator": "==",
                                "operands": [
                                    "@currentField",
                                    "Has issues"
                                ]
                                },
                                "sp-field-severity--severeWarning",
                                "sp-field-severity--blocked"
                            ]
                            }
                        ]
                        }
                    ]
                    }
                ]
                }
            },
            "children": [
                {
                "elmType": "span",
                "style": {
                    "display": "inline-block",
                    "padding-left": "4px"
                },
                "attributes": {
                    "iconName": {
                    "operator": "?",
                    "operands": [
                        {
                        "operator": "==",
                        "operands": [
                            "@currentField",
                            "Done"
                        ]
                        },
                        "CheckMark",
                        {
                        "operator": "?",
                        "operands": [
                            {
                            "operator": "==",
                            "operands": [
                                "@currentField",
                                "In progress"
                            ]
                            },
                            "Forward",
                            {
                            "operator": "?",
                            "operands": [
                                {
                                "operator": "==",
                                "operands": [
                                    "@currentField",
                                    "In review"
                                ]
                                },
                                "Error",
                                {
                                "operator": "?",
                                "operands": [
                                    {
                                    "operator": "==",
                                    "operands": [
                                        "@currentField",
                                        "Has issues"
                                    ]
                                    },
                                    "Warning",
                                    "ErrorBadge"
                                ]
                                }
                            ]
                            }
                        ]
                        }
                    ]
                    }
                }
                },
                {
                "elmType": "span",
                "txtContent": "@currentField",
                "style": {
                    "padding-left": "4px"
                }
                }
            ]
        }
    },
    {
      "verb": "addSPView",
      "name": "All Items",
      "viewFields": [
        "LinkTitle",
        "ProjectProgress",
        "ProjectStatus",
        "ProjectCategory"
      ],
      "query": "",
      "rowLimit": 30,
      "isPaged": true,
      "makeDefault": true,
      "formatterJSON": {"additionalRowClass": "=if([$ProjectCategory] == 'Legal', 'sp-field-severity--blocked', '' )"}
    }
  ]
},
{
  "verb": "addNavLink",
  "url": "Lists/Project Tracker/AllItems.aspx",
  "displayName": "My Projects",
  "isWebRelative": true
}
    ],
    "version": 1
  }
Scheme

Add Site Script

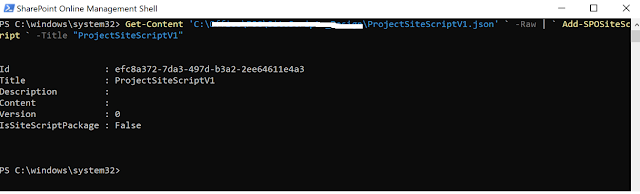
Site Scripts must be registered with SharePoint Online. New Site Scripts can be added with the below PnP Powershell commands.

$credentials =Get-Credential
$tenantURL="https://mittal1201-admin.sharepoint.com"
Connect-SPOService -Url $tenantURL -credential $credentials
BASIC

where mittal1201 should be your domain name.

$sitescriptLocation="C:\Path\ProjectSiteScriptV1.json"
Get-Content $sitescriptLocation -Raw | Add-SPOSiteScript -Title "ProjectSiteScriptV1"
BASIC

After running the script, you get a result with script ID. Keep track of ID, it will be used to associate with Site Template.


Create Site Template

The Site Template appears in the drop-down list of choose designs while provisioning the Site Collection. It can run one or more site scripts.

Add-SPOSiteDesign -Title "Project Site TemplateV1"
-WebTemplate "68"
-SiteScripts "efc8a372-7da3-497d-b3a2-2ee64611e4a3"
-Description "Project Site TemplateV1 site template designed for IT department projects to create and maintain the consistency of project sites with common schema across all site Project Site Collections."
JavaScript

WebTemplate value selected which base template associated with

  1. WebTemplate 64 - Modern Team Site
  2. WebTemplate 68 - Modern Communication Site
  3. Web Template 1 - Team site (no O365 group connected)

After running the script, you get a result with Site Template ID. Keep track of ID, it will be used to update or remove the Site Template in the future.

Id                  : be42d063-f67b-4d35-88df-88db0a79a59e
Title               : Project Site TemplateV1
WebTemplate         : 68
SiteScriptIds       : {efc8a372-7da3-497d-b3a2-2ee64611e4a3}
Description         : Project Site TemplateV1 site template designed for IT department projects to create and maintain the consistency of project sites with common
                      schema across all site Project Site Collections.
ThumbnailUrl        :
PreviewImageUrl     :
PreviewImageAltText :
IsDefault           : False
Version             : 1
DesignPackageId     : 00000000-0000-0000-0000-000000000000
DesignType          : Site
BASIC

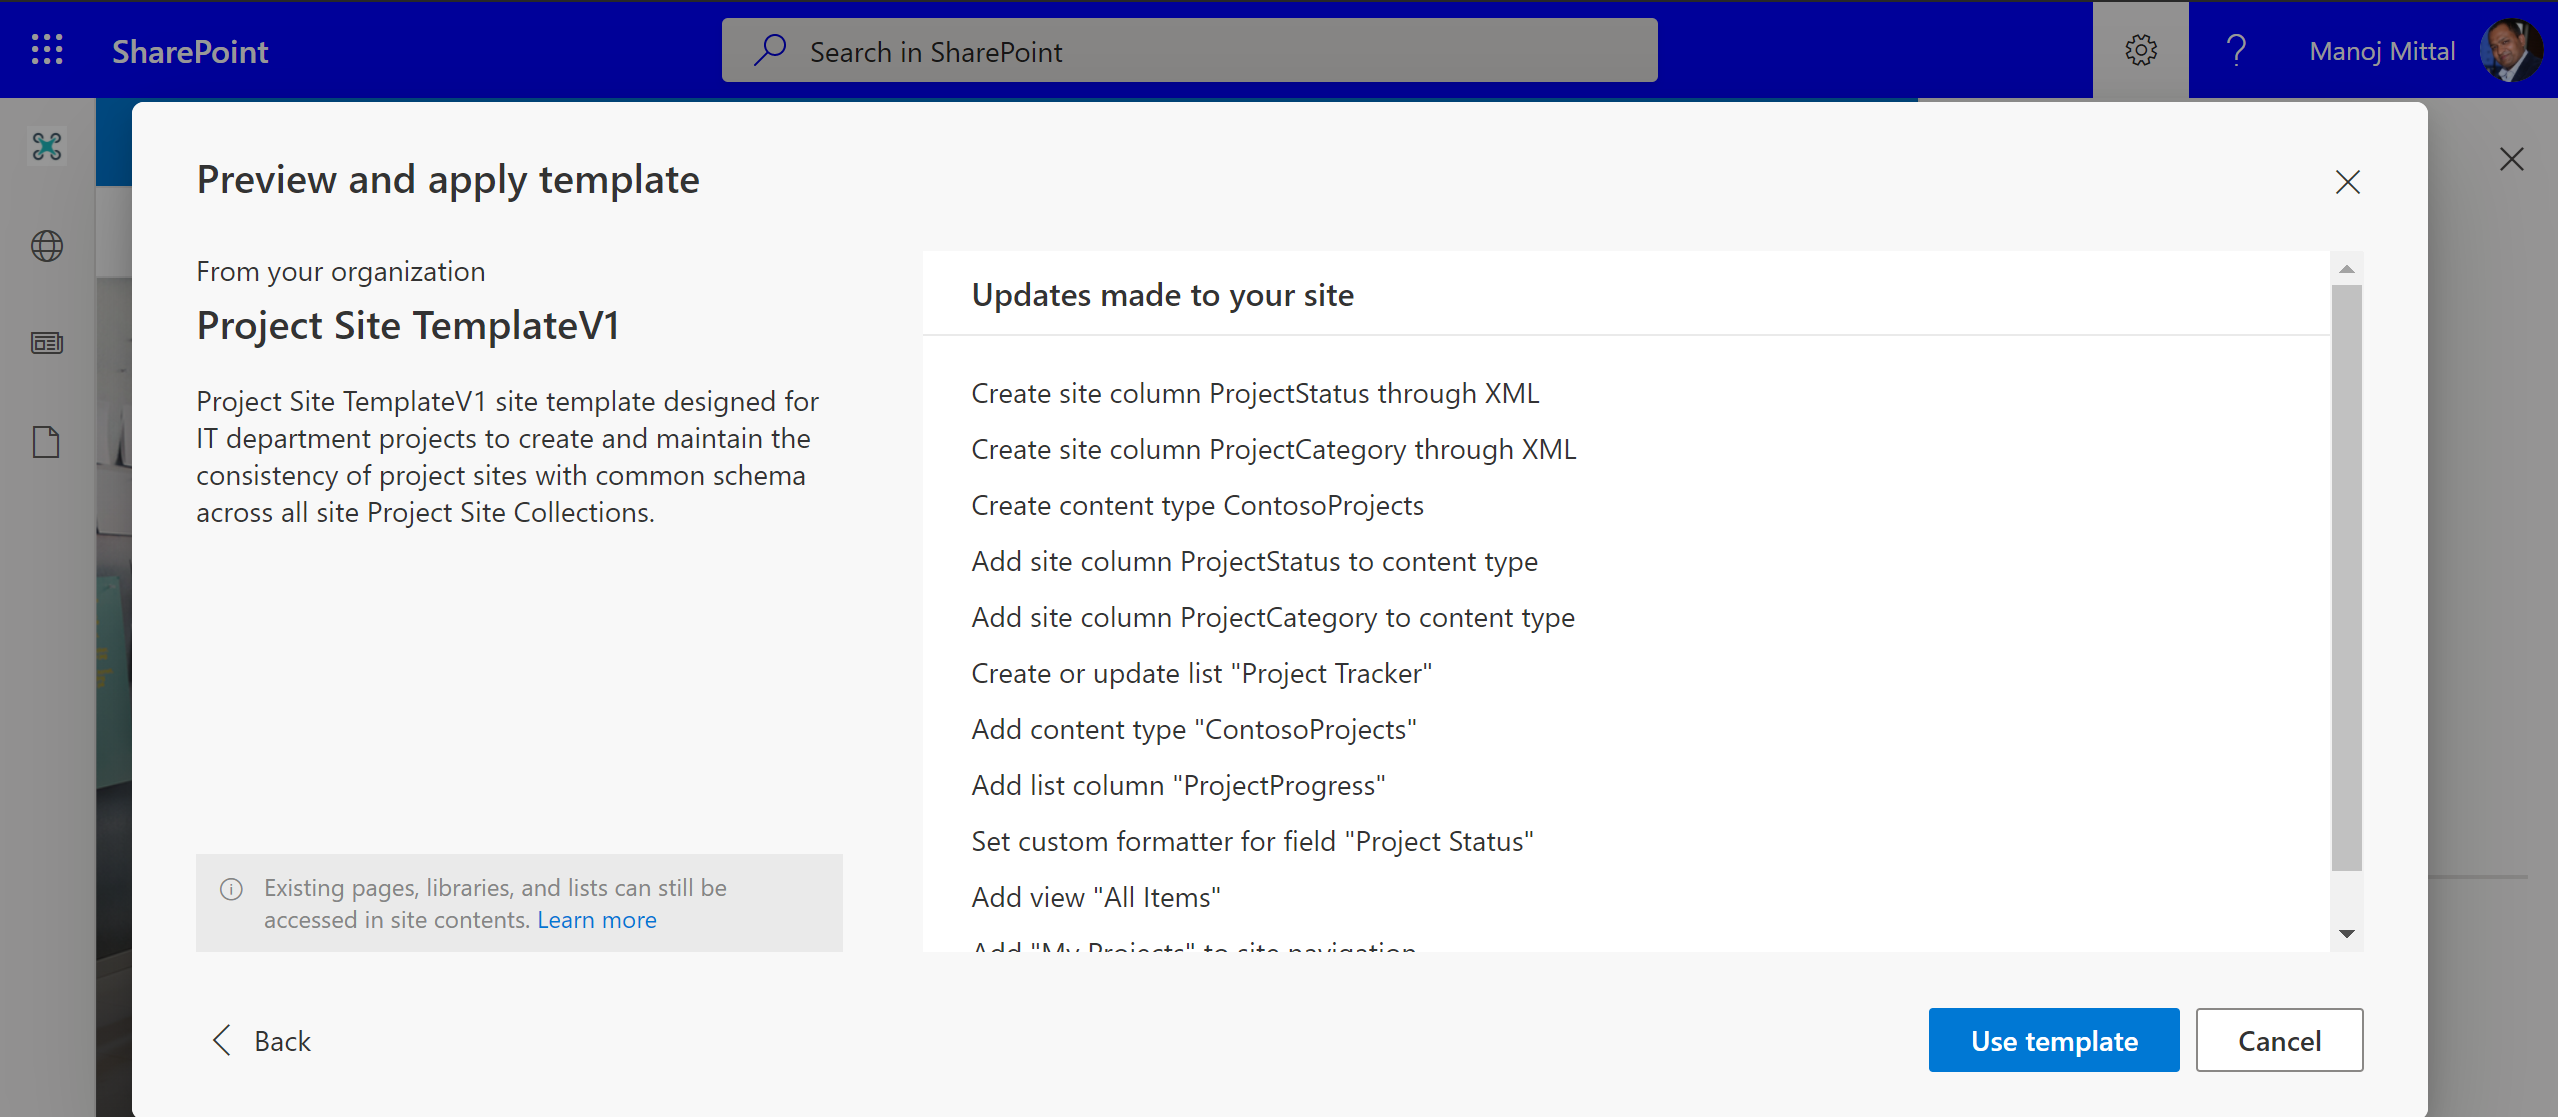
Navigate to existing Modern Communication Site -> Select Gear Icon from Top left -> Select Apply Template -> Choose "From your organization" options. You will find customize Site Template.


Once you click to customize Site Template i.e. Project Site TemplateV1, you will navigate to the detail window, which shows the action details, which template is going to apply.


Click the "Use Template" button. it will apply all defined actions into Site Collections.

Once you browse to applied changes, you can find the below update,

  • Create Site Column
  • Create Content-Type
  • Create custom List
  • Associate Site Column and Content-Type to List
  • Add Data Column Formatting
  • Add List to Top Navigation


Get existing Site Template and Site Scripts information

Once you have deployed Site Templates or Site Scripts to your tenant, you need to get information on deployed site templates or site scripts. you need to execute the below scripts,

$spoadminSiteUrl = "https://mytenant-admin.sharepoint.com"
$cred = Get-Credential
Connect-SPOService $spoadminSiteUrl -Credential $cred
Get-SPOSiteDesign
Get-SPOSiteScript
BASIC

Delete existing Site Template and Site Scripts

Currently, there is no manual option to delete existing Site Templates or Site Scripts. You need to execute the below scripts to delete it. Deletion of existing Site Template will not delete associated Site Scripts. Site Scripts need to delete separately.

$spoadminSiteUrl = "https://mytenant-admin.sharepoint.com"
$siteDesignId = "be42d063-f67b-4d35-88df-88db0a79a59e"
$siteScriptId = "5f99d2b8-c0f4-41e2-81c0-67bb5e3ba1bd"
$cred = Get-Credential
Connect-SPOService $spoadminSiteUrl -Credential $cred
Remove-SPOSiteDesign -Identity $siteDesignId
Remove-SPOSiteScript -Identity $siteScriptId
BASIC

I hope you enjoyed and learned something new in this article and stay tuned for the next step.