Join me at M365 Saturday Event Bangalore 2020


Catch me at Microsoft 365 Saturday, Bangalore!


About the event: https://lnkd.in/dchGV8i
Register: https://lnkd.in/dbyMiN3

🔊 Topic: Implement SPFX - CI / CD pipeline using Office365 CLI & SharePoint ALM
📅 When: 12 Dec, 2020 | ⏰ 3:00 PM IST
📌 Track: Dev Pro


Schedule:-


Azure AD B2B Application with Google Federation as an Identity Provider

 Introduction 

 
In today's world, the configuration of networks is driven by the needs of users and business which have changed over time.
 
Organizations can't assume users will be in one place, rather they are on both internal and/or external networks. Users don't access networks with one device either, they have a myriad of devices and types of software architectures they use including on-premises apps, SAAS apps, mobile apps, and so on.
 
How are you as a developer supposed to properly secure your applications and your user's access to information across so many scenarios?
 
Let's understand how to set up a business-to-business application with External Identity, i.e. Google Federation.
 
External Identities is a set of capabilities that enables organizations to secure and manage any external user, including customers and partners. Building on B2B collaboration, External Identities gives you more ways to interact and connect with users outside your organization.


Note
Google Federation works with Gmail Account users.
 
Step 1 - Configure a Google Developer Project
 
Create a new project in the Google Developers Console to obtain a client ID and a client secret that you can later add to Azure Active Directory (Azure AD).
  • Navigate to https://console.developers.google.com, and sign in with your Google account.
  • Create a new project: On the dashboard, select Create Project, give the project a name (for example, Demp App ), and then select Open.

Step 2 - Add Project Name and Select Create.


Step 3 - Configure Oauth Consent Screen 
  • Once the project is created, select your project.
  • Select OAuth Consent Screen
  • Select External
  • Click Create


  • Once the user clicks to create and navigate to App Information Screen
  • Add an App Name i.e. Demo App
  • Select the User Supported Email from DropDown


  • Scroll and Add Authorized Domains and enter microsoftonline.com
  • Add Developer Contact information
  • Click save and continue to proceed.


Step 4 - Add Credentials details
 
Select Credentials, click create credentials and select "Oauth Client ID"

  • Add Application Type as "Web Application" and give the application a suitable name.
  • Under Authorized redirect URLs add:
https://login.microsoftonline.com
https://login.microsoftonline.com/te/<tenant ID>/oauth2/authresp
(where <tenant ID> is your tenant ID) 


Now you will prompt with OAuth Client Created. Copy and Paste securely Client Id and Client Secret. It will be used to add an identity provider into Azure AD Portal.


Step 5 - Configure the Google Federation in Azure AD
  • Navigate to https://portal.azure.com.
  • Select App Registration -> New Registration
  • To register an application add Name i.e. demoapp01 and leave other information as-is click to register.
  • Navigate to External Identities and Click to "All Identity Providers"
  • Select "+Google" to configure the federation.


Add the copied Client ID and Client Secret and click save to continue.


Now the Google Federation configuration is done. Let's start with Application association with External Identities.
 
Step 6 - Configure User Flow
 
User flows that enable users to sign up, sign in, or manage their profile. (As of today, this feature is in public preview).
  • Select User Flow and click to "+ New user flow".

  • Add the name of the newly created flow, i.e. Demo App, and select the Federated Google Identity Provider


  • The User flow has been created and associated with the Google Federation identity provider.
  • For the associate application or Azure, add an instance created at step no.5. Select an application and proceed.


We are done with federated configuration and integration with an Azure AD Application, let's see how the output looks like now.

Output Screen 1
 
  • As the user runs the application and clicks on the sign in button, a login prompt will appear, If user click "Create New or Sign In Option", a sign in with Google option will appear.
  • As the user uses the google option to sign in, a request will go to Google and a Google sign in screen will appear
  • Once the user enters their Google credentials, the application asks for minimal permission consent approval, which is the default setting to read the user profile from Google.
  • As users accept the consent and social account as an external identity allowed to log in to the organization created, i.e. Business to Business Application. 


I hope you enjoyed and learned something new in this article. Thanks for reading and stay tuned for the next article.


Join me at Global Microsoft365 Developer Bootcamp - Bangalore 2020


Join me at Global Microsoft365 Developer Bootcamp - Bangalore 2020 at Staurday

I shall talk about "Design contextual user interface with Adaptive Cards " Cool Demo with Adaptive Card Templating

For Registration: https://www.eventbrite.com/e/global-microsoft365-developer-bootcamp-bangalore-2020-tickets-116608090939?aff=ebdssbonlinesearch&fbclid=IwAR2VtuJ_yG006saDIYJz_6rDOOMurJglSFokTdF6WvlqPnkiTKKthv8iXJI

Event Date and Time: Saturday, 7th November 2020, ⏱️01: 30 PM IST


Join me virtually at M365 Developer Boot camp 2020 | Hyderabad

Join me virtually at M365 Developer Boot camp Hyderabad 2020 at Saturday.

I shall talk about "Microsoft Search with Graph Connector " Cool Demo with DevOps Task Integration with Microsoft Search.


For Registration: https://www.eventbrite.co.uk/e/global-microsoft-365-developer-bootcamp-2020-hyderabad-india-tickets-116282310521?fbclid=IwAR1eYuD6HoanT6XWfkzVboarSqYKRxT2y8y-5VGgQCtSzPzjr8ZHUPCTVZw


Event Date and Time: Saturday, 17th October 2020, ⏱️02: 15 PM IST


Complete Event Agenda:-


Join me virtually at M365 Developer Boot camp 2020 | Chennai .

 Join me virtually at M365 Developer Boot camp 2020 @Chennai . 


I shall talk about "Deep Dive with MS Teams Extensions".


For Registration: https://lnkd.in/dBYisqp
Event Date and Time: Saturday, 10th October 2020, ⏱️10: 30 AM IST


Join me virtually at M365 Developer Boot camp 2020 | Ahmedabad

 Join me virtually at M365 Developer Boot camp 2020 @ahmedabad . 

I shall talk about "Microsoft Project Oakdale with Microsoft Teams".

For Registration: https://lnkd.in/dFZCaB7

Event Date and Time: Saturday, 10th October 2020, ⏱️11:30 AM IST


Join me at Power Platform updates at MS Ignite 2020

Power Platform Ignite 2020 Update  


Join me  at Recap of Power Platform Updates at Ignite 2020 webinar. I shall talk about couple of cool features and Demo.

Event Date & Time : Wednesday, 7th October 2020 ,⏱️06:00 PM IST


Extend Microsoft Search with Service Now Graph Connector

 Introduction 

 
Microsoft Search shows the content that your organization has stored in the Microsoft 365 Tenant or indexed through connectors.


Service Now knowledge-base articles can also be visible to all users within your organization. After you complete the connector configuration, end users can search for those articles from any Microsoft Search client. 
 
In this article, we'll understand how to index the "Service Now " knowledge base article using Graph Connector in Microsoft Search Results. 


License Requirements
 
To view data from connectors in your search results, users must have one of the following Microsoft 365 or Office 365 subscriptions:
  • Microsoft 365 or Office 365 Enterprise E3 or E5
  • Microsoft 365 or Office 365 Education A3 or A5
Let's start with the configuration steps.
 
Step 1 - Navigate to Connectors
  1. Go to Microsoft 365 admin center.
  2. In the navigation pane, go to Settings.
  3. Select > Microsoft Search.
  4. Select > Connectors
  5. Select > + Add


Step 2 - Select Azure DevOps as a Data Source
 
Microsoft has seven connectors available to connect with an external data source and several partners released connectors to connect with an external data source


Step 3 - Fill connection name details
  • Name (mandatory)
  • Connection Id (mandatory)
  • Description (optional)


Step 4 - Configure settings
 
To connect ServiceNow data, you need your organization's ServiceNow instance URL.
 
Your organization’s ServiceNow instance URL typically looks like https://<your-organization-domain>.service-now.com
 
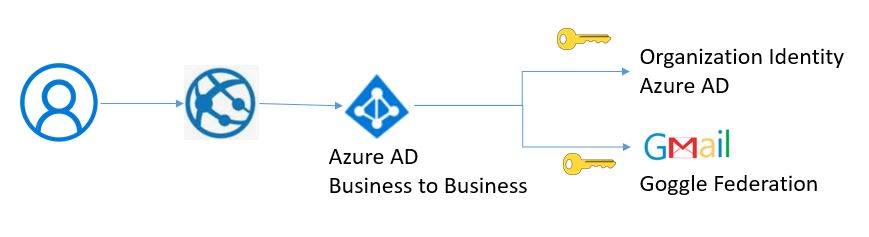
To authenticate and sync content from ServiceNow, choose one of two supported methods:
  1. Basic authentication
  2. OAuth (recommended)
Note
For demo purposes, I used basic authentication.
 
To create a service now instance, you need to follow this link.


Step 5 - Configure Data
 
Select a project in the organization to crawl
 
Edit properties, if more properties need to added, click preview > next to proceed.


Step 6 - Manage Schema
 
You can choose which column can be set as Querable, Searchable & Retrieve. It is the same standard schema configuration as SharePoint Search.


Step 7 - Manage Search Permissions
 
You can choose to use the ACLs specified in the full crawl screen, or you can override them to make your content visible to everyone.


Step 8 - Content Refresh Settings
 
You can configure the incremental and full refresh intervals.


Step 9 - Review connection and complete
 
All defined configurations can be reviewed and modified here. Once it's complete, click Finish to proceed.


Step 10 - Review connection and complete
 
Wait for a couple of minutes and the connection content will full crawl. The connection state will also change from Publishing to Ready. Once the connection state is ready, two actions need to be performed in sequence:
1. Create Result Source.
2. Create Vertical.


Result Type
 
A search result type is a rule that causes distinct kinds of search results to be displayed in different ways. It consists of the following:
  • One or more conditions to compare each search result against, such as the content source of the search result.
  • A result layout to use for search results that meet the conditions. The resulting layout controls the way that all results that meet the conditions appear and behave on a search results page.
Step 11 - Result Type Section
 
Once you select create result type, follow the simple steps to follow a naming convention. Enter the result type name

Step 12 - Result Type Content Source
 
Select the appropriate content source so that crawled or configured data can be mapped properly.


Step 13 - Design Layout
 
These are the important steps to design your layout or adaptive rich card, which will be rendered into search results.
 
Once you click "Launch Layout Designer", it will navigate to https://searchlayoutdesigner.azurewebsites.net/


Step 14 - Search Layout Designer
 
Select a blank layout and design the required card.
 
Copy content from the Layout Payload editor and paste it into step no. 13.


Layout payload editor added to the GitHub link here
 
Review the result type configuration and proceed to Vertical creation to map with defined result type.
 
Manage Vertical
 
Verticals make it easier for users to find the information that they have permission to see.
 
You can add search verticals that are relevant to your organization. These will appear on the Microsoft Search results page in SharePoint, Office, and Bing.
 
Before you start, make sure that the connector has been indexed. This can take up to 48 hours, depending on the file size.
 
You can’t create a vertical for content that resides in SharePoint.
 
There are three basic steps to add a vertical:
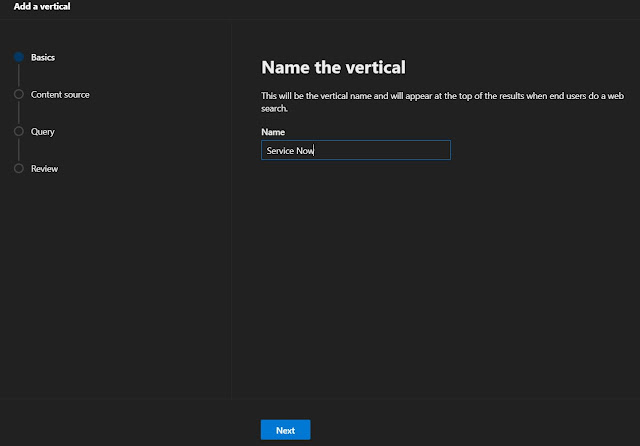
  1. Create the vertical. In this step, you define the vertical’s name, content source, and scope of the content to search.
  2. Define what the results for this vertical will look like.
  3. Enable the vertical (to be displayed) from the vertical list page.
Step 15 - Create Vertical
 
In the navigation pane, go to custom connector and then select the Verticals Link.
 
To add a vertical, select Add, or to edit a vertical, select it in the list.
 
Remember that verticals are created in a disabled state. They must be enabled before users can see them.


Step 17 - Connect Vertical with Content Source


Add the required Query section as it is an optional section. Proceed to review, Add, and Enable vertical via the following screens.
 
Outcome
 
Service Now Data Screen Shot


Finally, we receive the Output in Microsoft Search


Same article published here also

I hope you have enjoyed and learned something new in this article. Thanks for reading and stay tuned for the next article!