Integrating Windows Live ID, Google and Facebook Authentications with SharePoint 2013
Federated authentication mechanism handles authentication by external providers which send the token back to SharePoint. So, Instead of we, creating accounts internally (in AD, SQL Server) for external users and partners, We can make use of external authentication providers like Microsoft Live ID Accounts, Google, Yahoo, Facebook accounts (or even external Active Directory - ADFS ) to manage authentication. Its extremely useful with public facing SharePoint sites, isn't it?
This article walks through step by step on integrating Windows Live ID, Google and Facebook account authentications with SharePoint 2013.
To start with, Here are the steps in summary:
- We need Windows Azure ACS (Access Control Service) as our Trusted Identity provider. Subscribe and get one.
- Add new Identity Provider for SharePoint 2013 with PowerShell.
- Authorize users by granting them access to the web application.
Step 1: Configure Azure ACS with required Providers:
Create a Windows Azure Account
We need Windows Azure Access Control Service (ACS) to handle authentication from external entities. From ACS we can to choose Providers like Microsoft Live ID, Google , etc. Create a windows Azure Account - Subscribe for Azure (you must have a Microsoft Live ID & may need credit card).
Go to: https://www.windowsazure.com/en-us/ and register a new account.

I registered a Trial account with Azure. If you are part of any Windows Azure user groups, you can obtain a free coupon and get Windows Azure 30 days free pass at: http://www.windowsazurepass.com/
Create New Azure Access Control Service
- Login to Windows Azure Portal, Click on "New" link from the footer pane >> App Services >> Active Directory >> Access Control >> Quick Create. Provide Namespace and location for your ACS service.

- Once the service is created and activated, Select the ACS and Click on "Manage" link from the footer pane. This takes us to the ACS configuration page.

We need Windows Azure Access Control Service (ACS) to handle authentication from external entities. From ACS we can to choose Providers like Microsoft Live ID, Google , etc. Create a windows Azure Account - Subscribe for Azure (you must have a Microsoft Live ID & may need credit card).
Go to: https://www.windowsazure.com/en-us/ and register a new account.

I registered a Trial account with Azure. If you are part of any Windows Azure user groups, you can obtain a free coupon and get Windows Azure 30 days free pass at: http://www.windowsazurepass.com/
Create New Azure Access Control Service


Configure Azure ACS
There are four settings we got to configure in ACS.
- Identity providers
- Relying party applications
- Rule groups
- Certificates and keys
Proceed to the below configurations one by one.
1. Identity Providers:
- To start with, click on "Identity Providers" link - You'll notice "Windows Live ID" already listed there. You can add additional providers by clicking "Add" link in Identity Providers Tab. Lets Add "Google"

- From the list, Choose "Google" and click on "Next" button

- Click Save button to complete the changes.

1. Identity Providers:

Integrate Facebook Authentication with SharePoint 2013:
For Facebook accounts integration with SharePoint 2013, We need to do one more step: Create New Application in Facebook and then add the provider as Facebook in ACS.
- Go to Facebook Apps, https://developers.facebook.com/apps
- Create new Facebook Application

- Give it a App Name and App Namespace. Click on "Continue"

- Provide the Website with Facebook Log-in as: https://{your ACS Namespace}.accesscontrol.windows.net

- Click Save Changes.
Now, in ACS:
- Add new "Facebook Application" identity provider and Click Next

- Enter Application ID, Application Secret values from Facebook application.

- Click on save to complete your changes. Now our identity providers page contains these three identity providers:

2. Relying party applications:
Relying party application is generally a web site or application that uses ACS for Authentication. Here in our case, Its our SharePoint site. So, Lets create a Relying party Application.
- Go to Relying Party Applications Tab, Click on "Add"
- Enter the below parameters: Give it a Name (can be anything)
- Specify the "Realm" as your SharePoint Web Application's URL (Say: http://extranet.crescent.com")
- In Return URL, Just append /_trust , So, in our case, Its: http://extranet.crescent.com/_trust
- Token format should be SAML 1.1
- Set the Token timeout value to 3600
- Make sure "Create new rule Group" is checked and click "Save" button

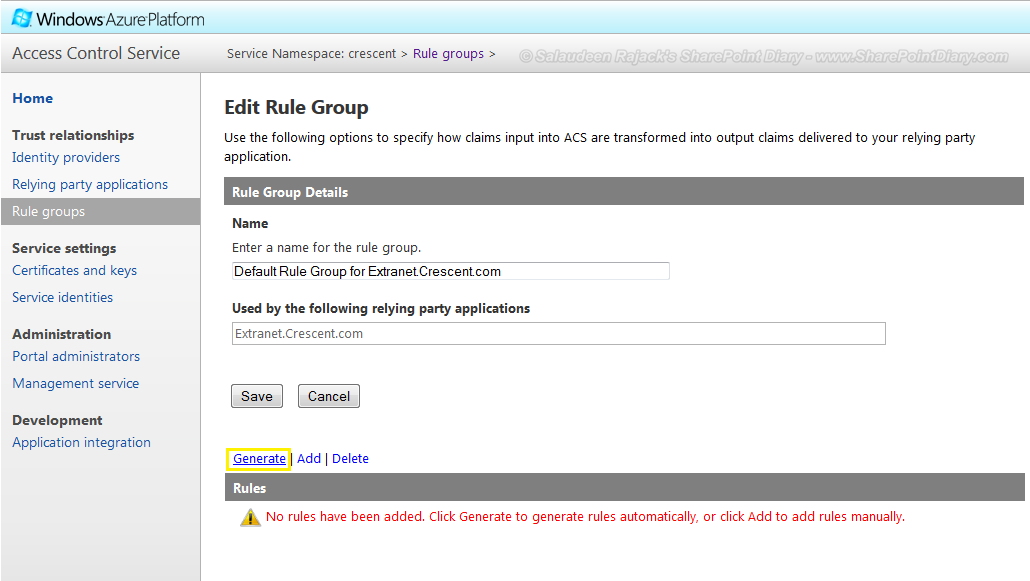
3. Rule groups:
- Click on "Default Rule Group for http://extranet.crescent.com"

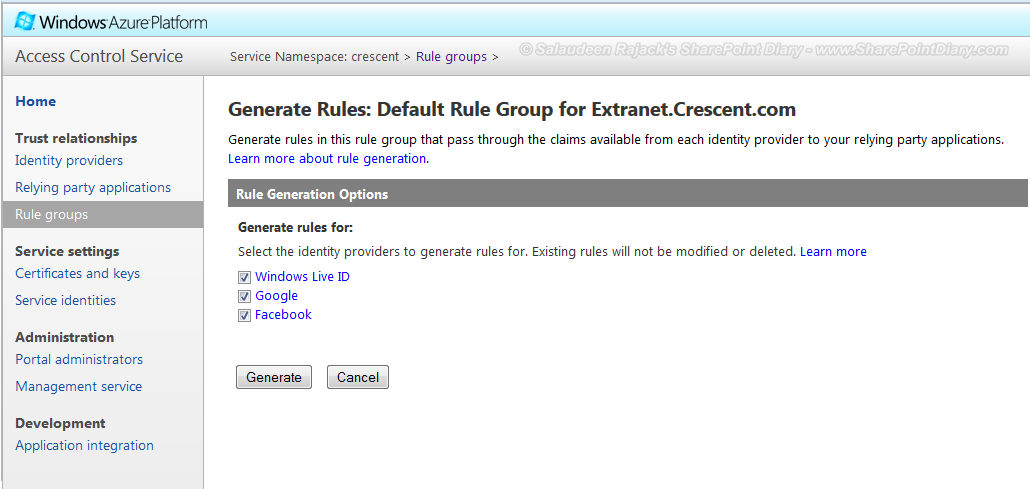
- Under rules, You'll get a message: "No rules have been added. Click on "Generate" link just above "Rules" section
- Select the providers, Hit Generate button again on the apps presented. Click on "Save"
- If you visit the default Rule group again, You will see the mapping fields used by these providers.
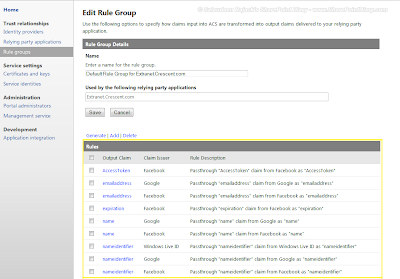
You can also map additional properties from providers.
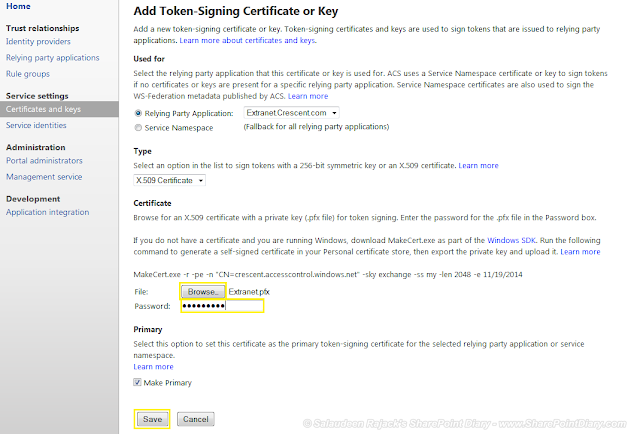
4. Certificates and keys:
We have to Encrypt the traffic between ACS and our SharePoint environment by exchanging certificate between Azure ACS and SharePoint. So, we need a Digital certificate. You can create SSL certificate from development environments with MakeCert.exe.
MakeCert.exe is part of Windows SDK. You can download it from: http://go.microsoft.com/fwlink/p/?linkid=84091 .MakeCert lives under: C:\Program Files (x86)\Microsoft SDKs\Windows\v7.0A\BinSo, in command prompt: enter:
C:\>cd "C:\Program Files (x86)\Microsoft SDKs\Windows\v7.0A\Bin"
MakeCert.exe -r -pe -n "CN=crescent.accesscontrol.windows.net" -sky exchange -ss my -len 2048 -e 11/15/2014
This will generate the certificate and install it automatically to the trusted certificate store. Or you can use:
MakeCert.exe -r -pe -n "CN=crescent.accesscontrol.windows.net" -sky exchange -ss my -len 2048 -e 11/15/2014 -sv "c:\Extranet.pvk" "c:\Extranet.cer "
If makecert.exe is not available, Use IIS self signed certificate creation with the specified common name, and the export the .CER & PFX files from Certificates Snap-in through MMC.
Import the Certificate to ACS:
- Once certificate is generate, on the certificates and keys tab, Click on "Add link"

- Browse to the certificate created (.pfx), provide password of it and then click "Save"
Warning: MakeCert.exe is not recommended for Production environments!


Relying party application is generally a web site or application that uses ACS for Authentication. Here in our case, Its our SharePoint site. So, Lets create a Relying party Application.
- Click on "Default Rule Group for http://extranet.crescent.com"
- Under rules, You'll get a message: "No rules have been added. Click on "Generate" link just above "Rules" section
- Select the providers, Hit Generate button again on the apps presented. Click on "Save"
- If you visit the default Rule group again, You will see the mapping fields used by these providers.

4. Certificates and keys:
We have to Encrypt the traffic between ACS and our SharePoint environment by exchanging certificate between Azure ACS and SharePoint. So, we need a Digital certificate. You can create SSL certificate from development environments with MakeCert.exe.
MakeCert.exe is part of Windows SDK. You can download it from: http://go.microsoft.com/fwlink/p/?linkid=84091 .MakeCert lives under: C:\Program Files (x86)\Microsoft SDKs\Windows\v7.0A\BinSo, in command prompt: enter:
C:\>cd "C:\Program Files (x86)\Microsoft SDKs\Windows\v7.0A\Bin"
MakeCert.exe -r -pe -n "CN=crescent.accesscontrol.windows.net" -sky exchange -ss my -len 2048 -e 11/15/2014
This will generate the certificate and install it automatically to the trusted certificate store. Or you can use:
MakeCert.exe -r -pe -n "CN=crescent.accesscontrol.windows.net" -sky exchange -ss my -len 2048 -e 11/15/2014 -sv "c:\Extranet.pvk" "c:\Extranet.cer "
If makecert.exe is not available, Use IIS self signed certificate creation with the specified common name, and the export the .CER & PFX files from Certificates Snap-in through MMC.
Import the Certificate to ACS:
- Once certificate is generate, on the certificates and keys tab, Click on "Add link"
- Browse to the certificate created (.pfx), provide password of it and then click "Save"


Warning: MakeCert.exe is not recommended for Production environments!
Step 2: Add new Trusted identity Provider as Azure ACS
We've our authentication providers ready now! We've make SharePoint aware by creating a new "Trusted Authentication Provider". Here is the PowerShell script to create new trusted authentication provider.
1
2
3
4
5
6
7
8
9
10
11
12
13
14
15
16
17
18
19
20
21
22
23
24
25
26
27
28
29
30
Add-PSSnapin Microsoft.SharePoint.PowerShell
#Realm we created in Azure
#Replace "crescent.accesscontrol.windows.net" and "extranet.crescent.com" with yours here!
$signinurl = "https://crescent.accesscontrol.windows.net:443/v2/wsfederation?wa=wsignin1.0&wtrealm=http%3a%2f%2fextranet.crescent.com%2f"
#Location of the certificate generated with Makecert.exe
$certloc = "C:\extranet.crescent.com.cer"
$rootcert = Get-PfxCertificate $certloc
New-SPTrustedRootAuthority "Windows Azure ACS" -Certificate $rootcert
$cert = New-Object System.Security.Cryptography.X509Certificates.X509Certificate2($certloc)
#Map the Fields from Rules Created for All Providers: Facebook , Google & Live ID
# NameIdentifier Field
$NameIdentifier = New-SPClaimTypeMapping -IncomingClaimType "http://schemas.xmlsoap.org/ws/2005/05/identity/claims/nameidentifier" -IncomingClaimTypeDisplayName "UPN" -LocalClaimType "http://schemas.xmlsoap.org/ws/2005/05/identity/claims/upn"
# Email Field
$Email = New-SPClaimTypeMapping -IncomingClaimType "http://schemas.xmlsoap.org/ws/2005/05/identity/claims/emailaddress" -IncomingClaimTypeDisplayName "Email" -SameAsIncoming
#Given Name Field
$GivenName = New-SPClaimTypeMapping -IncomingClaimType "http://schemas.xmlsoap.org/ws/2005/05/identity/claims/name" -IncomingClaimTypeDisplayName "Display Name" –LocalClaimType "http://schemas.xmlsoap.org/ws/2005/05/identity/claims/givenname"
$AccessToken = New-SPClaimTypeMapping -IncomingClaimType "http://www.facebook.com/claims/AccessToken" -IncomingClaimTypeDisplayName "Access Token" -SameAsIncoming
$Expiration = New-SPClaimTypeMapping -IncomingClaimType "http://schemas.microsoft.com/ws/2008/06/identity/claims/expiration" -IncomingClaimTypeDisplayName "Expiration" -SameAsIncoming
#Create New Trusted Identity Provider
New-SPTrustedIdentityTokenIssuer -Name "Live ID/Google/Facebook" -Description "Live ID/Google/Facebook" -Realm $realm -ImportTrustCertificate $cert -ClaimsMappings $NameIdentifier, $Email, $GivenName, $AccessToken, $Expiration -SignInUrl $signinurl -IdentifierClaim "http://schemas.xmlsoap.org/ws/2005/05/identity/claims/nameidentifier"
# IdentifierClaim defines the Field to display on User Name
# E.g. If you use only Google: New-SPTrustedIdentityTokenIssuer -Name "Google Account" -Description "Google Account" -Realm $realm -ImportTrustCertificate $cert -ClaimsMappings $NameIdentifier,$Email,$GivenName -SignInUrl $signinurl -IdentifierClaim $Email.InputClaimType
# Make sure that the IdentifierClaim is common for all providers, if you are using more than one!
1
2
3
4
5
6
7
8
9
10
11
12
13
14
15
16
17
18
19
20
21
22
23
24
25
26
27
28
29
30
| Add-PSSnapin Microsoft.SharePoint.PowerShell#Realm we created in Azure#Replace "crescent.accesscontrol.windows.net" and "extranet.crescent.com" with yours here!$signinurl = "https://crescent.accesscontrol.windows.net:443/v2/wsfederation?wa=wsignin1.0&wtrealm=http%3a%2f%2fextranet.crescent.com%2f"#Location of the certificate generated with Makecert.exe$certloc = "C:\extranet.crescent.com.cer"$rootcert = Get-PfxCertificate $certlocNew-SPTrustedRootAuthority "Windows Azure ACS" -Certificate $rootcert$cert = New-Object System.Security.Cryptography.X509Certificates.X509Certificate2($certloc)#Map the Fields from Rules Created for All Providers: Facebook , Google & Live ID# NameIdentifier Field$NameIdentifier = New-SPClaimTypeMapping -IncomingClaimType "http://schemas.xmlsoap.org/ws/2005/05/identity/claims/nameidentifier" -IncomingClaimTypeDisplayName "UPN" -LocalClaimType "http://schemas.xmlsoap.org/ws/2005/05/identity/claims/upn"# Email Field$Email = New-SPClaimTypeMapping -IncomingClaimType "http://schemas.xmlsoap.org/ws/2005/05/identity/claims/emailaddress" -IncomingClaimTypeDisplayName "Email" -SameAsIncoming#Given Name Field$GivenName = New-SPClaimTypeMapping -IncomingClaimType "http://schemas.xmlsoap.org/ws/2005/05/identity/claims/name" -IncomingClaimTypeDisplayName "Display Name" –LocalClaimType "http://schemas.xmlsoap.org/ws/2005/05/identity/claims/givenname"$AccessToken = New-SPClaimTypeMapping -IncomingClaimType "http://www.facebook.com/claims/AccessToken" -IncomingClaimTypeDisplayName "Access Token" -SameAsIncoming$Expiration = New-SPClaimTypeMapping -IncomingClaimType "http://schemas.microsoft.com/ws/2008/06/identity/claims/expiration" -IncomingClaimTypeDisplayName "Expiration" -SameAsIncoming#Create New Trusted Identity ProviderNew-SPTrustedIdentityTokenIssuer -Name "Live ID/Google/Facebook" -Description "Live ID/Google/Facebook" -Realm $realm -ImportTrustCertificate $cert -ClaimsMappings $NameIdentifier, $Email, $GivenName, $AccessToken, $Expiration -SignInUrl $signinurl -IdentifierClaim "http://schemas.xmlsoap.org/ws/2005/05/identity/claims/nameidentifier"# IdentifierClaim defines the Field to display on User Name# E.g. If you use only Google: New-SPTrustedIdentityTokenIssuer -Name "Google Account" -Description "Google Account" -Realm $realm -ImportTrustCertificate $cert -ClaimsMappings $NameIdentifier,$Email,$GivenName -SignInUrl $signinurl -IdentifierClaim $Email.InputClaimType# Make sure that the IdentifierClaim is common for all providers, if you are using more than one! |
Step 3: Authorize users by granting them access to the web application.
Associate Authentication provider to the target web Application:
- Go to Central Admin >> Application Management >> Manage Web Applications
- Select the web application you want to enable Federated Authentication
- Click on "Authentication Providers" from Ribbon >> Click on 'the "Default" link >> Scroll down
- Enable "Live ID/Google/Facebook" under "Trusted Identity Provider section

Grant Users Access:
So the authentication part is over. we've to handle authorization from SharePoint side, as we do for Windows AD accounts. Lets create a user policy to grant all users of the trusted identity provider to Read access to all sites in the web application (Otherwise, They'll get "Access denied" error message.
- Go back to Manage web applications page, Click on "User Policy" button from the ribbon.
- Click on Add Users
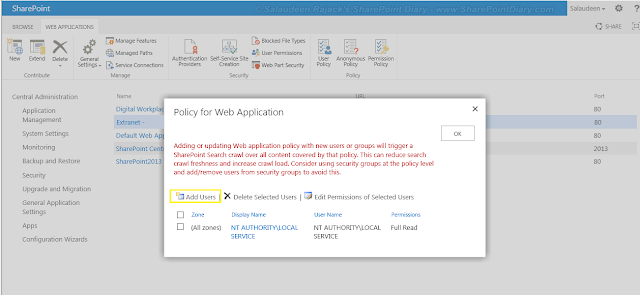
- Choose All zones and click Next

- Under Uses section, Browse and select "All Users"

- Select "Full Read" permission and Click Finish.

Unit Test:
That's all! we are done!!
- Hit the SharePoint Web Application URL. Users presented with login page.
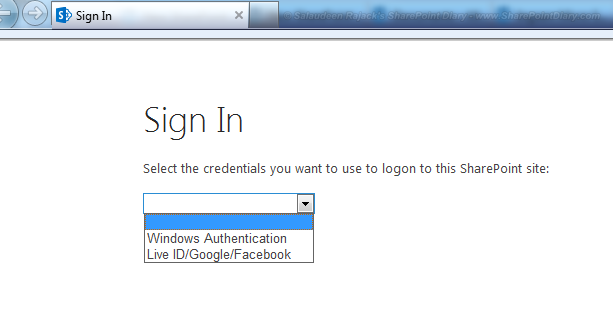
- From the list, choose "Windows Live ID/Google/Facebook"

- Choose the appropriate login provider which takes us to the appropriate login screens.
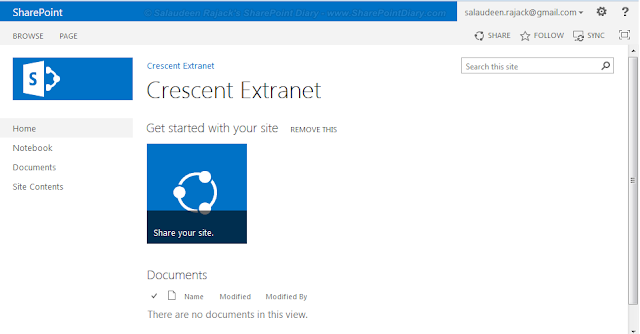
Verify users are able to access SharePoint site with Google & Facebook accounts. Here are some screen shots:
Ref:
http://social.technet.microsoft.com/wiki/contents/articles/22309.integrating-windows-live-id-google-and-facebook-accounts-with-sharepoint-2013-white-paper.aspx
- Go to Central Admin >> Application Management >> Manage Web Applications
- Select the web application you want to enable Federated Authentication
- Click on "Authentication Providers" from Ribbon >> Click on 'the "Default" link >> Scroll down
- Enable "Live ID/Google/Facebook" under "Trusted Identity Provider section

So the authentication part is over. we've to handle authorization from SharePoint side, as we do for Windows AD accounts. Lets create a user policy to grant all users of the trusted identity provider to Read access to all sites in the web application (Otherwise, They'll get "Access denied" error message.
- Go back to Manage web applications page, Click on "User Policy" button from the ribbon.
- Click on Add Users
- Choose All zones and click Next
- Under Uses section, Browse and select "All Users"
- Select "Full Read" permission and Click Finish.


That's all! we are done!!
- Hit the SharePoint Web Application URL. Users presented with login page.
- From the list, choose "Windows Live ID/Google/Facebook"
- Choose the appropriate login provider which takes us to the appropriate login screens.