Step by step creating News Page
Layout using Content Type in SharePoint 2013
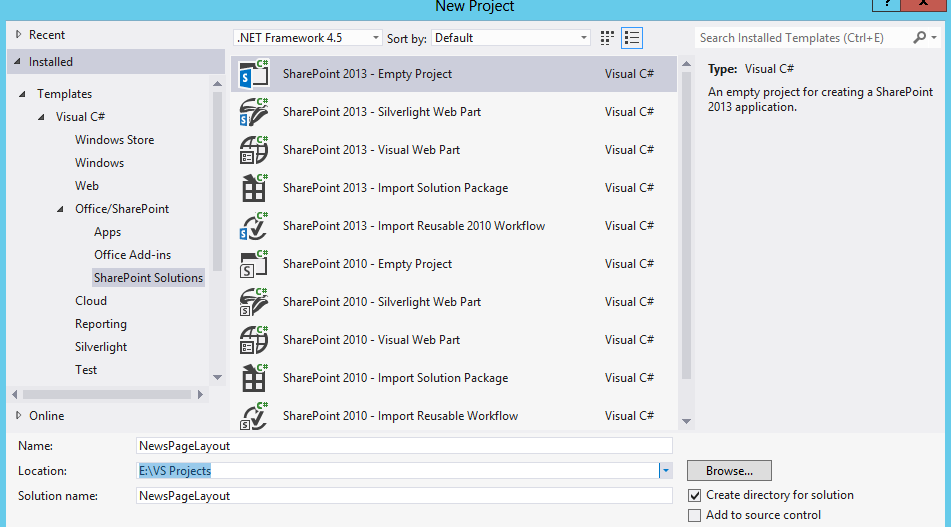
Step 1- Open Visual studio 2013 and create new
project of type SharePoint Solutions…”SharePoint 2013 Empty Project”.
Step 2- As we will deploy our solution as a farm
solution in our local farm on our local machine.

Step 3- Our solution will be as the picture blew
and we will add a three folder for “SiteColumns”, “ContentTypes”, “PageLayouts” and "Resources" .

Step 4: - Starting by adding a new
item to “SiteColumns” folder.


then add the blew fields and you will note
that I use Resources in the DisplayName and the Group.
|
<Field
ID="{9fd593c1-75d6-4c23-8ce1-4e5de0d97545}"
Name="NewsTitle"
DisplayName="$Resources:SPWorld_News,NewsTitle;"
Type="Text"
Required="TRUE"
Group="$Resources:SPWorld_News,NewsGroup;">
</Field>
<Field
ID="{fcd9f32e-e2e0-4d00-8793-cfd2abf8ef4d}"
Name="NewsBrief"
DisplayName="$Resources:SPWorld_News,NewsBrief;"
Type="Note"
Required="FALSE"
Group="$Resources:SPWorld_News,NewsGroup;">
</Field>
<Field
ID="{FF268335-35E7-4306-B60F-E3666E5DDC07}"
Name="NewsBody"
DisplayName="$Resources:SPWorld_News,NewsBody;"
Type="HTML"
Required="TRUE"
RichText="TRUE"
RichTextMode="FullHtml"
Group="$Resources:SPWorld_News,NewsGroup;">
</Field>
<Field
ID="{FCA0BBA0-870C-4D42-A34A-41A69749F963}"
Name="NewsDate"
DisplayName="$Resources:SPWorld_News,NewsDate;"
Type="DateTime"
Required="TRUE"
Group="$Resources:SPWorld_News,NewsGroup;">
</Field>
<Field
ID="{8218A8D9-912C-47E7-AAD2-12AA10B42BE3}"
Name="NewsImage"
DisplayName="$Resources:SPWorld_News,NewsImage;"
Required="FALSE"
Type="Image"
RichText="TRUE"
RichTextMode="ThemeHtml"
Group="$Resources:SPWorld_News,NewsGroup;">
</Field>
|
Step 6 : - Creating Content Type, we will adding
new Content Type to the folder ContentTypes.

Step 7- We must make sure to select the base of
the content type “Page”.

Step 8- Open the content type and adding our new
columns to it.

Step 9 - Open the elements file of the content
type and make sure it will look like this the code blew.
Note: we use Resources in the Name,
Description and the group of the content type.
|
<!-- Parent ContentType: Page
(0x010100C568DB52D9D0A14D9B2FDCC96666E9F2007948130EC3DB064584E219954237AF39)
-->
<ContentType
ID="0x010100C568DB52D9D0A14D9B2FDCC96666E9F2007948130EC3DB064584E219954237AF39007A5224C9C2804A46B028C4F78283A2CB"
Name="$Resources:SPWorld_News,NewsContentType;"
Group="$Resources:SPWorld_News,NewsGroup;"
Description="$Resources:SPWorld_News,NewsContentTypeDesc;"
Inherits="TRUE"
Version="0">
<FieldRefs>
<FieldRef
ID="{9fd593c1-75d6-4c23-8ce1-4e5de0d97545}"
DisplayName="$Resources:SPWorld_News,NewsTitle;"
Required="TRUE" Name="NewsTitle" />
<FieldRef
ID="{fcd9f32e-e2e0-4d00-8793-cfd2abf8ef4d}"
DisplayName="$Resources:SPWorld_News,NewsBrief;" Required="FALSE"
Name="NewsBrief" />
<FieldRef
ID="{FF268335-35E7-4306-B60F-E3666E5DDC07}"
DisplayName="$Resources:SPWorld_News,NewsBody;"
Required="TRUE" Name="NewsBody" />
<FieldRef
ID="{FCA0BBA0-870C-4D42-A34A-41A69749F963}"
DisplayName="$Resources:SPWorld_News,NewsDate;"
Required="TRUE" Name="NewsDate" />
<FieldRef
ID="{8218A8D9-912C-47E7-AAD2-12AA10B42BE3}"
DisplayName="$Resources:SPWorld_News,NewsImage;"
Required="FALSE" Name="NewsImage" />
</FieldRefs>
</ContentType>
|
Step 10- Add new Module to the PageLayouts
folder after that we will find sample.txt file then rename it
“NewsPageLayout.aspx”.

Step 11- Adding the the code blew to
this “NewsPageLayout.aspx”.
|
<%@ Page language="C#"
Inherits="Microsoft.SharePoint.Publishing.PublishingLayoutPage,Microsoft.SharePoint.Publishing,Version=15.0.0.0,Culture=neutral,PublicKeyToken=71e9bce111e9429c"
%>
<%@ Register
Tagprefix="SharePointWebControls"
Namespace="Microsoft.SharePoint.WebControls"
Assembly="Microsoft.SharePoint, Version=15.0.0.0, Culture=neutral, PublicKeyToken=71e9bce111e9429c"
%>
<%@ Register
Tagprefix="WebPartPages"
Namespace="Microsoft.SharePoint.WebPartPages"
Assembly="Microsoft.SharePoint, Version=15.0.0.0, Culture=neutral,
PublicKeyToken=71e9bce111e9429c" %>
<%@ Register
Tagprefix="PublishingWebControls"
Namespace="Microsoft.SharePoint.Publishing.WebControls"
Assembly="Microsoft.SharePoint.Publishing, Version=15.0.0.0,
Culture=neutral, PublicKeyToken=71e9bce111e9429c" %>
<%@ Register
Tagprefix="PublishingNavigation" Namespace="Microsoft.SharePoint.Publishing.Navigation"
Assembly="Microsoft.SharePoint.Publishing, Version=15.0.0.0,
Culture=neutral, PublicKeyToken=71e9bce111e9429c" %>
<asp:Content
ContentPlaceholderID="PlaceHolderPageTitle"
runat="server">
<SharePointWebControls:FieldValue
id="FieldValue1" FieldName="Title"
runat="server"/>
</asp:Content>
<asp:Content
ContentPlaceholderID="PlaceHolderMain" runat="server">
<H1><SharePointWebControls:TextField
ID="NewsTitle"
FieldName="9fd593c1-75d6-4c23-8ce1-4e5de0d97545"
runat="server"></SharePointWebControls:TextField></H1>
<p><PublishingWebControls:RichHtmlField
ID="NewsBody"
FieldName="FF268335-35E7-4306-B60F-E3666E5DDC07"
runat="server"></PublishingWebControls:RichHtmlField></p>
<p><SharePointWebControls:NoteField
ID="NewsBrief" FieldName="fcd9f32e-e2e0-4d00-8793-cfd2abf8ef4d"
runat="server"></SharePointWebControls:NoteField></p>
<p><SharePointWebControls:DateTimeField
ID="NewsDate"
FieldName="FCA0BBA0-870C-4D42-A34A-41A69749F963"
runat="server"></SharePointWebControls:DateTimeField></p>
<p><PublishingWebControls:RichImageField
ID="NewsImage"
FieldName="8218A8D9-912C-47E7-AAD2-12AA10B42BE3"
runat="server"></PublishingWebControls:RichImageField></p>
</asp:Content>
|
Step 12- Adding the following code to the
elements file of the “NewsPageLayouts” module.
|
<Module Name="NewsPageLayout"
Url="_catalogs/masterpage" List="116" >
<File
Path="NewsPageLayout\NewsPageLayout.aspx"
Url="NewsPageLayout.aspx" Type="GhostableInLibrary"
IgnoreIfAlreadyExists="TRUE" ReplaceContent="TRUE" Level="Published"
>
<Property
Name="Title"
Value="$Resources:SPWorld_News,NewsPageLayout;" />
<Property
Name="MasterPageDescription"
Value="$Resources:SPWorld_News,NewsPageLayout;" />
<Property
Name="ContentType"
Value="$Resources:cmscore,contenttype_pagelayout_name;" />
<Property
Name="PublishingPreviewImage"
Value="~SiteCollection/_catalogs/masterpage/$Resources:core,Culture;/Preview
Images/WelcomeSplash.png,
~SiteCollection/_catalogs/masterpage/$Resources:core,Culture;/Preview
Images/WelcomeSplash.png" />
<Property
Name="PublishingAssociatedContentType"
Value=";#$Resources:SPWorld_News,NewsContentType;;#0x010100C568DB52D9D0A14D9B2FDCC96666E9F2007948130EC3DB064584E219954237AF39007A5224C9C2804A46B028C4F78283A2CB;#"></Property>
</File>
</Module>
|
Step 13- Don’t forget to add the Resources
Folder then adding the resource file with the name “SPWorld_News.resx” as we
used it the previous steps and adding the blew keys to it.
|
News News
NewsBody News Body
NewsBrief News Brief
NewsContentType News
Content Type
NewsContentTypeDesc News
Content Type Desc.
NewsDate News Date
NewsGroup News
NewsImage News Image
NewsPageLayout News Page
Layout
NewsTitle News Title
|
Step 14- Finally Deploying the solution.
Step 15- The next steps will
explain how we add the “news content type” to the page layout through
SharePoint wizard we will do these steps pragmatically in the next article.
A- Go to Site Contents
then Pages , Library, Library Settings

B-Add the news content
type to the page layout.

c- Then

D- Go to Pages
Library , Files , New Document select News Content Type.

E- Write the page title.

F- Open the page to edit
it.
G- Now We can see
the page Layout after we adding the title, Body, Brief,date and image finally
click Save the news.

Note: Make sure that the site is publishing
site to be able to proceed.
No comments:
Post a Comment