Showing posts with label QnA Maker. Show all posts

Learn QnAMaker Azure Bot With Bot Framework SDK V4


QnA Maker service is used to create a knowledge base to add question-and-answer support to your Azure Bot. When you create your knowledge base, you seed it with questions and answers.


Previous Article : Learn azure bot service using Bot Framework SDK V4

In this tutorial, you will learn the following.
  1. Create a QnA Maker service and knowledge base.
  2. Train and Publish knowledge base information.
  3. Add QnA Maker Knowledge Bas information to your Bot
  4. Update your bot to query the knowledge base
  5. Test you bot locally
  6. Publish your bot to Azure Bot Service
  7. Test your bot using Web Chat Client
Below are the prerequisites,
  1. The bot created in the previous article. We will add a question-and-answer feature to the bot.
  2. QnA Maker portal is used to create, train, and publish the knowledge base to use with the bot.
Step 1 - Create a QnA Maker service and knowledge base
  • Sign into to the QnA Maker portal with your Azure credentials.
  • Click "Create a knowledge base".
  • Click “Create a QnA Services".


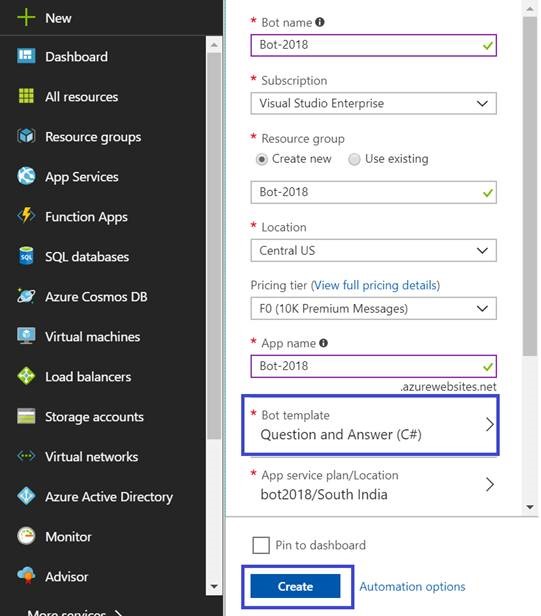
  • It will navigate to Azure Portal. Once there, fill all the below details to proceed
    • Name
    • Subscription
    • Pricing Tier
    • Resource Group
    • Search Location
    • App Name
    • Website Location


  • Once it is created, connect your QnA Services with your knowledge base.
  • Select Microsoft Azure Directory ID.
  • Select Azure Subscription Name.
  • Select available Azure QnA Service.
  • Name your knowledge base.


  •  Provide the URL from where the data needs to be extracted.


  • Click “Create your KB” to build a knowledge base.


Step 2 - Train and Publish knowledge base information
  • Once the knowledge base is created, click “Save and Train” followed by Publish button to publish the knowledge base.


  • You can click "Create Bot" using this screen or integrate the QnA Maker Services with an existing solution.


Step 3 - Add QnA Maker Knowledge information to your Bot
To continue with the below steps, kindly visit my previous article and download the source code.
Browse the solution and navigate to the app.settings file.
  1. {  
  2.   "MicrosoftAppId""",  
  3.   "MicrosoftAppPassword""",  
  4.   "ScmType""None",  
  5.     
  6.   "QnAKnowledgebaseId""knowledge-base-id",  
  7.   "QnAAuthKey""qna-maker-resource-key",  
  8.   "QnAEndpointHostName""your-hostname"   
  9. }  


Field
Value
QnAKnowledgebaseId
The knowledge base ID that the QnA Maker portal generated for you.
QnAAuthKey
The endpoint key that the QnA Maker portal generated for you.
QnAEndpointHostName
The host URL that the QnA Maker portal generated. Use the complete URL, starting with https:// and ending with /qnamaker. The full URL string will look like "look like "https://< >.azure.net/qnamaker".
Step 4 - Update your bot to query the knowledge base
  • Add NuGet Package to your project Microsoft.Bot.Builder.AI.QnA
  • Right-click dependencies and select Manage Nuget Package
  • Select Browse Option
  • Type NuGet package “Microsoft.Bot.Builder.AI.QnA”
  • Select the Nuget Package
  • Check the version and click install and accept the prompt.


Similarly, add Nuget Package Microsoft.Extensions.Configuration


Navigate to Startup.cs file, add these namespace references.
    1. using Microsoft.Bot.Builder.AI.QnA;  
    2. using Microsoft.Extensions.Configuration;  
    And, modify the ConfigureServices method create a QnAMakerEndpoint that connects to the knowledge base defined in the appsettings.json file in Startup.cs.
      1. services.AddSingleton(new QnAMakerEndpoint    
      2. {    
      3.    KnowledgeBaseId = Configuration.GetValue<string>($"QnAKnowledgebaseId"),    
      4.    EndpointKey = Configuration.GetValue<string>($"QnAAuthKey"),    
      5.    Host = Configuration.GetValue<string>($"QnAEndpointHostName")    
      6.  });    
      In your EchoBot.cs file, add these namespace references.
      1. using System.Linq;  
      2. using Microsoft.Bot.Builder.AI.QnA;  
       Add a EchoBotQnA connector and initialize it in the bot's constructor to EchoBot.cs.
        1. public QnAMaker EchoBotQnA { get; private set; }  
        2. public EchoBot(QnAMakerEndpoint endpoint)  
        3. {  
        4.    EchoBotQnA = new QnAMaker(endpoint);  
        5. }  
        Below the OnMembersAddedAsync( ) method, create the method AccessQnAMaker( ) by adding the following code.
          1. private async Task AccessQnAMaker(ITurnContext<IMessageActivity> turnContext, CancellationToken cancellationToken)  
          2. {  
          3.    var results = await EchoBotQnA.GetAnswersAsync(turnContext);  
          4.    if (results.Any())  
          5.    {  
          6.       await turnContext.SendActivityAsync(MessageFactory.Text(" results.First().Answer), cancellationToken);  
          7.    }  
          8.    else  
          9.    {  
          10.       await turnContext.SendActivityAsync(MessageFactory.Text("Sorry, could not find an answer in the Q and A system."), cancellationToken);  
          11.    }  
          12. }  
          Now, within OnMessageActivityAsync( ), call your new method AccessQnAMaker( ) by adding the following code.
            1. protected override async Task OnMessageActivityAsync(ITurnContext<IMessageActivity> turnContext, CancellationToken cancellationToken)  
            2. {  
            3.    // First send the user input to your QnA Maker knowledge base  
            4.    await AccessQnAMaker(turnContext, cancellationToken);  
            5.    ...  
            6. }  
            Step 5 - Test your bot locally
            • Press F5, Browse the bot emulator and connect with localhost and port number
            • At this point, your bot should be able to answer some questions. Run the bot locally and open it in the Emulator.


            Step 6 - Publish your bot to Azure Bot Service
            • Right-click the solution.
            • Select the Publish option.
            • Select the publish profile  and click Publish to proceed. 


            Step 7 - Test your bot using Web Chat Client
            • Browse the WebApp Bot using Azure Portal
            • Select the Test in WebChat under Bot Management


            I hope you have enjoyed and learned something new in this article. Thanks for reading and stay tuned for the next article.

            I’ll be talking on SharePoint Saturday Bangalore


            Hello Folks,


            We’re all set for SPS (SharePoint Saturday) Bangalore on Sep 1st 2018 at Microsoft’s new Office in Bangalore where I would be taking on How to build intelligent Azure Bot using Cognitive Services i.e. LUIS and QnA Maker with SharePoint Online . If you’re interested in attending this event , please use the link below to enroll yourself . We have many great sessions lined up for you on SharePoint and Office 365 .
            See you all on Sep 1st ….
            Happy Coding

            Build Intelligent Microsoft Azure Bot Using LUIS and QnAMaker

            Introduction
            The interaction between users and bots is mostly free-form, so bots need to understand language naturally and contextually

            QnAMaker  This service enables developers to build, train and publish a simple question and answer bot based on FAQ URLs, structured documents . 

            LUIS Language Understanding Intelligent Service (LUIS) enables developers to build smart applications that can understand human language and react accordingly to user requests. 

            My Previous article can be find here

            I have explained about Bot framework environment setup & QnA configuration in the below articles -
            1. FAQ based Bot Application Using QnA Maker - Part One
            2. Setup Bot Framework Development Environment Using .Net (C#) - Part Two
            3. How to add or remove synonyms or alternative keywords to QnAMaker 
            4. Add Rich Card (Image or Video) to Chat Bot Response
            5. Explore Luis


            Add RichCard (Image or Video) to Chat bot Response

            Introduction

            The Azure Bot Framework supports different types of rich cards and provides a richer interaction experience to the users in term of text, image, video etc.
            In this article, I will show how to exchange a message between user and bot can contain one or more rich cards rendered as an image, video.

            My Previous article can be find here

            I have explained about Bot framework environment setup & QnA configuration in the below articles -
            1. FAQ based Bot Application Using QnA Maker - Part One
            2. Setup Bot Framework Development Environment Using .Net (C#) - Part Two
            3. How to add or remove synonyms or alternative keywords to QnAMaker 


            Add or Remove Synonyms or Alternative keywords to QnAMaker service

            How to Add / Remove the synonymous or alternative keywords to QnAMaker Services.


            My Previous article can be find here
            I have explained about Bot framework environment setup & QnA configuration in the below articles

            1. FAQ based Bot Application Using QnA Maker - Part One
            2. Setup Bot Framework Development Environment Using .Net (C#) - Part Two


            FAQ based Bot Application Using QnA Maker - Part One

            What is Microsoft Azure Bot Framework?
            Microsoft Azure Bot framework enables the organization to build virtual agents known as Bots.
            Bots let users interact with intelligent solutions as though they are conversing with another person and assist end users and business users. Bot Connector let you connect your bot seamlessly to social channels such as Twitter, Slack, Facebook and other services. Even connect with web application using Iframe.

            What is QnA Maker?
            QnAMaker distills information into conversational, easy-to-navigate answers. QnA Maker is based on cognitive service and NLP. QnA Maker is a free, easy-to-use, REST API and web-based service that trains AI to respond to user's questions in a more natural, conversational way.
            Question and Answer uses FAQ content in Word, PDF, Excel and Web.


            Let us get started with configuration.
            1. Login to the QnA Maker Service via https://qnamaker.ai
            2. Sign and login with your Microsoft account.
            Follow below steps to create QnA Maker Services
            1. Click a Create New Service.
            2. Give the service name (i.e. FAQKB).
            3. Give FAQ site URL or upload the excel, doc or pdf with question and answer .


            4. Click on create.

            5. It takes a couple of seconds and redirects to a knowledge based page.


            6. Click Test to verify the QnA Maker


            7. Click Save and retrain -> Publish knowledge base 


            8. Click Publish one more time and you will re-direct to Rest End point page. Here you can find two important things,

            1. QnAMaker Service ID
            2. QnAMaker Service Subscription Key


            Integrate the QnAMaker with Bot Application
            Navigate to Azure Portal i.e. https://portal.azure.com with your Microsoft Account or Subscription account,
            1. Click New -> AI + Cognitive Service -> Web App Bot


            2. Set all fields


            3. Search your bot with name and click to open. Select Application setting under APP SERVICE SETTING.

            4. Provide the QnAMaker Service ID and QnAMaker Service Subscription Key in QnAKnowledgebaseId and QnASubscriptionKey respectively.

              
            5. Done with Bot Application. To test -> click Test in Web Chat and start typing the question and get answer as provided by QnAMaker crawler. 


            6. Last Section, Integrate bot application with multiple channels or use Iframe in web applications 


            7. Click on Edit or Get bot embed codes.

            8. Select the embed code (i.e. Iframe and replace your secret keys with Secret Keys) 


            Note
            I recorded the complete article available at my youtube channel.


            Happy Learning !!