Add Conversation Bot To Microsoft Teams Channel And Group Chat

Conversational Bot can do many thing within the MS Teams Client.
  • Personal Conversation or Personal Chat: It's one to one chat between users and a bot.
  • Group Conversation or Group Chat: It's between a bot and two or more users.
  • Teams Channel: It's available to all channel team members.
Prerequisites and how to create a Microsoft Azure Bot can be followed from my previous article Build Personal 1:1 Conversation Bot with Microsoft Teams 
 
In this article, your conversation bot can subscribe to events and activity related to Channels, Channel members, Group Chat and Message Reaction Events.

Below are conversation bot events and activities,
  • Channel Conversation Activity
  • Group Chat Activity
  • Message Reaction Event
    • reaction added
    • reaction removed
  • Team Member Events
    • team member added
    • team member removed
  • Channel Events
    • Channel created
    • Channel Renamed
  • Channel Deleted
  • Team Events
    • team renamed
 
Step 1 - Create Microsoft Teams App
 
In this section, we are going to create a Node.js project
  • Open the Command Prompt and navigate to desired directory to create a project.
  • Run the Yeomen Generator for Microsoft Teams

    yo teams
  • Yeomen generator will ask the following question


Step 2 - Add Channel Support to Conversational Bot
 
Type code in the command prompt. Nodejs scaffolding project opens in Visual Studio Code.
 
Locate and open the bot file /src/teamsChannelandGroupChatBot/teamsChannelandGroupChat.ts
 
Add import statement:

  1. import * as Util from "util";    
  2. const TextEncoder = Util.TextEncoder;   
 Add Message Factory object reference to existing botbuilder package: 
  1. import {    
  2.   StatePropertyAccessor,    
  3.   CardFactory,    
  4.   TurnContext,    
  5.   MemoryStorage,    
  6.   ConversationState,    
  7.   ActivityTypes,    
  8.   TeamsActivityHandler,    
  9.   MessageFactory,    
  10. } from 'botbuilder'

Locate the handler onMessage() within the constructor().
 
Locate and replace the line  (text.startsWith("hello")) { in the onMessage() handler with the following code:

  1. if (text.startsWith("mentionme")) {  
  1.                          
  1.                        if (context.activity.conversation.conversationType == "personal") {  
  1.                            await this.handleMessageMentionMeOneOnOne(context);  
  1.                          } else if(context.activity.conversation.conversationType == "groupChat")  
  1.                          {   
  1.                            await this.handleMessageMentionMeGroupChatConversation(context);  
  1.                          }   
  1.                          else  {                               
  1.                            await this.handleMessageMentionMeChannelConversation(context);  
  1.                          }  
  1.                          return;  
  1.                    } else if (text.startsWith("hello")) {  
Finally add the following method.
 
One on One Conversation:

  1. private async handleMessageMentionMeOneOnOne(context: TurnContext): Promise<void> {  
  1.     const mention = {  
  1.       mentioned: context.activity.from,  
  1.       text: `<at>${new TextEncoder().encode(context.activity.from.name)}</at>`,  
  1.       type: "mention"  
  1.     };  
  1.     
  1.     const replyActivity = MessageFactory.text(`Hi ${mention.text} from a one to one personal chat.`);  
  1.     replyActivity.entities = [mention];  
  1.     await context.sendActivity(replyActivity);  
  1.   } 

Teams Channel Conversation:
  1. private async handleMessageMentionMeChannelConversation(context: TurnContext): Promise<void> {  
  1.     const mention = {  
  1.       mentioned: context.activity.from,  
  1.       text: `<at>${new TextEncoder().encode(context.activity.from.name)}</at>`,  
  1.       type: "mention"  
  1.     };  
  1.     
  1.     const replyActivity = MessageFactory.text(`Hi ${mention.text}!`);  
  1.     replyActivity.entities = [mention];  
  1.     const followupActivity = MessageFactory.text(`*We are in a channel conversation*`);  
  1.     await context.sendActivities([replyActivity, followupActivity]);  
  1.   } 

Group Chat Conversation:

  1. private async handleMessageMentionMeGroupChatConversation(context: TurnContext): Promise<void> {  
  1.     const mention = {  
  1.       mentioned: context.activity.from,  
  1.       text: `<at>${new TextEncoder().encode(context.activity.from.name)}</at>`,  
  1.       type: "mention"  
  1.     };  
  1.     
  1.     const replyActivity = MessageFactory.text(`Hi ${mention.text}!`);  
  1.     replyActivity.entities = [mention];  
  1.     const followupActivity = MessageFactory.text(`*We are in a Group Chat conversation*`);  
  1.     await context.sendActivities([replyActivity, followupActivity]);  
  1.   } 
Step 3 - Update Manifest Changes 
  • Browse manifest.json file ./src/maifest/manisfest.json
  • Update below properties:-
  • ID : Replace with azure bot id
  • Version: 1.0.0
  • PackageName : InteractiveBotBot
  • Bot Property
  1. "bots": [  
  1.    {  
  1.      "botId""b0edaf1f-0ded-4744-ba2c-113e50376be6",  
  1.      "needsChannelSelector"true,  
  1.      "isNotificationOnly"false,  
  1.      "scopes": [  
  1.        "team",  
  1.        "personal",  
  1.        "groupchat"  
  1.      ],  
  1.      "commandLists": [  
  1.        {  
  1.          "scopes": [  
  1.            "team",  
  1.            "personal",  
  1.            "groupchat"  
  1.          ],  
  1.          "commands": [  
  1.            {  
  1.              "title""Help",  
  1.              "description""Shows help information"  
  1.            }  
  1.          ]  
  1.        }  
  1.      ]  
  1.    }  
  1.  ]  
Step 4 - Update Project Environemnt Variable
 
Locate and open the file. /.env.
 
Locate the following section in the file, and set the values of the two properties that you obtained when registering the bot: 

  1. MICROSOFT_APP_ID=  
  1. MICROSOFT_APP_PASSWORD= 
 
Step 5 - Test and Run the Bot
 
From VSCode select View -> Terminal and Hit the below command

gulp ngrok-serve  
Ngrok-serve builds your project and starts runing at local web server. Ngrok starts with a random subdomain and creates a secure url for local web server.
 
Microsoft Teams require all content to be displayed with HTTPS request. Local debugging requires local HTTP webserver. Ngrok creates a secure routable url to HTTP webserver to debug the HTTPS application securely.

  • Browse https://Portal.Azure.com
  • Navigate to created Bot
  • Select Setting under Bot Management
  • Update Messaging End Point with Ngrok url
  • Click save to update.
Step 6 - Upload Manifest File
 
Navigate to manifest folder /src/manifest. Select both .png files and manifest.jon file and zip all three files. Give the name of zip file "manifest."
 
Login to https://teams.microsoft.com
  1. Navigate to App Studio
  2. Select Import an existing app
  3. Select the manifest.zip file and Bot name with icon will appear on screen.

Step 7 - Install Cusotm App to Teams Solution
 
Using the app bar navigation menu,
  • Select the Mode added apps button.
  • Select Browse all apps followed by Upload for me or my teams.


Select Add to Teams. It will prompt you to add to a specifc channel. Conversation bot will be added to the selected channel. 


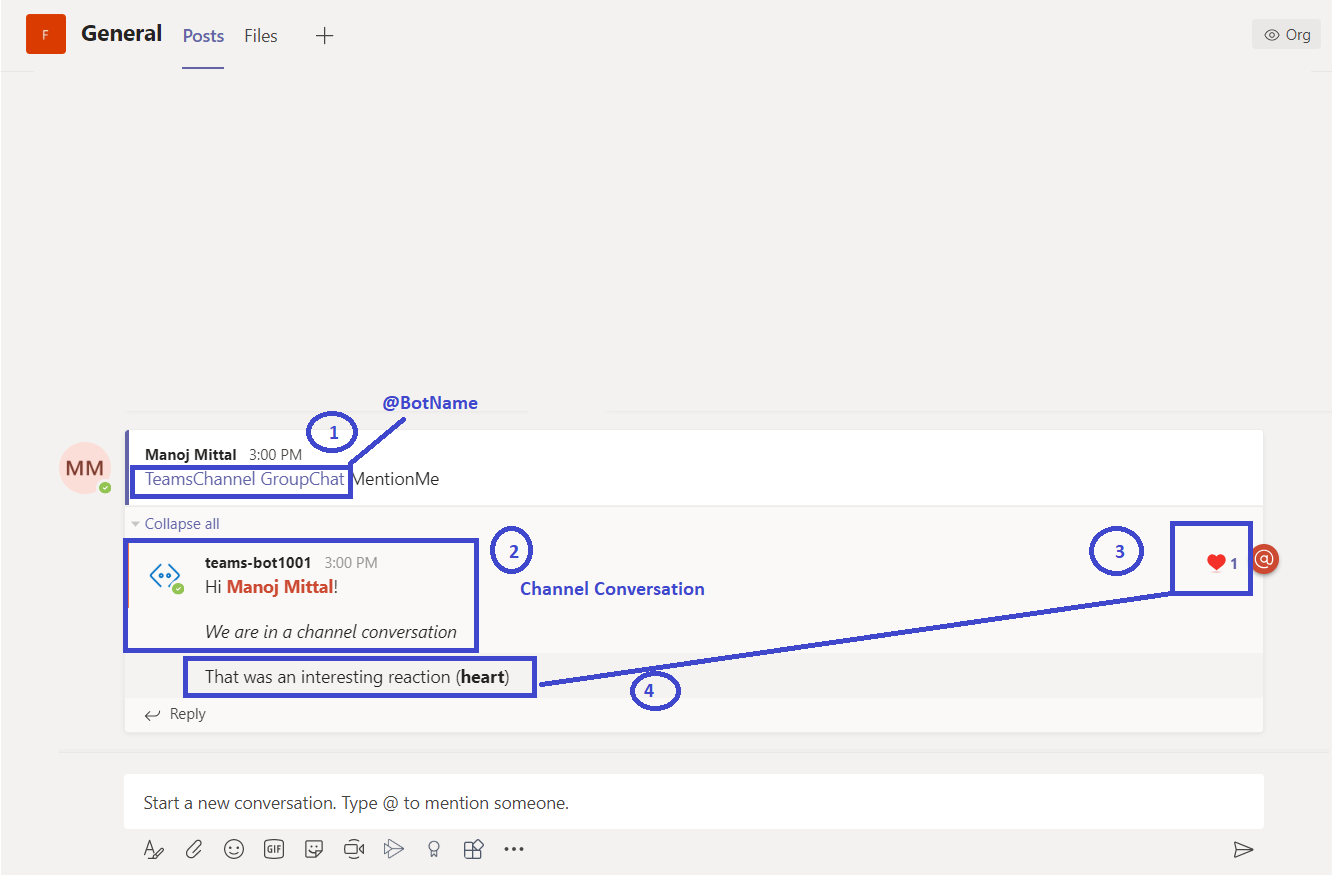
User needs to type "@Botname" followed by text which will cause the bot to respond.
  1. As user type defined keyword with @BotName
  2. Bot responds as its invoked into channel conversation context.
  3. User reacts to reponse
  4. Chanel conversation bot again reacts with selected reactions. 

If user selects Add to Chat, it will prompt to add to Group Chat. Conversation bot will be added to selected Group Chat.
 
User needs to type "@Botname" followed by text which will invoke the bot to respond,
  • As user types defined keyword with @BotName
  • Bot respond as its invoked into Group conversation context.
  • User reacts to response
  • Group conversation bot again reacts with selected reactions. 


Same article exists here also
 
I hope you have enjoyed and learned something new in this article. Thanks for reading and stay tuned for the next article.

Build a Personal 1:1 Conversational Bot With Microsoft Teams

Introduction

 
A conversation bot allows users to interact within multiple forms like text, adaptive cards, forms, etc., from the Microsoft Teams client.
 
A bot in Microsoft Team can be part of a one to one conversation, group chat, or a channel in a team. Each section has its own opportunities and challenges.


Conversational Bots 

 
Conversation bot is a series of messages between the users and the bot. There are three types of conversation within the Microsoft Team Client:
  • Personal Conversation or Personal Chat: It's a one to one chat between users and bot.
  • Group Conversation or Group Chat: It's between a bot and two or more users.
  • Teams Channel: It's available to all channel team members, any team member can do a conversation. 
Bots behave differently depending on the type of conversation, for example:
  • Personal conversation i.e. one to one conversation doesn't need @mention. All messages sent by the user directly routed to the bot.
  • Teams Channel or Group Conversation requires users to use @mention to invoke the bot into the channel or group chat. 
Prerequisites
 
To build Microsoft Teams Bot, below are the necessary tools needed to install at your environment:
  1. Microsoft Azure Subscription
  2. Office 365 Tenant
  3. Microsoft Team enable at Office 365 tenant and allowed the custom app to upload
  4. Node.js (V10.* or higher)
  5. NPM (V6.* or higher)
  6. Gulp (V4.* or higher)
  7. Yeoman (V3.* or higher)
  8. Yeomen Generator of MS Teams
  9. Visual Studio Code

Let's start with Azure Bot

 
To create Microsoft Team Bot requires two activities:
  1. Create Microsoft Azure Bot.
  2. Add a bot to MS Team-based code base. 
Step 1 - Create Microsoft Azure Bot
  1. Browse the https://portal.azure.com with your work or school account.
  2. Click "+Create Resource"
  3. Select "AI + Machine Learning"
  4. Select "Web App Bot"


Step 2 - Complete all required information and click create to provision the bot
  1. Bot handle:- its unique name of your bot.
  2. Subscription:- Select a valid available subscription.
  3. Resource Group:- select an appropriate resource group or create a new one as per requirement. 
  4. Location:- Select your closed azure location or the preferred location.
  5. Pricing:- Select the required pricing tier or F0 as free for POC activity.
  6. App Name:-  Leave it as-is for this demo purpose.
  7. Service Plan:- Leave it as-is for this demo purpose.
  8. Bot Template:- Leave it as-is for this demo purpose.
  9. Application insight: Select off for this demo purpose
  10. Microsoft App Id and Password:- Leave it as-is for this demo purpose.
  11. Click create to provision. 

Step 3 - Enable Microsoft Team Channel for your Bot
 
In order for the bot to interact with MS Teams, you must enable the Teams Channel.

To complete the process, MS Teams and Webchat should be available and should be listed in your channel lists.


Step 4 - Create a Microsoft Teams App
 
In this section, we are going to create a Node.js project
  • Open the Command Prompt and navigate to the desired directory to create a project.
  • Run the Yeomen Generator for Microsoft Teams

    yo teams  
  • Yeomen generator will ask the following question:

Step 5 - Update Default Bot Code
 
Here we will find a 1:1 conversation response. 
 
Browse Interactive ChatBotBot file

Step 6
 
To implement this functionality, locate and open the ./src/app/interactiveChatBotBot/InteractiveChatBotBot.ts file and add the following method to the InteractiveChatBotBot class:
 
Add the below code after the import statement 
  1. import * as Util from "util";  
  2. const TextEncoder = Util.TextEncoder;  
 Add Message Factory object reference to the existing botbuilder package:
  1. import {  
  2.   StatePropertyAccessor,  
  3.   CardFactory,  
  4.   TurnContext,  
  5.   MemoryStorage,  
  6.   ConversationState,  
  7.   ActivityTypes,  
  8.   TeamsActivityHandler,  
  9.   MessageFactory,  
  10. } from 'botbuilder';  
Locate the handler onMessage() within the constructor().
 
Locate and replace the line if (text.startsWith("hello")) { in the onMessage() handler with the following code:
  1. if (text.startsWith("onetoonepersonalchat"))  
  2.   await this.handleMessageMentionMeOneOnOne(context);  
  3.   return;  
  4. else if (text.startsWith("hello")) {   
Add the following method to the class:
  1. private async handleMessageMentionMeOneOnOne(context: TurnContext): Promise<void> {  
  2.   const mention = {  
  3.     mentioned: context.activity.from,  
  4.     text: `<at>${new TextEncoder().encode(context.activity.from.name)}</at>`,  
  5.     type: "mention"  
  6.   };  
  7.   
  8.   const replyActivity = MessageFactory.text(`Hi ${mention.text} from a one to one personal chat.`);  
  9.   replyActivity.entities = [mention];  
  10.   await context.sendActivity(replyActivity);  
  11. }  
Step 7 - Update Project Environment Variable
 
Locate and open the file ./.env.
 
Locate the following section in the file and set the values of the two properties that you obtained when registering the bot:
  1. # App Id and App Password fir the Bot Framework bot  
  2. MICROSOFT_APP_ID=  
  3. MICROSOFT_APP_PASSWORD=  
Step 8 - Update Manifest File
  • Browse manifest.json file  ./src/maifest/manisfest.json
  • Update below properties:-
  • ID: Replace with Azure bot ID
  • Version: 1.0.0
  • PackageName   : InteractiveBotBot
  • Bot Property
  1. "bots": [  
  2.     {  
  3.       "botId""b0edaf1f-0ded-4744-ba2c-113e50376be6",  
  4.       "needsChannelSelector"true,  
  5.       "isNotificationOnly"false,  
  6.       "scopes": [  
  7.         "team",  
  8.         "personal"  
  9.       ],  
  10.       "commandLists": [  
  11.         {  
  12.           "scopes": [  
  13.             "team",  
  14.             "personal"  
  15.           ],  
  16.           "commands": [  
  17.             {  
  18.               "title""Help",  
  19.               "description""Shows help information"  
  20.             },  
  21.             {  
  22.               "title""mentionme",  
  23.               "description""Sends message with @mention of the sender"  
  24.                 
  25.             }  
  26.           ]  
  27.         }  
  28.       ]  
  29.     }  
  30.   ],  
Step 9 - Test and Run the Bot
 
From VSCode select View -> Terminal and Hit below command
  1. gulp ngrok-serve  
Ngrok-serve builds your project and starts running at a local webserver. Ngrok start with random subdomain and create  secure URL for the local webserver
 
Microsoft Team requires all content to be displayed with an HTTPS request. Local debugging requires local HTTP webserver. Ngrok creates a secure routable URL to HTTP webserver to debug the HTTPS application securely.


Ngrok created a temporary URL "14dceed6815b.ngrok.io". The same needs to be updated at Azure Bot with Message endpoint as per the below screenshot.
  • Select Setting under Bot Management
  • Update Messaging End Point with Ngrok URL
  • Click save to update.

Step 9 - Upload Manifest File
 
Navigate to manifest folder /src/manifest. Select both .png files and manifest.jon file and zip all three files. Give the name of zip file "manifest"
 
Login to https://teams.microsoft.com 
  1. Navigate to App Studio
  2. Select Import an existing app
  3. Select the manifest.zip file
  4. Bot name with the icon will appear at the screen

Step 10 - Install Custom App to Teams Solution
 
Using the app bar navigation menu, select the Mode added apps button. Then select Browse all apps followed by Upload for me or my teams.


In the file dialog that appears, select the Microsoft Teams package in your project. This app package is a ZIP file that can be found in the project's ./package folder.


Click Add or Select app to navigate to chat with the bot 


Select the MentionMe command, or manually type mentionme in the compose box, then press enter.
 
After a few seconds, you should see the bot respond mentioning the user you are signed in with,


Same Article Published here also

 I hope you have enjoyed and learned something new in this article. Thanks for reading and stay tuned for the next article.