Azure Bot Service provides an integrated environment that is purpose-built for bot development, enabling you to build, connect, test, deploy, and manage intelligent bots.
Overview
In this article, I am going to discuss how to leverage document search using Azure bot framework SDK V4.
SharePoint Online search engine is quite robust at the enterprise level and allows the developer to define custom managed properties and leverage that into search.
Here I am going to leverage SharePoint online search api to find the document based on keywords.
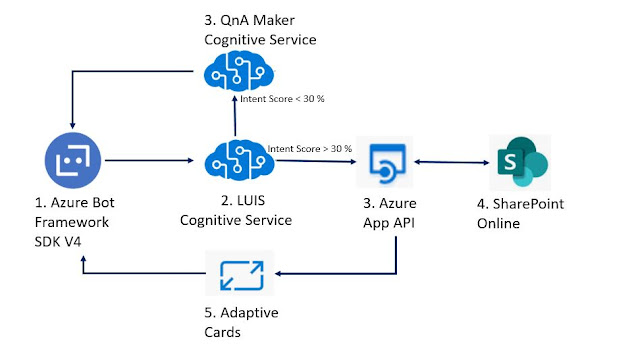
- Azure Bot Framework used to build chatbot interface.
- Luis cognitive services used to defined the intent and it will help to define the score and identified keywords.
- QnAMaker cognitive service used to define the FAQ based questions and answers
- Azure App API used to build search api and return data based on defined keywords.
- SharePoint Online is used as content repositorty.
- Adaptive Card used to design the card based on api results.
Let's get started with implementation
Step 1
Lanuch VS2019 and create echo bot project.
Bot Project Structure look like this,
Step 2
Login to Luis.ai and create an app with intent, entity and utterances.
Luis is known as language understanding and used to defined intent; i.e. intention around the phrases, and Entity is used to define multple phrases with custom and build in entities.
In short, Luis has inbuilt machine learning capability and help to understand the intention around phases as well as defined keywords which will help to search documents.
Select and define intent name: "DocumentSearch"
Select Entities and add some phrase
Once you finish with Intent and Entities, train and publish the app.
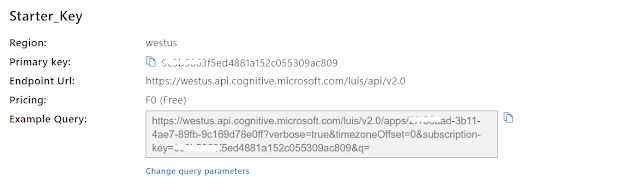
Luis Key and End Point
Step 3
Browse the appsetting.json file in the solution and add Luis and QnA Maker keys and endpoint url:-
- {
- "MicrosoftAppId": "",
- "MicrosoftAppPassword": "",
- "ScmType": "",
-
- "LuisAppId": "XXXXXXXX-3b11-4ae7-89fb-9c169d78e0ff",
- "LuisAPIKey": "XXXXXX63f5ed4881a152c055309ac809",
- "LuisAPIHostName": "westus.api.cognitive.microsoft.com/",
-
- "QnAKnowledgebaseId": "XXXXXX7b-e0d4-4b32-b9c3-27634d078778",
- "QnAAuthKey": "XXXXXXX-17a9-4772-aaed-fb2ba3f8775e",
- "QnAEndpointHostName": "https://docsearchqna.azurewebsites.net/qnamaker"
- }
Step 4
Add Luis recognizer class; i.e. create a connection with Luis based on defined Luis ID, Luis Key and Luis end point.
Create a folder name; i.e. Cognitive Services.
Add new file; i.e. SearchLuisRecognizer.cs and add the below code as-is.
- public class SearchLuisRecognizer : IRecognizer
- {
- private readonly LuisRecognizer _recognizer;
- public SearchLuisRecognizer(IConfiguration configuration)
- {
- var luisIsConfigured = !string.IsNullOrEmpty(configuration["LuisAppId"]) && !string.IsNullOrEmpty(configuration["LuisAPIKey"]) && !string.IsNullOrEmpty(configuration["LuisAPIHostName"]);
- if (luisIsConfigured)
- {
- var luisApplication = new LuisApplication(
- configuration["LuisAppId"],
- configuration["LuisAPIKey"],
- "https://" + configuration["LuisAPIHostName"]);
-
- var recognizerOptions = new LuisRecognizerOptionsV3(luisApplication)
- {
- PredictionOptions = new Microsoft.Bot.Builder.AI.LuisV3.LuisPredictionOptions
- {
- IncludeInstanceData = true,
- }
- };
-
- _recognizer = new LuisRecognizer(recognizerOptions);
- }
- }
-
- public virtual bool IsConfigured => _recognizer != null;
-
- public virtual async Task<RecognizerResult> RecognizeAsync(ITurnContext turnContext, CancellationToken cancellationToken)
- => await _recognizer.RecognizeAsync(turnContext, cancellationToken);
-
- public virtual async Task<T> RecognizeAsync<T>(ITurnContext turnContext, CancellationToken cancellationToken)
- where T : IRecognizerConvert, new()
- => await _recognizer.RecognizeAsync<T>(turnContext, cancellationToken);
- }
Step 5
Add Main Dialog and define water fall model to call Luis and QnA Maker.
MainDialog will recognize the intention in the phrases.
- Create folder name i.e. Dialogs
- Add new file i.e. MainDialogs.cs
- private readonly SearchLuisRecognizer _luisRecognizer;
- public QnAMaker SearchBotQnA { get; private set; }
-
-
-
- public MainDialogs(SearchLuisRecognizer luisRecognizer, QnAMakerEndpoint endpoint)
- : base(nameof(MainDialogs))
- {
- _luisRecognizer = luisRecognizer;
- SearchBotQnA = new QnAMaker(endpoint);
-
- AddDialog(new TextPrompt(nameof(TextPrompt)));
- AddDialog(new WaterfallDialog(nameof(WaterfallDialog), new WaterfallStep[]
- {
- IntroStepAsync,
- ActStepAsync,
- FinalStepAsync,
- }));
-
-
- InitialDialogId = nameof(WaterfallDialog);
- }
Main Dialog is used to define the Luis Connection, QnAMaker Connection and Waterfall Dialog Model used for implementing sequencial conversation flow.
1. IntroStepAsync -> It's used to check Luis connection and move forward.
- private async Task<DialogTurnResult> IntroStepAsync(WaterfallStepContext stepContext, CancellationToken cancellationToken)
- {
- if (!_luisRecognizer.IsConfigured)
- {
- return await stepContext.NextAsync(null, cancellationToken);
- }
-
- return await stepContext.PromptAsync(nameof(TextPrompt), new PromptOptions { }, cancellationToken);
- }
2. ActStepAsync -> Used to define the intent against phrase. Based on intention, calls respective method to execute.
- private async Task<DialogTurnResult> ActStepAsync(WaterfallStepContext stepContext, CancellationToken cancellationToken)
- {
-
- var luisResult = await _luisRecognizer.RecognizeAsync<ContentSearchLuisRecognizer>(stepContext.Context, cancellationToken);
- APICaller aPICaller = new APICaller();
- switch (luisResult.TopIntent().intent)
- {
-
-
- case ContentSearchLuisRecognizer.Intent.DocumentSearch:
- string documentName = luisResult.DocumentNameEntities != null ? luisResult.DocumentNameEntities : "";
- string documents = aPICaller.GetDocument(documentName);
- var docAttachments = DocumentCard.GetDocumentCard(documents);
- await stepContext.Context.SendActivityAsync(MessageFactory.Carousel(docAttachments), cancellationToken);
- break;
-
- default:
-
- var results = await SearchBotQnA.GetAnswersAsync(stepContext.Context);
- if (results.Length > 0)
- {
- var answer = results.First().Answer;
- await stepContext.Context.SendActivityAsync(MessageFactory.Text(answer), cancellationToken);
- }
- else
- {
- string documentNames = aPICaller.GetDocument(stepContext.Context.Activity.Text);
- if (!String.IsNullOrEmpty(documentNames) && documentNames != "[]")
- {
- var documentAttachments = DocumentCard.GetDocumentCard(documentNames);
- await stepContext.Context.SendActivityAsync(MessageFactory.Carousel(documentAttachments), cancellationToken);
- }
- else
- {
- Activity reply = ((Activity)stepContext.Context.Activity).CreateReply();
- reply.Text = $"😢 **Sorry!!! I found nothing** \n\n Please try to rephrase your query.";
- await stepContext.Context.SendActivityAsync(reply);
- }
- }
- break;
- }
-
- return await stepContext.NextAsync(null, cancellationToken);
- }
3. FinalStepAsync -> Used to initiate the conversation flow again.
- private async Task<DialogTurnResult> FinalStepAsync(WaterfallStepContext stepContext, CancellationToken cancellationToken)
- {
-
- return await stepContext.ReplaceDialogAsync(InitialDialogId, null, cancellationToken);
- }
Step 6 - Call Custom API
API will return data from SharePoint Online into Json Format. As of now I used anonymous api so it didn't generate access token. It's always a best practice to use user token and access token to make api and connection secure.
- Create a folder name Services
- Create a file "APICaller.cs"
- public string GetDocument(string qry)
- {
- HttpClient httpClient = new HttpClient();
- var baseUrl = "http://botapi.azurewebsites.net/";
- var route = "api/document?query=" + qry;
- httpClient.BaseAddress = new Uri(baseUrl);
- httpClient.DefaultRequestHeaders.Accept.Clear();
- httpClient.DefaultRequestHeaders.Accept.Add(
- new MediaTypeWithQualityHeaderValue("application/json"));
-
- string responseString = string.Empty;
- var response = httpClient.GetAsync(route).Result;
- if (response.IsSuccessStatusCode)
- {
- responseString = response.Content.ReadAsStringAsync().Result;
- }
- return responseString;
- }
Step 7
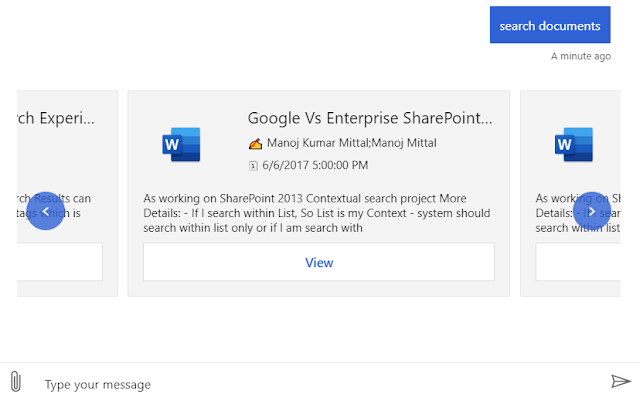
Define Adaptive; i.e. Document Card, based on api response.
Adaptive; i.e. Document card, will be designed to return api response into card format and the same is going to attach to carousel.
Create Folder Name: Cards
Create file name : DocumentCards.cs
- public static List<Attachment> GetDocumentCard(string dataSet)
- {
- var attachments = new List<Attachment>();
- List<DocumentDto> documentDtos = JsonConvert.DeserializeObject<List<DocumentDto>>(dataSet);
- foreach (DocumentDto info in documentDtos)
- {
- string summary = HtmlToPlainText(info.Summary);
- string documentIcon = GetFileIcon(info.DocumentPath);
-
-
- var card = new AdaptiveCard("1.2");
- List<AdaptiveElement> AdaptiveElements = new List<AdaptiveElement>
- {
- new AdaptiveColumnSet()
- {
- Columns =new List<AdaptiveColumn>()
- {
- new AdaptiveColumn()
- {
- Width="100px",
- Items = new List<AdaptiveElement>()
- {
-
- new AdaptiveImage(documentIcon)
- {
- Id="documentIcon",
- Size = AdaptiveImageSize.Medium,
- Style = AdaptiveImageStyle.Default,
- },
- }
- },
- new AdaptiveColumn()
- {
- Width=AdaptiveColumnWidth.Stretch,
- Items = new List<AdaptiveElement>()
- {
- new AdaptiveTextBlock()
- {
- Id="title",
- Text = info.Title,
- Size = AdaptiveTextSize.Medium,
- Weight = AdaptiveTextWeight.Bolder,
- HorizontalAlignment =AdaptiveHorizontalAlignment.Left,
- },
- new AdaptiveTextBlock()
- {
- Id="author",
- Text ="✍ " +info.Author,
- Weight = AdaptiveTextWeight.Lighter,
- Size=AdaptiveTextSize.Small,
- Color=AdaptiveTextColor.Dark,
- Wrap=true,
- },
- new AdaptiveTextBlock()
- {
- Id="date",
- Text = "🗓 "+info.CreatedDateTime,
- Weight = AdaptiveTextWeight.Lighter,
- Color=AdaptiveTextColor.Dark,
- Size=AdaptiveTextSize.Small,
- Wrap=true,
- },
- }
- }
- }
- },
- new AdaptiveColumnSet()
- {
- Columns =new List<AdaptiveColumn>()
- {
- new AdaptiveColumn()
- {
-
- Items = new List<AdaptiveElement>()
- {
- new AdaptiveTextBlock()
- {
- Id="summary",
- Text = summary,
- Weight = AdaptiveTextWeight.Default,
- Size=AdaptiveTextSize.Small,
- Color=AdaptiveTextColor.Dark,
- Wrap=true,
- },
-
- }
-
- }
- }
- },
- new AdaptiveActionSet()
- {
- Actions = new List<AdaptiveAction>(){
- new AdaptiveOpenUrlAction()
- {
- Id="open_url_action",
- Title = "View",
- UrlString = info.DocumentPath
- }
- }
- }
- };
-
- card.Body = AdaptiveElements;
- Attachment attachment = new Attachment()
- {
- ContentType = AdaptiveCard.ContentType,
- Content = card
- };
- attachments.Add(attachment);
-
- }
- return attachments;
- }
Step 8
Create search bot file and call MainDialog file
Add new file searchbot.cs into bot folder. It has two main functions.
OnMemberAddedAsync
- protected override async Task OnMembersAddedAsync(IList<ChannelAccount> membersAdded, ITurnContext<IConversationUpdateActivity> turnContext, CancellationToken cancellationToken)
- {
- foreach (var member in membersAdded ?? Array.Empty<ChannelAccount>())
- {
- if (member.Id != turnContext.Activity.Recipient.Id)
- {
-
-
- Activity reply = ((Activity)turnContext.Activity).CreateReply();
- reply.Text = $" 😀 **Hi, I am Virtual Assistant!!** \n\n I am here to assist you.";
- await turnContext.SendActivityAsync(reply, cancellationToken);
-
- }
- }
- await Dialog.RunAsync(turnContext, ConversationState.CreateProperty<DialogState>(nameof(DialogState)), cancellationToken);
- }
OnTeamMemberAddedAsync
- protected override async Task OnTeamsMembersAddedAsync(IList<TeamsChannelAccount> membersAdded, TeamInfo teamInfo, ITurnContext<IConversationUpdateActivity> turnContext, CancellationToken cancellationToken)
- {
- foreach (var teamMember in membersAdded)
- {
- Activity reply = ((Activity)turnContext.Activity).CreateReply();
- reply.Text = $" 😀 **Hi, I am Virtual Assistant!!** \n\n I am here to assist you.";
- await turnContext.SendActivityAsync(reply, cancellationToken);
- }
- }
Step 9
Call Search Bot.cs file into startup.cs file,
- public void ConfigureServices(IServiceCollection services)
- {
- services.AddMvc().SetCompatibilityVersion(CompatibilityVersion.Version_2_1);
-
-
- services.AddSingleton<IBotFrameworkHttpAdapter, AdapterWithErrorHandler>();
-
-
- services.AddSingleton<IStorage, MemoryStorage>();
-
-
- services.AddSingleton<UserState>();
-
-
- services.AddSingleton<ConversationState>();
-
- services.AddSingleton<SearchLuisRecognizer>();
-
-
-
- services.AddSingleton<MainDialogs>();
-
- services.AddSingleton(new QnAMakerEndpoint
- {
- KnowledgeBaseId = Configuration.GetValue<string>($"QnAKnowledgebaseId"),
- EndpointKey = Configuration.GetValue<string>($"QnAAuthKey"),
- Host = Configuration.GetValue<string>($"QnAEndpointHostName")
- });
-
-
- services.AddTransient<IBot, SearchBot>();
- }
Step 10
Test, Build and Run the solution to test into bot emulator
Press F5 to test locally; i.e. using Bot Emulator,
I hope you have enjoyed and learned something new in this article. Thanks for reading and stay tuned for the next article.


