PowerApps is an enterprise service that lets you connect, create, and share business apps with your team in minutes and help to build highly tailored application with optimize user experience. You can expedite the business solution with Power Apps as well as SharePoint Online.
Problem Statement
We are creating a solution for audit department. Audit department need to maintain the reports as well as reference document during audit process.
Blueprint approach
Let’s gets start, how we can design and implement such problem statement in optimize way.
Solution Approach
- Create Library to store content and List or Library to store all reference documents.
- Design SPFx extension solution to deploy at specific library, which will call Modal Dialog with Iframe.
- Design Power Apps form calls the same from Modal Dialog with Iframe section.
- PowerApps form then saves the data into SharePoint Online List or Library.
Prerequisites
1. Office 365 subscription
2. SPFX environment set up
4. Office 365 Subscription should have access to PowerApps.
Implementation approach
Step1: Create Schema
- Login to SharePoint Online Teams or Communication site
- Create Library with name: Audit Report
- Create a List with name: Audit Reference
First, Let’s start with power apps form creation
Step 2: Navigate to PowerApps Form
Step 3: Create Canvas App
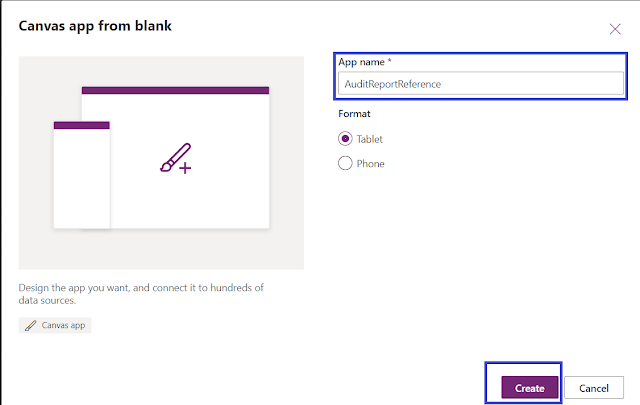
Click on ‘Canvas app from blank’.
Step 4: Power App Name
- Select app name as ‘Audit Report Reference’, click ‘Create’.
Step 5: Update the app size.
Go to file from menu bar, then select settings -> click on ‘screen size + orientation’ -> select custom give width as 1024 and height as 550.
Click Apply and back button.
Step 6: Rename the Screen
Rename default Screen1 as ‘EditScreen’. Clicking on 3 dots will give option to rename.
Step7 Insert Form and Rename to Edit Form
Click on ‘insert’ from menu bar. Select ‘Edit’ form.
Rename form1 as ‘EditFrom’
Step 8: Connect to SharePoint Online Data source
Click on ‘connect to data’.
Search for SharePoint in data source options. And select SharePoint.
Type/paste your site URL, and click ‘connect’.
Select the list ‘Audit Reference’. Click ‘Connect’.
Step 9: Change Form DataSource and Form Mode
Select ‘EditForm’, and select data source as ‘Auditreference’ and default mode as ‘New’ from right pane properties.
Step 10: Populate Fields at Form
Edit form populate with fields.
Select datacardvalue of ‘Title’ field.
Step 11: Modify the default formula of Control
Change the default formula as ‘Param("Input")’
Step 12: Add Button Control and Set Navigation
Select ‘EditScreen’. Click on ‘insert ’ on menu bar. Click on button.
Button will get added to screen, rename the button as ‘Save’, in left side tree view.
Place (Drag and drop) the button below the screen,
Select the button and Change the button text as ‘Save’
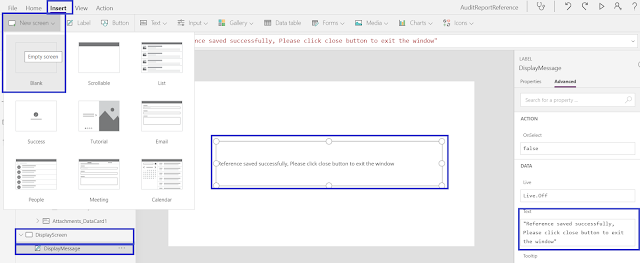
Step 13: Add new screen for display message
- Select ‘Insert’ in menu bar. Add new blank screen.
- Rename that screen as ‘DisplayScreen’ in left side tree view.
- Select displayScreen and add a label from menu bar insert option.
- Rename the label as ‘DisplayMessage’.
- Select label text option and give text as ‘Reference saved successfully, Please click close button to exit the window’
- Select label. From menu bar select home, change the font size to 24. Alignment as center aligned.
- Change the text color to blue.
- Update the label position, size and padding in label properties as shown in below screenshot.
Step 14: Update Navigation
Select EditScreen. Then select ‘Save' button and update ‘OnSelect’ Property to ‘SubmitForm(EditForm);Navigate(DisplayScreen,ScreenTransition.Fade)’
Step 15: Save and publish the PowerApps form
Go to ‘File’ from menu bar. Click on Save & Publish
Store the app id , we need to use the same in SPfx Extension.
Let’s Start with SharePoint Extension i.e. List View Command Set
Step 16: Create and SPFX Extention Solution
Navigate to folder structure and type Code .
Command "yo @microsoft/sharepoint"
Create SPFx Extension Solution with below selected options
Set Command Name and Description

After couple of seconds, you will get below congratulation message. SharePoint Framework extension solution created successfully.
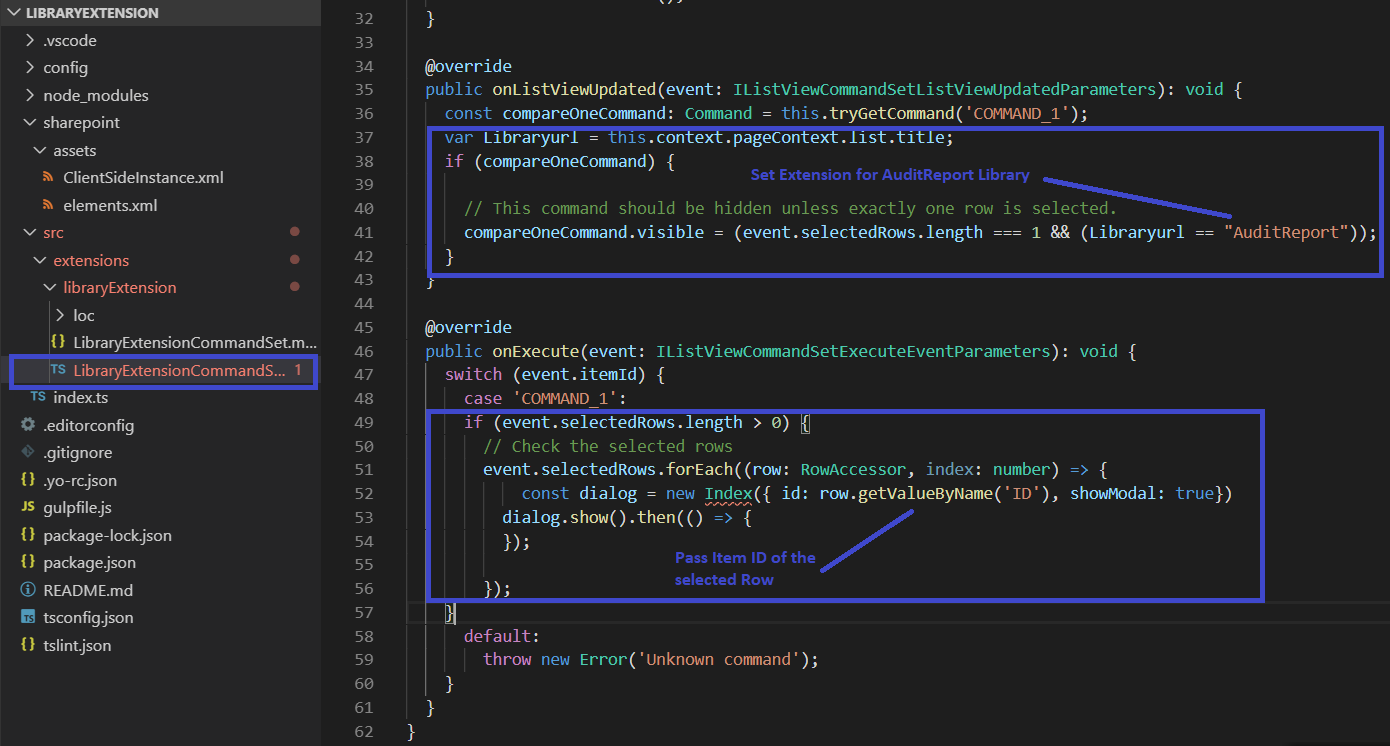
Step 17: Set Extension to specific Library
You can add extension to specific library as per below command and use RowAccessor to get Row or Item values.
Add Reference “RowAccessor”
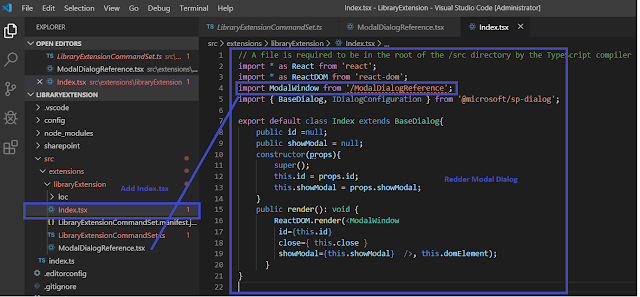
Step 18: Add Modal Dialog Reference TSX file
Step 19: Add Index file to call out Modal Dialog Window
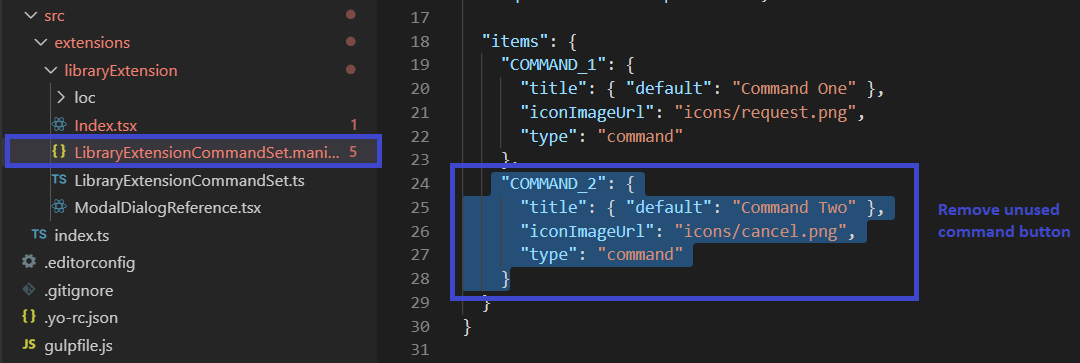
Step 20: Remove unused command set
Step 21: Modify the Template and Registration ID to Document Library
Step 22: Build, Bundle and Package the Solution
- npm install "react-iframe" --save
- gulp build
- gulp bundle --ship
- gulp package-solution –ship
Step 23: Deploy package to app catalog
Login to SharePoint site and redirect to ‘Site Contents’.
Click on ‘Apps for SharePoint’.
Click on ‘Upload’ button
Select .sppkg package from your solution and click on ‘Ok’
Click on ‘Deploy’ in dialog window.
Verify for successful deployment. Also verify for deployment errors.
Step 25: Add an app to SharePoint site
Redirect to ‘Site Contents’.
Click on ‘New’ then ‘App’.
Add the solution ‘m-365-Bangalore-client-side-solution’.
Verify app is available in SharePoint ‘site contents’
The Output
Finally, How output look like
1. Select Item at Library and select List View extension
How easy and quick it was to build a custom PowerApps solution with SharePoint Framework Extension.
Hope you have enjoyed and learned something new in this article. Thanks for reading and stay tuned for the next article.